Showing posts with label active. Show all posts

Saturday, March 11, 2017

Active Directory on Server 2008 R2 Core

Active Directory on Server 2008 R2 Core


IT: How to Install and Manage Active Directory on Server 2008 R2 Core

WindowsActiveDIrectory1
Installing Active Directory on Server Core is not a task that can be achieved using  the Optional Component Setup tool–instead we actually have to use DCPROMO from the command line. Here’s how to do it.
Note: this is part of our ongoing series teaching IT administration basics, and might not apply to everybody.
Before we install Active Directory there are a few things that need to be done first–we need to set static IP information for the network adapter as well as change the name of our server. This all needs to be done from the command line, so lets take a look at how to go about doing these tasks.

Setting a Static IP Address

Active Directory requires that the Server has a static IP assigned, so we need to get a list of the network adapters attached to this server. To do this we use a netsh command:
netsh interface ipv4 show interface
Now that you can see the names of all the network cards in your machine, you can change the settings for a specific card. To change the IP address we again use the netsh command:
netsh interface ipv4 set address name=”Local Area Connection” source=”static” address=”10.10.10.1? mask=”255.255.255.0? gateway=”10.10.10.254?
Where the following values should be substituted:
  • Name – Name of the interface that you wish to change the settings for
  • Address – IP address that you want to assign the interface
  • Mask – The subnet mask for the interface
  • Gateway – The default gateway for the interface
To set up DNS information for the server, we run the following command:
netsh interface ipv4 add dnsservers name=”Local Area Connection” address=”127.0.0.1? index=1 validate=no
Where the following values should be substituted:
  • Name – Name of the interface that you wish to change the settings for
  • Address – IP address of the DNS Server (we are using the loopback address)
  • Index – Specify 1 to set the Primary DNS Server, Specify 2 to set the Secondary DNS Server

Changing The Computer Name

We would also want to rename the server before promoting it to a domain controller, to do that we use the netdom command. You should substitute DC1 in the following command, to whatever you want to call your server.
netdom renamecomputer %computername% /newname:DC1
For the changes to take effect you need to reboot your PC, to do this from the command line run the following command:
shutdown /r /t 0

Installing Active Directory

There is a couple of ways to install Active Directory on a Server Core, however we will go with the answer file method. So I have created an answer file (seen in the screenshot below) this is a basic answer file but if you have special needs you should see  this TechNet article which will give you a full list of parameters. You can create a file exactly like this in notepad and  just call it DCPROMO.txt
So what does this do:
  • Creates a new domain at the root of a new forest called howtogeek.local
  • Sets the forest functional level to Server 2008 R2
  • Installs DNS with an Active Directory Integrated Zone
  • Makes this sever a Global Catalog
  • Sets the AD Restore Mode password to Pa$$w0rd
  • Reboots on completion
You use the answer files by running the following command:
dcpromo :/unattend:”path to answer file”
This will kick off the installation of Active Directory and reboot on completion.
That’s all there is to installing Active Directory on Server Core.

Managing Active Directory

The easiest way to manage a Server Core Server is to use the RSAT (Remote Server Administrator Tools) which allows you to load up MMC consoles on any Windows 7 machine and connect to an instance of the role running on the server. You can grab the RSAT fromhere. The installation is in the form of a Windows Update, once installed open the Turn Windows features on or off option from the Programs and Features section in Control Panel. You need to add the AD DS Snap-ins and Command-line tools, check the screenshot to see how to get there.
Once the components have been added, you can open a run box by hitting the Windows + R key combination and type MMC before hitting enter.
This will open a blank MMC console, click on file and then choose Add/Remove Snap-in..
Choose Active Directory Users and Computers from the list and hit the Add button.
If you are logged in with a Domain Admin account, it will automatically connect to the Active Directory instance, if not you will have to connect to it manually.

Available link for download

Read more »

Saturday, October 29, 2016

Install Active Directory Domain Services ADDS Role

Install Active Directory Domain Services ADDS Role


Install Active Directory Domain Services (ADDS) Role

Launch Server Manager
Click Add Roles and Features


Click Next

Select Role-based or feature-based installation and press Next

Since I am installing my forest locally I will select “Select a server from the server pool
Select the server, in my case its DC2012
Press Next

Check off Active Directory Domain Services


When you check off Active Directory Domain Services a dialog window will pop up
Press Add Features

Press Next

Press Next on the features section, you do not need to check anything off here.
Some things will be checked off because you selected Active Directory Domain Services in the last section.

Read the important things to note about this installation.
Press Next

Press Install

Installation will complete. Press Close

Configure ADDS Forest and Domain

Next time your launch Server Manager. You will see a notification icon. Press the exclamation point. Select Promote this server to a domain controller


Warning: Do not create new Active Directory forests with the same name as an external DNS name. For example, if your Internet DNS URL is http://contoso.com, you must choose a different name for your internal forest to avoid future compatibility issues. That name should be unique and unlikely for web traffic. For example: corp.contoso.com.
Select Add a new forest
Specify the root domain name, in my case its pintolab.net
Press Next

In my new lab all servers will be Windows Server 2012. So I will be setting the functional level to Windows Server 2012. To understand more about Functional Levels please visit: http://technet.microsoft.com/en-us/library/cc771294.aspx
I will select Domain Name System (DNS), because ADDS needs DNS. This machine will function as the DNS server for the whole forest.
Enter a password for Directory Services Restore Mode (DSRM)
Press Next

Press Next. If there was an existing DNS server you would be able to change this option.

I like to set my domain name to 8 characters or less so that the NetBIOS name is the same as the domain name. If my domain name was longer, it would have truncated it. You can however make this anything you want. More information on NetBIOS Domain Names: http://technet.microsoft.com/en-us/library/cc961556.aspx
Press Next

Press Next

Press Next

Press Install
In my case I got a couple of warnings. The most important warning was the one saying I am using DHCP instead of an assigned IP Address. It’s important to make sure your Domain Controller and DNS Servers use static IP’s.

After Installation, Press Close

Setup will reboot the server, you will notice that the domain name is now in front of the username

One thing to take note of is that when DNS gets installed it will point the preferred DNS Server to itself and within DNS it will use the DNS Server that was in there before as a forwarder.


Managing Active Directory


Open Server Manager
Select AD DS
Right Click the Server Name, I find this is the quickest way to get to the Management Tools, since they removed the good ole start menu.

When you right click the server name you should see the familiar AD tools.

Active Directory Users and Computers thankfully has the same look and feel as previous versions.


Available link for download

Read more »

Sunday, October 2, 2016

How to Syncthru LDAP to 2008 active directory

How to Syncthru LDAP to 2008 active directory


I had the opportunity recently to work with one of the newer large multifunction Samsung copiers this month.  The Syncthru web interface is fairly feature rich but the documentation really could use more examples in some places.  My bane for 2 hours was figuring out how to populate the address book inside it by doing an LDAP pull from Active Directory.
The initial setup of the LDAP connector went through pretty quickly.  I just went to Security -> Network Security and then down to LDAP Server on the left menu.  I then clicked Add to enter in my LDAP server.  I added in the IP address of one of my domain controllers and then used Port number 3268 to start with because you want to keep it simple initially and introduction SSL LDAP would just add one more thing to troubleshoot.  Fill in your AD Domain name in DC=yourdomain,DC=com format.  Choose simple and enter in your username in DOMAINNAMEusername format.  Note that this is the first oddity in that were mixing netbios/domain nameusername format and LDAP convention on the same form.

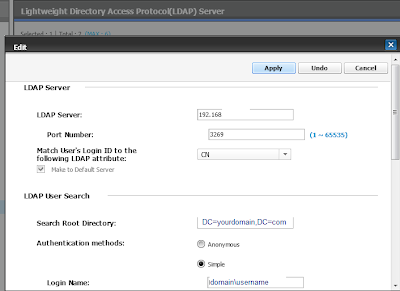
On the second half of that window, dont check the LDAPS yet!!!  
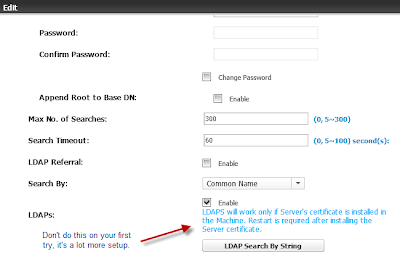
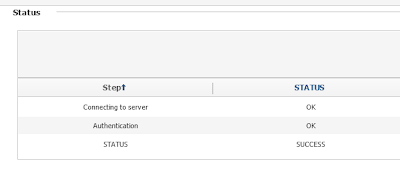
Click on the TEST button at the very bottom and make sure you get all OK/Success. 
Once that works, then click the Apply button at the top to save these settings.
So now were halfway done and ready for the twists.  Go to the Address book and then click on the LDAP button at the top right.
Now for the GOTCHAS!   
a)  I couldnt get it to search recursively
b)  It only worked when the user account I used to authentication against AD was in the same ORG that I was searching.  (My AD is set to not allow anonymous searching so I have to use authentication)
c)  The login ID is in CN=firstname lastname format.  This is different than the domainnameusername from the other LDAP screen.
d)  The search root is the full path to the exact ORG that you want to pull from. (note the OU=test, OU=US prepended)
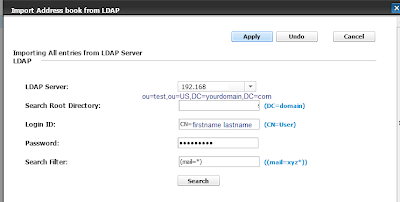
To keep it simple, I used (mail=*) for my search filter.  Click on the Search button when done and IF you are successful, a list of people will show up.  Just click the Apply button to pull them all into the Address book (you can always delete the ones you dont want later from inside the copier).  If you botched it, youll get Incorrect Filter errors.
Repeat for your other ORG units, remembering to use an account inside each one for the Login ID.  If you make it past the inconsistencies of the interface and the limitations of the AD implementation of LDAP youre home free.  Once youre done youll have a fully functional Scan to Email function that works great.

Thanks

Gnawgnus Realm


Available link for download

Read more »