Showing posts with label how. Show all posts
Showing posts with label how. Show all posts
Sunday, July 30, 2017
How to Configure my Range Extender
How to Configure my Range Extender
How to Configure my Range Extender
Suitable for: TL-WA730RE, TL-WA830RE

Before configuration, please get the right information of the Root Router as below:
Information of Root Router:
- LAN IP: 192.168.1.254
- SSID: 2WIRE_TEST
- Encryption Type: WPA2-PSK with AES
- Passphrase: testtplink
Preparation
- Since the DHCP function on the Range Extender is disabled by default, we have to manually assign an IP address as 192.168.1.x to the computer to match the default IP address of the Range Extender. Please click here for detailed instruction. For TL-WA830RE, its LAN IP is 192.168.0.254, please assign 192.168.0.x for you computer.
- Connect the computer to the Range Extender with an Ethernet cable. And disconnect the wireless from the root router.
Configuration on Range Extender :
1. Log onto the Range Extender’s management page. Please click here for the detailed instruction;
2. Click Network. Please make sure the Range Extenders IP address is in the same IP segment with the Root Router and avoid the IP conflict. In this instance, we can change the IP to "192.168.1.250". Then click Save.

Notice: If the root router is not in the IP segment 192.168.1.X, for example, it is 192.168.0.254.you need to change the IP of the Range Extender to 192.168.0.250. and after clicking on Save, please change the IP of your computer to 192.168.0.100. and then log in the Range Extender’s management page by using the new IP 192.168.0.250.
3. Click Quick Setup, Click on Next->Wireless. Select Range Extender as the Operation Mode. Then click Search.

4. Find the Root Routers SSID on the list, and then click Connect.

5. Click Save.
6. Click Wireless -> Wireless Security. Select WPA-PSK/WPA2-PSK, and Encryption AES. input the password "testtplink" in the PSK Password field. Then click Save. The Security settings on the Range Extender must be the same as the root router. Please contact the support of the router to check it if you are not sure.

After you go through all the above steps, the Range Extender should get working properly with the Root Router.
How to confirm:
Go to System Tools->Diagnostic?in the IP address(or IP address/Domain Name) bar type in the root router’s IP 192.168.1.254, click on the Start on the bottom.

And the last step is to set the computer to obtain the IP addre
Available link for download

Thursday, March 30, 2017
How to Flash or Upgrade BSNL Penta WS702C with Flash tool tested
How to Flash or Upgrade BSNL Penta WS702C with Flash tool tested
When you try to Flash or Upgrade of BSNL Penta WS702C, remember some impotent notes, first of must be tablet charged, this is easy way to Flash or Upgrade if you understand and this is AllWinner CPU so for that different flash tool and Stock ROM Firmware is .img file not like scatter or .pac last two is running in mostly device but in this different so method also different, you can use this flash file when your device hangs on logo problem, restarting problem, security lock problem, password lock problem, pattern lock problem etc software related problem, before use preparation for flash, Stock ROM Firmware, USB Cable, Flash tool, Driver, Computer or Laptop and in requirement where mention like which cable to be, about Stock ROM, about USB Driver also with link just follow that, take all type data in your tablet because this is factory stock ROM, if data in SD Card so dont worry its be safe but remember not to be in internet storage and this flash file tested by me without any error working well
And you can use this tutorial without any box and this is free for all who know about software in mobile, impotent for flashing first must check your micro USB cable if not good then you cant flash it so check micro USB cable second check your device battery that is impotent for flashing if your device battery low so stop your device between flash so this is impotent for flash, before you flash save your data like contact, photos, videos etc because this is factory flash file so you cant save after full flash so must remember all are impotent notes.
And you can use this tutorial without any box and this is free for all who know about software in mobile, impotent for flashing first must check your micro USB cable if not good then you cant flash it so check micro USB cable second check your device battery that is impotent for flashing if your device battery low so stop your device between flash so this is impotent for flash, before you flash save your data like contact, photos, videos etc because this is factory flash file so you cant save after full flash so must remember all are impotent notes.
Requirement:
- BSNL Penta WS702C Tablet with charged battery up to 80%, do not try with low battery otherwise dead will be dead or another issues
- BSNL Penta WS702C Tablet Flash file its must be working well means not to be corrupted, you can download tested from this link | Download here
- BSNL Penta WS702C Tablet Flash tool | Download here
- BSNL Penta WS702C Tablet USB Driver | Download here
- Good Quality Micro USB Cable
- Computer or Laptop
Method to Flash or Upgrade for BSNL Penta WS702C:
- First Download required from the above link, if link dead or other problem just leave your comment on below comment box
- UnZip all are files from WinZip to Desktop or As you like path, must be installed WinZip in your computer or laptop for Extract
- Open Update tool folder and choose LiveSuit.exe file and open it
- YES button for Continue and NO for Cancel so choose YES button
- General Mode for Upgrade mode, Mandatory Mode for Update Mode (Recommended) so choose General
- Now choose YES and choose DZHW-A088hd-dou-XXXA-B-M1190-5875y-V2.0-20120907.img file from the img folder
- Press and hold Volume Down and insert USB Cable and wait until driver installing, if not installed then try to manual and update from above links driver
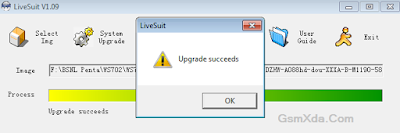
- After Installed Driver, Download start automatically and wait until full process, do not try to disconnected device while in flashing mode
- Congratulation you are done
BSNL Penta WS702C Flash done Screenshot and Video :
Available link for download
Wednesday, March 29, 2017
How to Flash Lenovo A536 with SP Flash Tool Tested
How to Flash Lenovo A536 with SP Flash Tool Tested
If any problem in Lenovo A536 use this method really working easy to flash without any error and remember do not try with wrong stock ROM because device will be dead so carefully use this guide really working well, Lenovo A536 in any type issue software related you can easy solve using this method and this is for everyone who new fresher technician or experience technician in android software related, before use remember of must be working well all are required which you can see in this method it below to be mention, different to be error when you try to flash or upgrade first of USB not recognized this error possible when micro USB not working, battery not charged, phone USB socket not working properly so if you fail with this method just write down your comment on below comment box i will soon possible to fix it, first take backup into device if live otherwise dead you cant take backup, this guide you can use when device in dead condition also but must be in software related issue otherwise if any hardware then you can solve that.
If you want to repair your device, you can try to repair it by you. You have to charge your battery with any charger and charged it by 85%. Your data is very important for you so it is good to do a backup of your data it may consist like your contact details,your important messages, your emails or any other important thing which you feel to be the backup in your device. This backup can be done on another device. we have to do the backup because after a format of your device, all your data will be gone and it will not be recovered. For backup in other devices you can use other external device like your hard drive, SD card or any other suitable devices. If you are doing by your own.do it at your own risk as we dont take any responsibility if your device is damaged
When you use this method ?
This method you can use without any box its done from flash tool its also available here, and impotent of must be installed phones driver, you cant flash or upgrade if not installed in your computer or laptop it must be installed and also available in this post, here all are linked that tested and working fine just in one try, you can use this guide when your device in hang on logo, restarting, auto turn on internet connection, auto turn on WiFi connection, auto apk installing, auto gone balance, pattern lock, screen lock etc these type issues you can use this way.
Requisite for Lenovo A536
- Lenovo A536 phone with good battery charged, do not try with low battery
- Lenovo A536 Stock ROM Firmware Tested | Download here
- Lenovo A536 Flash Tool | Download here
- Lenovo A536 USB (Flashing) Driver | Download here
- Computer or Laptop
- Good Quality Micro USB Cable
Procedure for Lenovo A536
- First take files from above link, if link not working just leave your comment on below comment box i will soon fix if possible
- Install WinZip software in your Computer or Laptop, if already installed then ignore
- Extract to desktop or as you like path from the WinZip
- Open SP Flash Tool folder and choose flash_tool.exe file and open it
- Click on Scatter-loading button and choose MT6582_Android_scatter.txt file from the Stock ROM firmware folder
- Click on Download button then Just Insert USB Cable into device
- Wait until driver installed automatically, if not installed auto then just manual update from above links driver
- If device dead or not detect then use Press and hold Volume UP button and Insert USB Cable (Note: You can use Volume Down button for detection)
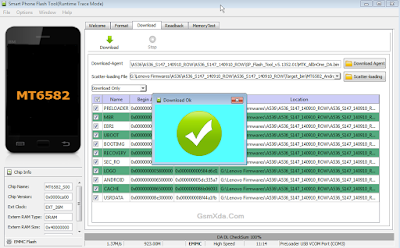
- Wait until finished process, do not try to unplug while device flashing mode
- Congratulation you are done
Lenovo A536 Flash done Screenshot:
Available link for download
Saturday, March 25, 2017
HOW TO PROTECT YOURSELF FROM CYBER ATTACKS
HOW TO PROTECT YOURSELF FROM CYBER ATTACKS
HOW TO PROTECT YOURSELF FROM CYBER ATTACKS :

Any time you engage in online activity you potentially open yourself up to cyber attacks. There is a wide range of techniques hackers can use to steal personal information like passwords, tax records, bank account numbers, or even stop the PC from working. Here are five tips to stay safe online:
Strong password
Be smart and create a strong password that is certain to be difficult for the would-be hacker to guess. A strong password uses a combination of special characters, numbers, and upper and lower-case letters. Plus, the difficult to guess password should be at least six characters long. Also, make sure to use a different password for each online account.
Use email sensibly
Stay safe when using email by being careful about the type of information sent to work colleagues, friends, or family. Email is not entirely safe to send personal information. So avoid sending a social security number, credit card information, or similar confidential information in an email message. Plus, avoid opening the unsolicited emails (spam) because they often contain offensive content, viruses, and scams.
Shop wisely
If you are planning on doing some online shopping, make sure the website used is a trusted brand and relies on secure technology. On the checkout or other page that asks for personal details, be sure the browser has a secure address and begins with https:. Also, most online stores will clearly state the website uses the latest security technology to keep their customer details safe and encrypted.
Monitor childrens online activity
Make sure to pay proper attention to the childrens online activity. A preferred place to keep the main computer is in a community area which makes it easier to monitor. Use and install parental control software to ensure the online activity is limited to age-appropriate content. By using the proper software, it is not only possible to block access to the more undesirable content, but it also makes it possible to prevent personal information being share via online programs.
Use security software
Make sure to use a comprehensive suite of software tools to give wide-ranging protection whenever you go online. Whether you are using a premium or free version of the security software, it has the ability to protect the home PC from a variety of cyberspace threats, such as identity theft, spam, adware, spyware, and viruses. Plus, to increase the ability to detect the latest threats it is essential to do regular updates to keep the software working properly.
Available link for download
Monday, March 20, 2017
How to Flash Karbonn A20 Check here with simple method
How to Flash Karbonn A20 Check here with simple method
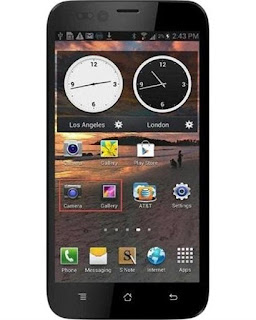
First back to all type data like photos, email, contacts, videos etc because this is factory firmware if dont take backup all then you will lost all type data of above mention.
This flash file tested by me without any error working well, you can use this flash file when your device hang on logo problem, restarting problem, security lock problem, password lock problem, pattern lock problem etc software related problem and you can use this tutorial without any box and this is free for all who know about software in mobile, impotent for flashing first must check your micro usb cable if not good then you cant flash it so check micro usb cable second check your device battery that is impotent for flashing if your device battery low so stop your device between flash so this is impotent for flash, before you flash save your data like contact, photos, videos etc because this is factory flash file so you cant save after full flash so must remember all are impotent notes.
Download Link
Karbonn A20 Firmware Download here
SP_Flash_Tool_v5.1343.01 Download here
Required for flash:
1. Karbonn A20 device with good battery charged
2. Karbonn A20 tested firmware
3. SP Flash Tool
4. Micro usb cable
5. Computer or Laptop
Procedure:
1. Download tested firmware or flash tool from above link
2. Extract to both winrar file into desktop or as you like path (must installed winrar software in your computer or laptop)
3. Open SP_Flash_Tool_v5.1343.01 folder and choose flash_tool.exe file and open it
4. Click on Scatter-loading button and choose MT6572_Android_scatter.txt file
5. Click on Download button
6. Press and hold Volume Up button and insert usb cable (device key or micro usb cable must be working well)
7. Wait until driver install, if driver installed in your computer or laptop then downloading start automatically in your device
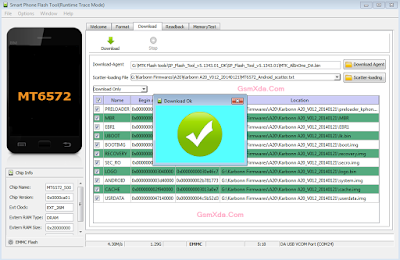
8. Wait until full install android os into device
9. You are done
Karbonn A20 flash done with flash tool screenshot:
Karbonn A20 flash done with flash tool video:
Available link for download
How to Flash Intex NEO V Plus with Flash tool tested
How to Flash Intex NEO V Plus with Flash tool tested
This guide to Intex NEO V Plus for phone not starting means hang on logo you can use this easy way for solve problem, and if phone has dead you can this method its simple to use for that need flash file or flash tool tested, you can tested that download from in this post, you can use this flash file when your device hangs on logo problem, restarting problem, security lock problem, password lock problem, pattern lock problem etc software related problem and here no need to any box this job you can done without any box with simple method, before use remember must your phone battery charged and do not try with low battery cause in low battery giving flashing error like USB not recognized and also must installed USB Driver in Computer or Laptop, must be working Micro USB Cable also, now lets go how to flash Intex NEO V Plus with Flash tool ?
Required:
- Intex NEO V Plus phone with good battery charged, do no try with low battery
- Intex NEO V Plus Flash file | Download here
- Intex NEO V Plus Flash tool | Download here
- Intex NEO V Plus USB Driver | Download here
- Good Quality Micro USB Cable
- Computer or Laptop
Procedure:
- Download needed file from the above link, if link broke just leave your comment on below comment box
- UnZip to Desktop or as you like path from the WinZip, must be installed WinRAR or WinZip installed in your Computer or Laptop
- Open ResearchDownload 2.9.7006 (GsmXda) folder and choose ResearchDownload.exe file
- Click on Flash Choose Button and select Intex_Neo V+_V01_WVB_Indian_SER.pac file
- Click on Download button (button are show like Play) just click there
- Press and hold Center key and Insert USB Cable and wait until driver installing, if driver installed then start process automatically if not just install from the above links driver
- Wait until Pass Process, do not disconnect device while in Flashing Mode
- You are done, Congratulation
Intex NEO V Plus Flash done with Flash tool Screenshot:
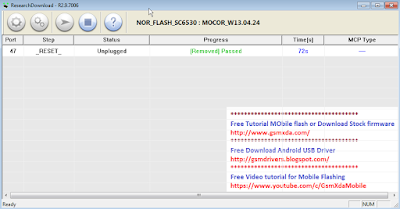
Available link for download
Sunday, March 19, 2017
How to Flash Gionee Elife E7 Mini with Flash tool simple way here
How to Flash Gionee Elife E7 Mini with Flash tool simple way here
Gionee Elife E7 very awesome phone and this device for using easy comfortable some time use internet connect in device then many issue comes on display like unfortunately, when you starting device then automatically restart, hang on logo problem any problem of software related this procedure its easy to everyone who working in software related here some impotent of before use this tutorial first read all are content to carefully after step by step using here we are try to very easy solution but if any problem using this tutorial just leave your comment on below comment i will soon with good reply or before using this tutorial please mention on required which are giving below must working well all are requireds if any problem then you cant flash or error on displayed see also mention below content of about firmware
This flash file tested by me without any error working well, you can use this flash file when your device hang on logo problem, restarting problem, security lock problem, password lock problem, pattern lock problem etc software related problem and you can use this tutorial without any box and this is free for all who know about software in mobile, impotent for flashing first must check your micro usb cable if not good then you cant flash it so check micro usb cable second check your device battery that is impotent for flashing if your device battery low so stop your device between flash so this is impotent for flash, before you flash save your data like contact, photos, videos etc because this is factory flash file so you cant save after full flash so must remember all are impotent notes.
Download link
Gionee Elife E7 Mini Stock Rom Firmware Download here
Gionee Elife E7 Mini Flash tool Download here
Gionee Elife E7 Mini USB Driver Download here
Need for Flash:
1. Gionee Elife E7 Mini device with good battery charged
2. Gionee Elife E7 Mini tested Stock ROM
3. Gionee Elife E7 Mini Flash tool
4. Gionee Elife E7 Mini USB Driver (for flashing)
5. Micro usb cable
6. Computer or Laptop
2. Extract to desktop or as you like path (must be installed winrar software in your computer)
3. Open SP flash tool and choose flash_too.exe file and open it
4. Click on Scatter-loading button and choose MT6592_Android_scatter.txt file
5. Now click on Download button and Press and hold Volume Up button and insert usb cable
6. If driver not installed in your computer then update from above link driver
7. Wait until full install (do not disconnect when your device in flashing mode)
8. Congratulation you are done
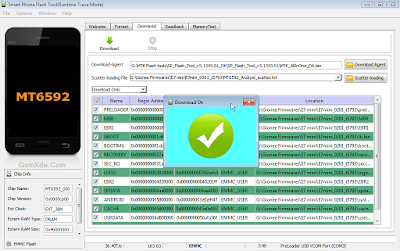
2. Gionee Elife E7 Mini tested Stock ROM
3. Gionee Elife E7 Mini Flash tool
4. Gionee Elife E7 Mini USB Driver (for flashing)
5. Micro usb cable
6. Computer or Laptop
How to Flash Gionee E7 Mini with flash tool ?
1. Download tested firmware, Flash tool or usb driver from above link2. Extract to desktop or as you like path (must be installed winrar software in your computer)
3. Open SP flash tool and choose flash_too.exe file and open it
4. Click on Scatter-loading button and choose MT6592_Android_scatter.txt file
5. Now click on Download button and Press and hold Volume Up button and insert usb cable
6. If driver not installed in your computer then update from above link driver
7. Wait until full install (do not disconnect when your device in flashing mode)
8. Congratulation you are done
Flash done Screenshot:
Available link for download
Friday, March 17, 2017
How to Flash Karbonn Titanium S4 Plus with Sp Flash Tool Tested
How to Flash Karbonn Titanium S4 Plus with Sp Flash Tool Tested
Actually this guide is no hard to use if you want to Flash or Upgrade Karbonn Titanium S4 Plus phone because this is tested by me without any error Karbonn Titanium S4 Plus in any type issue software related you can easy solve using this method and this is for everyone who new fresher technician or experience technician in android software related, before use remember of must be working well all are required which you can see in this method it below to be mention, different to be error when you try to flash or upgrade first of USB not recognized this error possible when micro USB not working, battery not charged, phone USB socket not working properly so if you fail with this method just write down your comment on below comment box i will soon possible to fix it, first take backup into device if live otherwise dead you cant take backup, this guide you can use when device in dead condition also but must be in software related issue otherwise if any hardware then you can solve that.
Must Follow:
If you want to repair your device, you can try to repair it by you. You have to charge your battery with any charger and charged it by 70%. Your data is very important for you so it is good to do a backup of your data it may consist like your contact details, your important messages, your emails or any other important thing which you feel to be the backup in your device. This backup can be done on another device. we have to do the backup because after a format of your device, all your data will be gone and it will not be recovered. For backup in other devices you can use other external device like your hard drive, SD card or any other suitable devices. If you are doing by your own do it at your own risk as we dont take any responsibility if your device is damaged
Required for Karbonn Titanium S4 Plus:
- Karbonn Titanium S4 Plus device with good battery charged, do not try to flash when battery in low condition
- Karbonn Titanium S4 Plus Stock ROM Firmware | Download here
- Karbonn Titanium S4 Plus Flash Tool | Download here
- Karbonn Titanium S4 Plus USB (Flashing) Driver | Download here
- Micro USB Cable with Good Quality
- Computer or Laptop
Procedure for Karbonn Titanium S4 Plus:
- Install WinZip or WinRAR Software in your Computer or Laptop, already installed ignore this
- Download all are files from above link which required for flash or upgrade, if link broke or not working just leave your comment on below comment box i will fix it soon if possible
- UnZip to all files anywhere you want from the WinZip
- Open SP Flash Tool folder and choose flash_tool.exe file and open it
- Click on Scatter-loading button and choose MT6582_Android_scatter.txt file from the Stock ROM Firmware folder
- Now click on Download button and Insert USB Cable into device, wait until driver automatically installing, if not take auto then manual update driver from the above links
- If device dead and not detect then try to Press and hold Volume Up and Insert USB Cable (Note : You can Try Volume Down Also for Detection if Volume Up button not working)
- After Device Detected then Downloading star automatically into device wait while finished the process (Note : Do not try to unplug while device in flashing mode)
- Congratulation you are done
Karbonn Titanium S4 Plus Flash done Screenshot:

Available link for download
Thursday, March 16, 2017
How to Change the Logon Screen Background in Windows 7
How to Change the Logon Screen Background in Windows 7

1. The image you need to set as the background should be a .jpg file and it’s size should not exceed 245KB.
2. The image resolution can be anything of your choice. However I prefer 1440 x 900 or 1024 x 768. You can use any of the photo editing software such as Photoshop to compress and set the resolution for your image. Once you’re done, save this image as backgroundDefault.jpg.
C:Windowssystem32oobeinfo ackgrounds
You will need to create that path if it does not already exist on your computer.4. Now open the Registry Editor (Start -> Run -> Type regedit) and navigate to the following key
HKLMSoftwareMicrosoftWindowsCurrentVersionAuthentication
LogonUIBackground
LogonUIBackground
If Background does not exist rightclick LogonUI, select New and then Key, and then name itBackground. Now locate OEMBackground (listed on the right side). If it does not exist, right-click Background and select New and then DWORD and name it OEMBackground.
6. Now log-off to see the new logon screen background. If you would like to revert back to the default background, just set the Value Data back to 0.
I hope you like this trick. Just try out and give your feedback!
Available link for download
Monday, March 13, 2017
How To Hard Unbricked LG G2 All Variants Fix Qualcomm HS USB QDLoader 9006 mode
How To Hard Unbricked LG G2 All Variants Fix Qualcomm HS USB QDLoader 9006 mode
After Read This Guide You Will Fix These Situations.
No Recovery Mode.
No Download Mode.
No Boot.
Showing Qualcomm HS-USB QDLoader 9006 mode In Device Manager.
Showing Unknown Device In Device Manager.
Require Tools.
Download Latest SRK Tool From Here
Qualcomm Drivers From Here
Now Solve This Problem.
Step 1.
If Your Phone Show Qualcomm HS-USB QDLoader 9006 mode in Device Manager You Can Skip This Step.
If Your Phone Showing Qualcomm HS-USB QDLoader 9008
And Any Another So Enter Your Phone In 9006 Mode By Follow These Instructions.
If Your Phone Are Not On Qualcomm HS-USB QDLoader 9006 mode So Follow These Instructions To Enter Into Qualcomm Mode.
a) Disassemble Your Phone
b) On Motherboard Navigate "eMMC" Chip. You Can See In Picture.
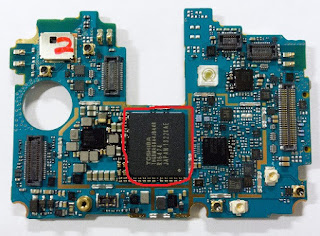
c) Now Connect USB With Battery Short Cut These Points With Cooper Wire That Shown In Picture Under The eMMc Chip.
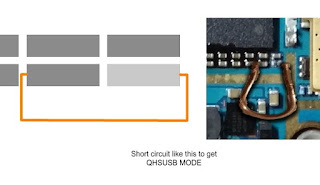
d) Now Your Device Shows In Device Manager As "Unknown Device" Then Install Drivers Which Given In Tools Section.
e) Your Device Will Shows Up.

Step 2.
1 : Download And Extract SRK Tool.
2 : Run SRK Tool.
3 : Press 4 Then 5.
4 : Select Your Device Model Number.
5 : Now Y For Yes, Then Again Y.
6: Then Disk Management Windows Pop-Up Then Select Disk Number Will Shows After Connecting Your Phone.
Note : Select Chose Correct Disk Which Shows lots Of Paritions.
7: Then Enter Disk Number.
8: Then Press Y And Wait
9: After Complete Your Phone Can Boot Into Download Mode.
10 : Then Boot into Download Mode And Flash kdz/tot File.
11 : Finished.... :)
7: Then Enter Disk Number.
8: Then Press Y And Wait
9: After Complete Your Phone Can Boot Into Download Mode.
10 : Then Boot into Download Mode And Flash kdz/tot File.
11 : Finished.... :)
Available link for download
Sunday, March 12, 2017
How to Flash Lava Iris Fuel 50 with Flash Tool Tested
How to Flash Lava Iris Fuel 50 with Flash Tool Tested
This guide very easy to use if you following step by step because this is tested by me without any error, Lava Iris Fuel 50 in restarting problem i decide to flash its first try then done no any error, this guide not for only restarting issue but you can use this when in hang on logo, restarting, auto turn on internet connection, auto turn on wifi connection, auto apk installing, auto gone balance, pattern lock, screen lock. If you want to repair your device, you can try to repair it by you. You have to charge your battery with any charger and charged it by 90%. Your data is very important for you so it is good to do a backup of your data it may consist like your contact details,your important messages, your emails or any other important thing which you feel to be the backup in your device. This backup can be done on another device. we have to do the backup because after a format of your device, all your data will be gone and it will not be recovered. For backup in other devices you can use other external device like your hard drive, SD card or any other suitable devices. If you are doing by your own.do it at your own risk as we dont take any responsibility if your device is damaged
Lava Iris Fuel 50 in any type issue software related you can easy solve using this method and this is for everyone who new fresher technician or experience technician in android software related, before use remember of must be working well all are required which you can see in this method it below to be mention, different to be error when you try to flash or upgrade first of USB not recognized this error possible when micro USB not working, battery not charged, phone USB socket not working properly so if you fail with this method just write down your comment on below comment box i will soon possible to fix it, you can use when device in dead condition also but must be in software related issue otherwise if any hardware then you can solve that, this flash file tested by me without any error working well,
Requisite for Lava Iris Fuel 50:
- Lava Iris Fuel 50 phone with good battery charged, do not try with low battery
- Lava Iris Fuel 50 Stock ROM Firmware (Tested) | Download here
- Lava Iris Fuel 50 SP Flash tool | Download here
- Lava Iris Fuel 50 USB Driver (for Flashing) | Download here
- Good Quality Micro USB Cable (do not try with market low quality USB cable) because some time not detect device
- Computer or Laptop
Method for Lava Iris Fuel 50:
- Download all needed flash files from above link, if link broke or not working just leave your comment on below comment box i will fix soon if possible
- Install WinRAR or WinZIP software in your Computer or Laptop
- Extract all files to anywhere path from WinZIP
- Open SP Flash Tool folder and choose flash_tool.exe file and open it
- Click on Scatter-loading button and choose MT6582_Android_scatter.txt file from the Firmware folder
- Click on Download button and Just Insert Micro USB Cable to device then wait until driver installing automatically
- If driver not installing auto then just manual update from the above links driver from the device manager
- If device dead then not detect with computer or laptop then Press and hold Volume Up button and Insert USB Cable to device, you can use Volume Down button also for detect
- After Installed driver device will be connected with flash tool and process starting, wait until finished process
- Congratulation you are done
Lava Iris Fuel 50 Flash done Screenshot:

Available link for download
Friday, March 10, 2017
How to upgrade Qmobile noir i9 to Kitkat 4 4 2 official
How to upgrade Qmobile noir i9 to Kitkat 4 4 2 official
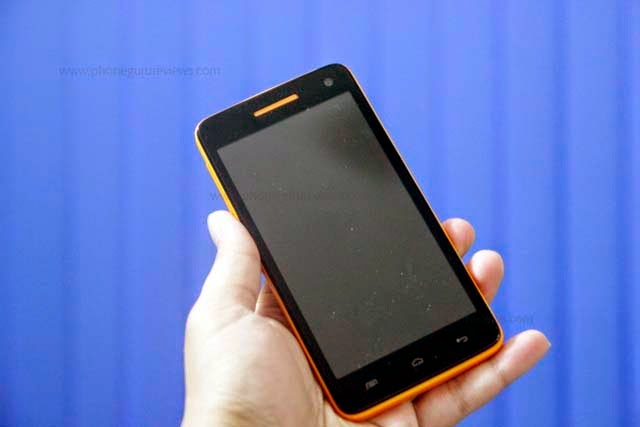
Disclaimer: Flash at your own risk, I added tutorial so if something gone wrong to your phone, dont blame me.
Quote:
IMEI / NVRAM Backup
Method 1:
Before Installing the KitKat Follow These Steps.
1. Download MTK Droid Tool From Here
2. i9 must be rooted and USB debugging must be enabled before you proceed.
3. Attach the cell phone with data cable and run mtk droid tool as admin.
4. When device got loaded press the root button and grant root access on cell phone.
5. Click on IMEI/NVRAM button and click on backup.
6. Now in case after flashing u lost IMEI follow the same steps but now click on restore.
Quote:
QMobile KitKat Release
Before you update Back Up your current rom using custom recovery in case you want to revert back
Smart Phone Flash Tool and Driver
Firmware Download
1. First of all download the required files.
2. Install Tinno Driver.
3. Extract All Zips.
4. Run the Flashing Tool as admin (Right Click on the file and click on run as admin)
5. Download Scatter File From Attachments And Add It In Firmware Folder Now Load It, all files will be loaded now click on the address bar in front of recovery and select the recovery attached below.
6. Select Firmware Upgrade.
7. Power off the cell phone and remove battery.
8. Now click on download and attach the cell phone without battery to data cable.
9. Wait till flash. You are done.

10. Enjoy Official Noir i9 KitKat.
Available link for download
Thursday, March 9, 2017
How to flash Intex Aqua Desire flash with sp flash tool see here with simple method
How to flash Intex Aqua Desire flash with sp flash tool see here with simple method
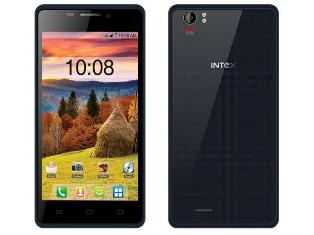
About Firmware or Tutorial:
This is tested firmware or flash tool you can do using this tutorial because this tutorial tested by me any error or issue and also this is simple method for everyone who know about android software related this tutorial use new user technician lets see how to flash intex aqua desire with sp flash tool ?
This flash file tested by me without any error working well, you can use this flash file when your device hang on logo problem, restarting problem, security lock problem, password lock problem, pattern lock problem etc software related problem and you can use this tutorial without any box and this is free for all who know about software in mobile, impotent for flashing first must check your micro usb cable if not good then you cant flash it so check micro usb cable second check your device battery that is impotent for flashing if your device battery low so stop your device between flash so this is impotent for flash, before you flash save your data like contact, photos, videos etc because this is factory flash file so you cant save after full flash so must remember all are impotent notes.
Download Link
Intex Aqua Desire Firmware or Flash tool Download here
Required for flash:
1. Intex Aqua desire device with good battery charged
2. Intex Aqua desire tested firmware or flash tool
3. Micro usb cable
4. Computer or Laptop
Procedure:
1. Download tested firmware or flash tool from above link (if link not working just write down comment on below comment box) 2. Extract winrar file to desktop or as you like path (must installed winrar software in your computer or laptop) 3. Open SP Flash Tool v3.1344.214 flash tool folder and choose flash_tool.exe file and open it 4. Click on Scatter-Loading button and choose MT6572_Android_scatter.txt file 5. Click on Download button and Press and hold Volume Up button and insert usb cable then wait until driver install if driver installed in your computer or laptop then downloading automatically start into android device 6. Wait until full os install in your device (not : do not disconnect device while your device in flashing mode) 7. Congratulation you are done from many problem and problem are mention above description.
Intex Aqua Desire Flash done with sp flash tool screenshot:

Intex Aqua Desire Flash done with sp flash tool video:
Available link for download
How to Set up an FTP Server in Ubuntu Linux
How to Set up an FTP Server in Ubuntu Linux
Steps
- 1Boot up Ubuntu Linux.
- 2Go to Application, then select Accessories and chose Terminal
- 3Enter the following command: “sudo apt-get install vsftpd” (without quotation marks). This will install the FTP server on your system. If you are logged in as the root user, the "sudo" command will not be necessary, since this command is used to give administrative privileges to the user. In this case, you will only need the command "apt-get install vsftpd".
- 4Open the FTP server configuration file. To do so, go to Places and click on Computer.
- 5In the file browser, click the “File System” icon.
- 6Click on the “etc” folder.
- 7Double-click the “vsftpd.conf” icon.
- 8Alter anonymous access. Enter "anonymous_enable=YES" (without quotation marks) to allow anonymous FTP access. The hash (#) at the beginning of each line indicates that this line is commented out and will be ignored. To enable this line, you must remove the hash (#). The parameter "write_enable=YES" (without quotation marks) will allow changes to the filesystem, such as uploading.
- 9Rename the FTP welcome banner. Uncomment it by removing the hash (#), and enter the welcome message. For this example its "ftpd_banner=Welcome to FTP Server!" (without quotation marks).
- 10Click on Save and close the file. (Note: You may need to login as root, then only you will be able to open file in edit mode or else the file will open in read-only mode)
- 11To restart the FTP service, type the following command: “sudo /etc/init.d/vsftpd restart” (without quotation marks). Again, you will only need to use "sudo" if you are no logged as the root user.
- 12Place files on the FTP server. To move files to the server, access the FTP Folder from the command in the image below.


Available link for download
Wednesday, March 8, 2017
How to Flash HTC Desire 820 820MU dual sim by using Fastboot code Tested
How to Flash HTC Desire 820 820MU dual sim by using Fastboot code Tested
HTC Desire 820 Dual Sim to be different Stock ROM Firmware in this method using stock rom model of A31_DTUL, Build : 1.01.709.1, CID : 11111111, HBoot : 3.19.0.0000, MID : 0PE621000, Security : OFF, Region : Super_CID, if you want to use this method first check this mention model number if not then do not try with this Stock ROM Firmware but you can use this guide if you want to correct Stock ROM firmware put on fastboot mode and readinfo using HTX Multi Tool.exe software and this software also available in this guide.
HTC Desire 820 in any type issue software related you can easy solve using this method and this is for everyone who new fresher technician or experience technician in android software related, before use remember of must be working well all are required which you can see in this method it below to be mention, different to be error when you try to flash or upgrade first of USB not recognized this error possible when micro USB not working, battery not charged, phone USB socket not working properly so if you fail with this method just write down your comment on below comment box i will soon possible to fix it, first take backup into device if live otherwise dead you cant take backup, this guide you can use when device in dead condition also but must be in software related issue otherwise if any hardware then you can solve that.
If you want to repair your device, you can try to repair it by you. You have to charge your battery with any charger and charged it by 95%. Your data is very important for you so it is good to do a backup of your data it may consist like your contact details,your important messages, your emails or any other important thing which you feel to be the backup in your device. This backup can be done on another device. we have to do the backup because after a format of your device, all your data will be gone and it will not be recovered. For backup in other devices you can use other external device like your hard drive, SD card or any other suitable devices. If you are doing by your own. do it at your own risk as we dont take any responsibility if your device is damaged
This method you can use without any box its done from flash tool its also available here, and impotent of must be installed phones driver, you cant flash or upgrade if not installed in your computer or laptop it must be installed and also available in this post, here all are linked that tested and working fine just in one try, you can use this guide when your device in hang on logo, restarting, auto turn on internet connection, auto turn on wifi connection, auto apk installing, auto gone balance, pattern lock, screen lock.
Requisite for HTC Desire 820MU
- HTC Desire 820 (820MU) dual sim with well battery charged, do not try with low battery
- HTC Desire 820 (820MU) dual sim Stock ROM tested | Download here
- HTC Desire 820 (820MU) dual sim HTC Fastboot Driver spl | Download here
- HTC HTX Multi Tool | Download here
- HTC Desire 820 (820MU) sual sim fastboot code | Download here
- Good Quality Micro USB Cable
- Computer or Laptop
Procedure for HTC Desire 820 (820MU) dual sim
- Download needed files from above link, if link not working just leave your comment on below comment box i will soon fix it if possible
- Install WinRAR in your Computer or Laptop if already installed ignore this
- UnZip to Desktop or as you like path from the WinRAR
- Install HTC USB (Flashing) Driver already installed ignore this
- Unplug battery socket wait few second and gain Insert battery socket
- Press and hold Volume Down + Power button and choose Fastboot mode and Insert Micro USB Cable into device
- Open RBSoft folder and choose HTX Multi Tool.exe file and open it
- Go to Fastboot Tab and click on Read Boot Info button and wait until full readinfo to your device
- If above mention model to be in your device then use this Stock ROM Firmware, if different readinfo then just write down your info on below comment box i will give you correct stock ROM firmware link
- Rename Stock ROM Firmware 0PE6IMG_A31_DTUL_K44_DESIRE_SENSE60_HTCCN_CHS_CMCC_1.20.1403.1_R6_Radio_01.01.110_U1030481_08.01.1119_F_release_414395_combined_signed to 0PE6IMG and do Copy
- Open htc fastboot driver spl folder and Paste there Stock ROM Firmware
- Right click with Shift key on White area and choose Open command windows here option (see below image)
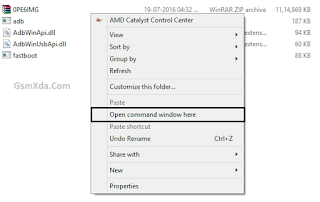
- Write down there first command of "fastboot devices" and press Enter key
- Write down again "fastboot oem rebootRUU" and Press Enter key
- Write down "fastboot flash zip 0PE6IMG.zip" and Press Enter key and wait until full installed Stock ROM Firmware
- After finished Stock ROM Firmware flashing procedure and use last command "fastboot reboot" and Hit Enter key
- Congratulation you are done
Available link for download
Saturday, March 4, 2017
How to configure TCP IP Properties
How to configure TCP IP Properties
Step 1
On the Windows taskbar, click the Start->Control Panel, then select and double-click Networking Connections.
Step 2
Right Click Local Area Connection, select and click Properties.
Step 3
Select Internet Protocol (TCP/IP), then double click it or click Properties.

Step 4
The TCP/IP Properties window will display, there are two ways to configure the TCP/IP Properties, automatically or manually.
1. Assigned automatically by DHCP server
Select Obtain an IP address automatically and even Obtain DNS server address automatically if necessary, click OK to save the settings.

2. Assigned manually
Select Use the following IP address, type IP address, subnet mask and default gateway IP address into it.
Select Use the following DNS server addresses, type your local area DNS server IP addresses into it.

Step 5
Click OK to save and apply your settings.
Note:
1. The IP address should be in range of 192.168.0.2 to 192.168.0.253, you can use anyone of them. The Subnet mask should be 255.255.255.0; the default gateway is usual 192.168.0.1 which is the same with your router’s IP address.
2. The DNS server addresses can be the gateway or provided by your ISP.
Available link for download
Wednesday, March 1, 2017
How to Flash Karbonn Titanium S205 2GB with SPD Upgrade Tool tested
How to Flash Karbonn Titanium S205 2GB with SPD Upgrade Tool tested
Karbonn Titanium S205 2GB in any type issue software related you can easy solve using this method and this is for everyone who new fresher technician or experience technician in android software related, before use remember of must be working well all are required which you can see in this method it below to be mention, different to be error when you try to flash or upgrade first of USB not recognized this error possible when micro USB not working, battery not charged, phone USB socket not working properly so if you fail with this method just write down your comment on below comment box i will soon possible to fix it, first take backup into device if live otherwise dead you cant take backup, this method use when device in dead condition also but must be in software problem in hardware device not be live, you have to charge your battery with any charger, For backup in other devices you can use other external device like your hard drive, sd card or any other suitable devices.
This method you can use without any box its done from flash tool its also available here, and impotent of must be installed phones driver, you cant flash or upgrade if not installed in your computer or laptop it must be installed and also available in this post, here all are linked that tested and working fine just in one try, you can use this guide when your device in hang on logo, restarting, auto turn on internet connection, auto turn on wifi connection, auto apk installing, auto gone balance, pattern lock, screen lock etc these type issues you can use this way now lets see how to above mention software related issues solve using this method ?
This method you can use without any box its done from flash tool its also available here, and impotent of must be installed phones driver, you cant flash or upgrade if not installed in your computer or laptop it must be installed and also available in this post, here all are linked that tested and working fine just in one try, you can use this guide when your device in hang on logo, restarting, auto turn on internet connection, auto turn on wifi connection, auto apk installing, auto gone balance, pattern lock, screen lock etc these type issues you can use this way now lets see how to above mention software related issues solve using this method ?
Whats a Need for that ?
- Karbonn Titanium S205 2GB handset with well battery charged it up to 80%, do not try with low battery
- Karbonn Titanium S205 2GB tested Stock ROM Firmware | Download here
- Karbonn Titanium S205 2GB tested Flash tool | Download here
- Karbonn Titanium S205 2GB USB (Flashing) Driver | Download here
- Good Quality micro USB Cable
- Computer or Laptop
How to Flash or Upgrade ?
- Download tested all are required from above link, if link not working just leave your comment
- Extract to Desktop or as you like path from the WinZip, must be installed WinZip in your Computer or Laptop
- Open SPD Upgrade Tool and choose UpgradeDownload.exe file and open it from the double click
- Click on Firmware button it be first number and choose UTLTitanium_S205_2GBv1004.pac file
- Now Click on Download button it be Third number, Turn off device if it ON
- Press and hold Volume Down key and inset USB cable wait until driver installed, already that then start flashing automatically
- Wait until finished process, do not try to unplug while device in flashing mode
- Congratulation you are done
Karbonn Titanium S205 2GB Flash done Screenshot

Karbonn Titanium S205 2GB Flash done Video
Available link for download
Monday, February 27, 2017
How To to Extend My Laptop Battery Life Tips Tricks
How To to Extend My Laptop Battery Life Tips Tricks
Many of us use Laptops or Notebooks for tons of hours to our work, to play Games and to Browse Internet. Unfortunately, when the battery runs out of power, you have to search for the power outlet to finish your job. Every laptop user wants to maximize the battery usage time between battery recharges. Although you can’t prevent your laptop’s battery from degrading, but there are several ways to slow down the process and Extend the Laptop Battery Life.
There are several things you can do to make your laptop’s battery last as long as possible
The lifespan of a laptop battery depends on a number of factors and is hard to predict. All rechargeable batteries wear out with time and usage. As time and cumulative use increase, the performance will degrade. For the typical user, noticeable reduction in run time generally will be observed after 18 to 24 months. For a power user, reduction in run time generally may be experienced prior to 18 months.
Also Read : Reduce Your Laptop Battery Power Consumption using Battery Booster
Then, How Do I Improve My Laptop’s Battery Life ?
1. Stay Cool
Use proper cooling pad when you use the laptop in your Lap to avoid the excessive heating. The excessive heat will turn on other hardware like fans in your Laptop to reduce the heat and cools itself. Fans and other resources will drain out your Laptop battery power.
2. Essential Battery Maintenance
Check Your Battery Contacts
Just remove the battery and clean the dust in the battery Metal contacts and also in laptop if is has.
Voltage Adapter
Just check that whether you are using a power adapter with the correct voltage for your Laptop. Unless if you are using the wrong one can damage your battery and lead to a costly replacement. Always the check the Right Voltage Power when you buy the replacement battery. It is best to buy the Battery from the Laptop Manufacturer.
3. Give It a Rest

If you are working continuously on AC power for more than a day or Month, then remove the battery from the Laptop and keep it safe in the room temperature. The unused battery will drain out over the time, so before removing the battery, at least it should have minimum a charge.
4. Keep Dust free

Keep your Laptop and working place free from dust, dirt and hair. These dusts may building up inside your Laptop and the dirt clogs the fans that help your computer cool itself and force the computer to run them longer to cool off.
By avoiding these dusts you can increase your System performance and can get fastest computer speed.
Also We will see about How to Get Longer Laptop battery Life Between Charges :
1. Dim Your Screen
Your Laptop’s Display backlight requires a lot of Battery Power . So that Turn down your display lights by Simply adjust the brightness of your laptop’s display.
2. Turn off the hardware when not needed
When you are not using internet then turn off the Wi-fi receiver and also Bluetooth hardware when not in use. Also turn off the external devices like External Mouse and keyboard. Also avoid CD/DVD drive when Laptop runs on battery power.
3. Avoid Multitasking
Run only few Programs or Applications when Laptop in battery Power. Try to reduce the background programs. To do so, Press the “Ctrl,” “Alt” and “Delete” keys to open the task manager. Click on “End task” to close any programs that you are not using. And if you’re not on the Internet, you should close your anti-virus program also.
4. Avoid multimedia
Also close the music player or reduce the sound of the Music system to get more battery power. If you want to listen music then try Mobile phones or iPod.
5. Use Power Saver
On your laptop and select the lowest power usage option from the power management section. This will dim the backlight of your laptop and reduce the amount of time the laptop stays on before hibernating. And also avoid the unnecessary Hardware and ports using the Power
Available link for download
Subscribe to:
Posts (Atom)