Showing posts with label problems. Show all posts
Showing posts with label problems. Show all posts
Tuesday, March 21, 2017
Wired and wireless network problems
Wired and wireless network problems
Introduction
This tutorial is designed to help you identify and fix problems with wired (Ethernet) and wireless (Wi-Fi) network connections in Windows.
You might experience network or Internet connection issues in Windows for a number of reasons. Some common issues that can cause these problems are:
- A wireless network adapter switch thats not enabled
- WEP, WPA, or WPA2 security key or passphrase issues
- Cables that arent connected properly
- Corrupted or incompatible drivers
- Missing updates
- Network connection settings
- Hardware or software problems
Connect to a wireless network in Windows XP
If you have a laptop or a PC with a wireless network adapter, you can see a list of available wireless networks and then connect to one of those networks. The wireless networks will only appear if your PC has a wireless network adapter installed, the adapter is turned on, and the wireless access point is in range.- Click Start, click Control Panel, click Network and Internet Connections, and then click Network Connections.
- In the left pane, under Network Tasks, click View available wireless networks.
Note
- If you dont see the network you want to connect to, click Refresh network list. If you see the network but the signal is weak, move the PC closer to the wireless router.
-
- Click the network you want to connect to, and then click Connect.
- If youre connecting to a secure network, type the security key, and then click OK.
-
Available link for download
Thursday, November 10, 2016
4 Troublesome Memory Problems and Their Solution
4 Troublesome Memory Problems and Their Solution
Problems related to your computer memory are quite frequent and occurs, either sooner or later. Your computer might become unbootable/inaccessible if memory problem took place. The only thing which makes you happy is, there are several fixes already available to deal with such tragic situations either from Microsoft or from third party sources.
But in some cases, all the possible fixes fail to address these memory errors and you may eventually lose any unsaved data or might not able to access your computer. Probably you’re facing this now and that’s why landed here to get 100% working solution(s), right??
If that’s the case, take a deep breath and carefully read the article. It’ll explain each and everything you need to know about computer memory problems along with working solutions to bring back your PC back again in healthy state as it was before.
Types of memory problems and their possible solutions
If your Windows computer has facing any memory problems, it will detect it automatically and offers subsequent solution such as memory diagnostic tool. If Windows has somehow not detected it, you have to manually find the problem and apply solutions accordingly.
There are some common symptoms mentioned below, that happens only when the error is related to your computer memory:
Problem 1) Strange Behavior
When memory problems strikes, your computer may start behaving abruptly such as sudden system shutdown, freezes, blue screens etc. There are other factors which may also cause this, but digging for memory problems first will save time and efforts.
Solution: Use Memtest86
To test and make sure that the computer has suffering from memory problems, you can use a free memory diagnostic utility, called memtest86 . You’ll need to arrange a different computer other than the one with problems, to create a bootable CD and investigate the errors. This tool require you to shut down the problem computer before it begin analyzing.
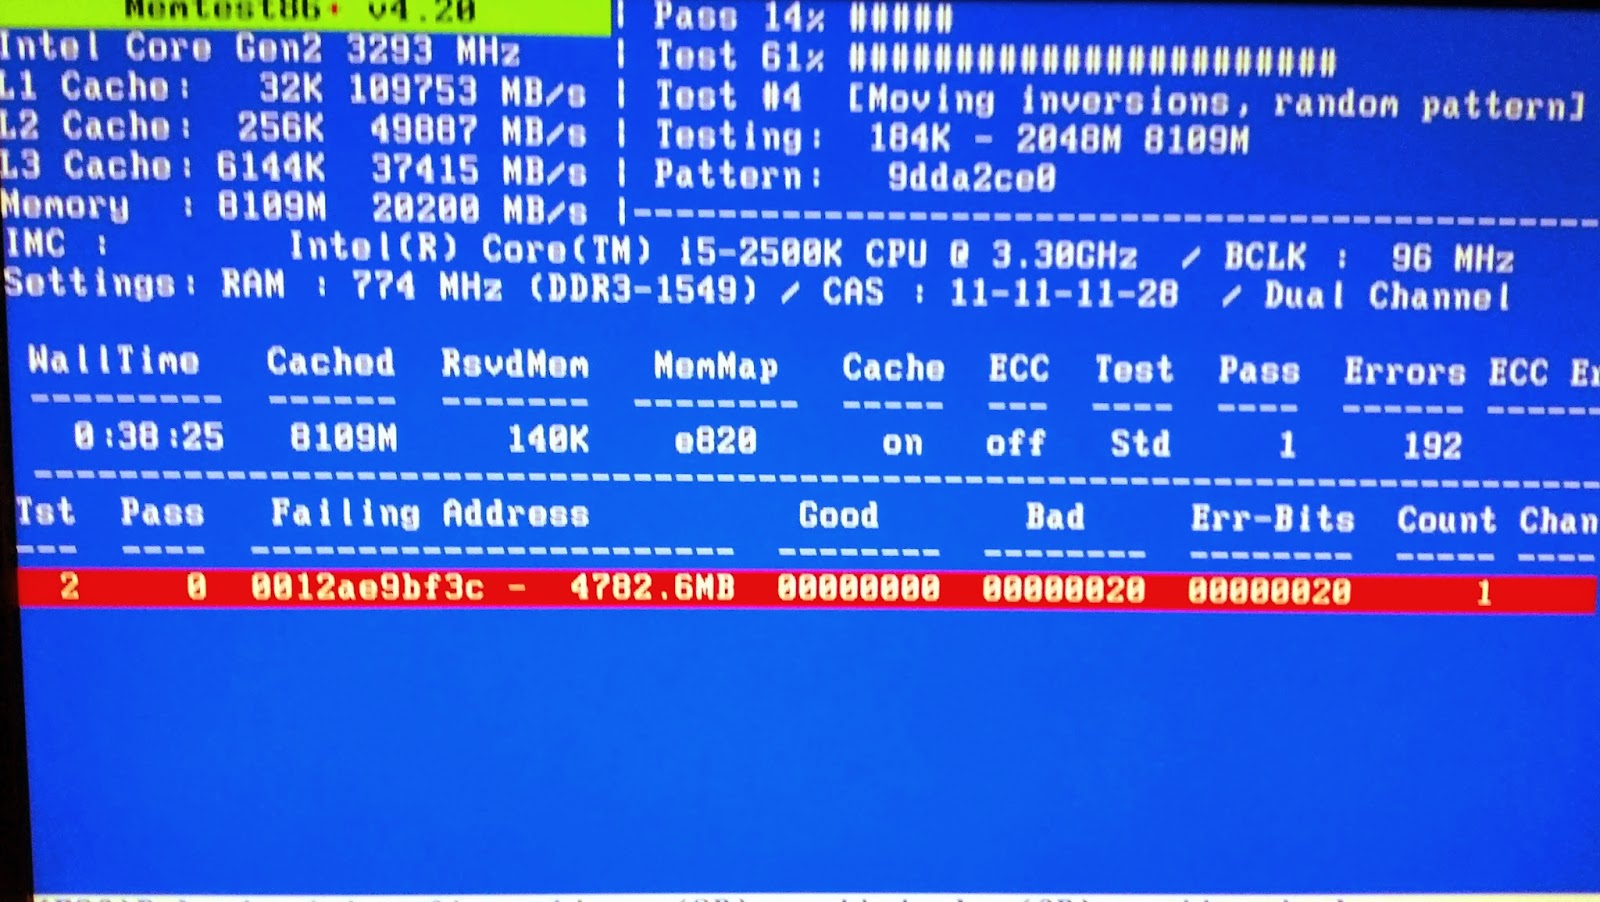
It’ll take some time before finally producing the results. On the result screen, you can see helpful information like the failing address, good & bad memory location, error count etc. If you see some red line highlighted with some information on it, most probably the computer has suffering from serious memory problems and you’ll need to replace either one or both the RAM sticks.
Problem 2) Black Screen
After pressing the power button, the computer not load successfully and may hangs at the black screen just after passing the ‘booting windows’ screen. Highly suspected cause would be faulty or damaged computer memory which prevents Windows to load properly. Other hardware problems such as CPU, motherboard or faulty fan could contribute towards the computer black screen but leaving them for last is recommended.
Solution: Running Inbuilt Memory Diagnostic Tool
This is an inbuilt utility and comes preinstalled with the latest Windows operating system such as Vista, Windows 7 and Windows 8. As soon as you get the memory error notification window, click on any of two available options to check memory problems: Restart now and check for memory problems (recommended) and check for problems the next time I start my computer.
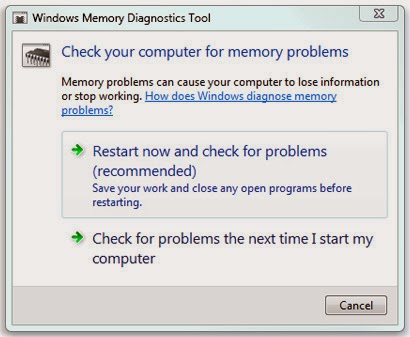
As the name suggest, you can choose to run memory diagnostic immediately or the next time you start your computer. In case you’re running it immediately, make sure you’ve saved all your work and closed all the open programs. Once the scan is completed, the computer will restart automatically and gives you the produced results. If the problem is memory chip related, you’ll need to contact the manufacturer to get it replaced, if it’s in warranty.
There are options to further customize the scanning even further. When the scan starts, Press F1 and adjust the settings for better results:
Test Mix: Basic, standard or extended scan is available. You can choose extended for detailed and thoroughly checking the memory problems.
Cache: choose the desired cache settings such as default. On or off.
Pass Count:You can choose to run this test 3 to 5 times repeatedly. The longer pass count you perform, the better result will produce.
Problem 3) No Lights on the monitor:
After pressing the power button, you can’t see any display on the monitor or the monitor lights keeps blinking for a long time. Moreover, you can’t hear any beep sound that computer does previously. The beep sound normally indicates that the computer is in healthy state and hardware parts are working properly.
Solution: To address this issue, you’ll need to clear the dust inside the CPU case or take off the RAM sticks and clean it. Again reinsert it and see if the computer starts this time. If the problem still persist even after cleaning every bit of dust from the CPU case, it’s better to look out for the other faulty hardware parts.
Problem 4) Faulty RAM Sticks
It might be possible that the any or all of your computer RAM sticks has gone bad and couldn’t be used any longer. Possible causes could be memory overage, faulty RAM sticks delivered from the manufacturer or circuit failure.
Solution: All you can do is to replace the RAM sticks and use a new one. If it’s not in guarantee, you can ask manufacturer for replacement.
There are various other causes responsible for making your computer memory unstable and later make your system completely inaccessible. It has emerged as one of the most troublesome problem and occurs in 67% cases of computer problems. Either you can reset all the memory and start from scratch or can investigate the possible causes and hunt for solutions over here and there.
No matter how serious the memory problem is, you always have risks to lose your valuable data on the system and may go through list of tools to recover data. It’s advisable to take a proper backup copy and update it frequently to always have the latest copy stored so you can never loose even a single piece of data.
Available link for download
Sunday, September 4, 2016
3 Major Problems Related to Windows Update and Their Relevant Solution – Windows 8
3 Major Problems Related to Windows Update and Their Relevant Solution – Windows 8
Microsoft releases updates and security patches for your Windows system to ensure its smooth functioning and protection against various type of Trojan and malware. Depending upon the settings you choose, Windows can install crucial updates automatically or you can manually start the process and then let the computer install updates for you.
P.S. Microsoft released critical updates on every second and fourth Tuesday of every month.
There are mainly three type of Windows updates provided from Microsoft, based upon their importance:
Important: Such updates are important for keeping your system safe and reliable, covering all your safety and privacy concerns.
Recommended: It is important to update installed software and drivers from time to time to achieve best performance out of your system. Recommended updates will be provided with important updates which generally download and install updates for the running programs.
Optional: These are the updates about new or trail Microsoft software which you may able to install manually.
On the darkest side, if you don’t install these updates daily or weekly (at least), your system may starts freezing, crashing or suddenly becomes inaccessible. In worst cases, user may not able to access the stored hard drive data and the only way out to recover data is by using inaccessible data recovery software.
However, there are some common problems related to Windows updates which may leave your system in unbootable state. Let us understand the problems with such updates along with subsequent troubleshooting steps to make your system working again.
System become inaccessible after installing updates
In some cases, after installing one or two updates and security patches from Microsoft, the system was not able to start successfully and give error messages like Blue screen of death, failed start loop, stuck at booting screen etc. You’ll need to double check and ensure that the problem is surfaced after the update installation took place and you haven’t done anything else that causes system inaccessibility.

Older version of Windows such as Windows 7, Vista and XP comes with an option to start system with previously loaded system files and drivers, known as “Last Known Good Configuration”. You can use this option by continuously tapping F8 just after starting your system which will takes you to the advanced system startup options. In case you’re using Windows 8, try reset or refresh option on your computer.
Windows 7 offers various other useful tools to fix unbootable computer like startup repair, system image recovery or system restore. You can apply any or all the option and check if you may able to get into Windows once again. Once you able to access your system, you may perhaps want to look for the culprit and uninstall it if it were still there:
Under ‘Control Panel’ option, click ‘Programs’ and then click on ‘View Installed updates’ option under ‘Programs and Features’ tab. Select the update that you want to remove and click on ‘Uninstall’ option to begin removing that particular update. If you want to remove any recently installed updates, check out their details like date and time, update name and related services or programs.
System give freezes after installing updates
After installing recently available updates, you couldn’t able to access program, play music or simply turn it off. System does nothing except to stay there forever.

These are the security updates released for keeping your files and folders safe and prevent viruses to steal confidential data. The problem surfaced when updates were not fully installed or stuck at mid of installation and therefore hamper performance of other important system files use to boot and perform read/write operation.
Once you are at mid of such tragic circumstances and puzzled could save you from this, run your system using clean boot mode. Clean boot is a special technique to start system with minimal set of drivers and programs so could you find the culprit driver or programs and later able to start your system.
USB Device not working after installing update
Microsoft sometime releases updates for your USB ports to ensure faster and reliable performance for various type of USB Devices. These update also helps your computer in easily reading the stored content and alarms if there is any suspicious files trying to interrupt performance of your computer.

On the other hand, sometime these updates make your system unable to detect USB devices. Moreover, it’ll make your system to freeze or hang as soon as you connect the USB device on your system. There is a special case that I’ve found where Windows 8 computer stop reading any USB device after installing update: KB2756872. Follow the steps mentioned below to free yourself from such problems:
- Restart your computer and switch to BIOS settings.
- Go to Advanced mode > USB Configuration.
- Find option ‘USB Legacy support’ and ‘USB3.0 Legacy support’ and make it disabled.
- Press F10 to save changes and exit from the BIOS.
- Again, restart your computer.
- Go to control panel > windows update and locate the recently installed updates after which, this all started happening.
- Remove that updates and restart computer back again.
- Again, in BIOS settings mode, set both the options to enable back again which we had previously set to disabled: USB Legacy Support & USB3.0 Legacy Support.
- Save and exit from the BIOS by pressing F10 and hitting enter.
Most probably, you may now able to access USB storage device and its stored content with absolutely no problem at all.
Available link for download
Subscribe to:
Comments (Atom)