Showing posts with label do. Show all posts
Showing posts with label do. Show all posts
Monday, March 20, 2017
3 Possible Things You Can Do to Repair Hard Drive Bad Sectors
3 Possible Things You Can Do to Repair Hard Drive Bad Sectors
Traditional hard drive carries multiple mechanical parts which degrades over time and affect its standard operation. Hard disk platter is one such equipment which plays the crucial role in saving and transferring the stored data. Due to its magnetic nature, the surface of the platter starts wearing out more often than normal. Once the magnetic area of the hard disk platter becomes damaged, it can’t be used by the system to store further data as well as the existing data become corrupt or damaged. Damaged area on the platters are known as Bad sectors of hard drive which will result in data loss of that particular area.
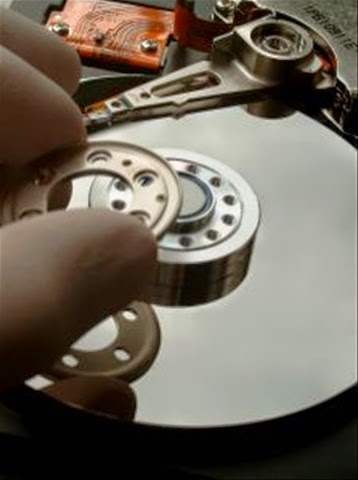
Bad sectors can also surfaced by physical damage delivered by dropping or throwing it on the floor. It is impossible to repair the damaged sectors physically, there are still some way out to repair it if the corruptions are logical (soft bad sectors) by running disk error checking tool in Windows or running disk utility in Mac. These utilities are designed to cooperate bad sectors smoothly so that it won’t hamper the saved data consistency and not damage its nearby sectors.
There are specially two types of bad sectors on the hard disk which may ends up in making your data corrupt or unreadable.
Soft bad sectors: Such problems arises due to software malfunction, read/write head problems which scratched the data area of the hard drive and makes data become unreadable by the operating system. These bad sectors are fairly common and can happen with hard drive of any age. The easiest possible solution to get rid of the soft bad sectors is by completely formatting or erasing the hard drive. Formatting will fill zero bytes on each and every sectors of the hard drive and make it ready to be used once again.
Hard bad sectors: Any mechanical problems with the hard drive itself can result in hard bad sectors. Such bad sectors has tendency to damage its nearby sectors and soon, makes the entire hard drive with loads of bad sectors enough for making it completely failed. Hard bad sectors can’t be repaired and the best bet is to copy/move all your data immediately and purchase another hard drive to continue using your system without any trouble. Using hard drive recovery software will not help at all in such circumstances as the drive already becomes unreable by the BIOS and therefore, recovery software too cant read it anymore.
Investigating Bad Sectors
There are few simple steps to find out whether your hard drive having bad sectors; however we suggest you to follow the extensive method of pin pointing the bad sectors on your hard drive.
Disk error checking: Windows have inbuilt utility that performs detailed analysis for files and folders and check for their consistencies. In case you’re experiencing problem with scan such as crashing, showing error while checking disk, freezing etc. , it might be a sign of failing hard disk as the bad sectors might preventing the normal operation of disk error checking operation.
Surface scan test: This test is performed on the hard drive with suspected with bad sectors symptoms. While checking, it’ll check and mark the bad sectors and use spare sectors to replace them.
SMART Tool:It performs the series of test on the problem hard drive and gives exact record of health status of problem hard drive including the bad sectors count.
Once you found that the hard drive has fairly large number of bad sectors, you should immediately start seeking for alternative options to repair it or replacing the whole hard drive (if your budget allows).
Repairing bad sectors
Bad sectors can result in major disaster and all your hard disk data soon become inaccessible. While it’s almost impossible to get back data from the damaged sectors, you can try repairing the logically damaged bad sectors so it won’t affect the remaining area of the hard drive.
Follow steps carefully mentioned below and see if you can overcome with any or all the bad sectors you may have found during scanning.
#1. Check Disk Utility
Microsoft Windows comes with an inbuilt disk repair utility to fix minor or major problems with the system such as problems with the volume, cross linked files, bad sectors, directory related errors and more.
You can run this utility directly from ‘My Computer’ > Windows Explorer or using elevated command prompt window. Below are the steps to run this utility from ‘My computer’:
- Open ‘My Computer’ by double clicking on it or directly press ‘window’ button + E.
- Right click on desired hard disk volume/partition and choose properties for which, you want to check errors. In case you are not sure which volume to select first, start by selecting any volume and if the problem is not resolved, follow the same procedure to check errors for another volume.
- On the Tools tab, click on Check Now button located under error checking section.
- Pop up window will open and ask you to choose the desired task to perform. Ensure that you’ve check mark the two boxes stating ‘Automatically fix file system errors’ and ‘Scan for and attempt recovery of bad sectors’.
- Click on Start to begin the scanning procedure.
Note: This utility wants exclusive access on the volume you’ve chosen to perform disk error check function. Also, the whole procedure may takes little longer time depending on the size of the targeted volume.
#2. Utilities provided from hard drive manufacturer
Famous hard drive manufacturer such as Western Digital, Seagate or Maxtor provide their own drive check utility such as Data Lifegaurd Diagnostics, Seatools for Windows and PowerMax.
These utilities were designed to perform error check function on the hard drive of only relevant manufacturer except WD Data Lifegaurd Diagnostics which generally detects hard drive from any manufacturers and attempt to repair bad sectors.
These utilities are fairly easy to use and runs in wizard based interface. Users with basic to advanced computer knowledge can efficiently use these tools.
#3. Disk Checkup from PassMark
It is a little different and comparatively easy to use utility which clearly draws barrier between normal and problem hard drive by executing tests based on the series of attributes. It comes with prebuilt SMART diagnostic tool which fetch all the required details from the hard disk and later, compares it with any normal hard drive which has nearly new or in perfect condition.
#2. Utilities provided from hard drive manufacturer
Famous hard drive manufacturer such as Western Digital, Seagate or Maxtor provide their own drive check utility such as Data Lifegaurd Diagnostics, Seatools for Windows and PowerMax.
These utilities were designed to perform error check function on the hard drive of only relevant manufacturer except WD Data Lifegaurd Diagnostics which generally detects hard drive from any manufacturers and attempt to repair bad sectors.
These utilities are fairly easy to use and runs in wizard based interface. Users with basic to advanced computer knowledge can efficiently use these tools.
#3. Disk Checkup from PassMark
It is a little different and comparatively easy to use utility which clearly draws barrier between normal and problem hard drive by executing tests based on the series of attributes. It comes with prebuilt SMART diagnostic tool which fetch all the required details from the hard disk and later, compares it with any normal hard drive which has nearly new or in perfect condition.
Available link for download

Monday, February 20, 2017
What to do when Windows XP won’t boot
What to do when Windows XP won’t boot
Windows XP is among the most commonly used operating system even after the release of newer versions. A XP user can have to face several issues while OS startup, installing, re-installing, migrating, loading or working with the OS.
I am going to discuss the case when the Windows XP OS turns unbootable.
There can be various malefactors that can lead to an unbootable Windows XP. Some common factors among them are: corrupt start up record of active partition, OS startup file corruption, misconfigured hardware and driver settings , issues with the hardware and driver settings, any impending change to the system-critical components, corrupt/damaged Boot.ini file, corrupt partition boot sector or issues with the master boot record.
What to do when Windows XP won’t boot?
Solution 1:
Troubleshoot the issue by restoring the system from recent backup:
If you have back up your system using some backup utility then you can perform a restore by using the restore instructions of the tool.
Solution 2:
Troubleshoot the issue by using system restore:
To use the System Restore feature:
Solution 3:
Troubleshoot the issue by booting the OS with the Last Known Good Configuration feature:
To boot the OS with Last Known Good Configuration:
Solution 4:
Troubleshoot the issue by booting from the Windows XP CD:
You can use the recovery console feature to fix the issue, to do so:
Solution 5:
Troubleshoot the issue using a Windows startup disk:
To create a Windows startup disk:
Solution 6:
Troubleshoot the issue by using Bootcfg tool:
Use Bootcfg tool to fix a corrupt Boot.ini:
I am going to discuss the case when the Windows XP OS turns unbootable.
There can be various malefactors that can lead to an unbootable Windows XP. Some common factors among them are: corrupt start up record of active partition, OS startup file corruption, misconfigured hardware and driver settings , issues with the hardware and driver settings, any impending change to the system-critical components, corrupt/damaged Boot.ini file, corrupt partition boot sector or issues with the master boot record.
What to do when Windows XP won’t boot?
Solution 1:
Troubleshoot the issue by restoring the system from recent backup:
If you have back up your system using some backup utility then you can perform a restore by using the restore instructions of the tool.
Solution 2:
Troubleshoot the issue by using system restore:
To use the System Restore feature:
- Press [Ctrl][Alt][Delete] to restart the system.
- Select OS to start
- Or press F8 to go to Advanced Options.
- Select safe mode and hit Enter to run windows in safe mode
- Now, Go to Start>All Programs> Accessories> System Tools menu> System Restore.
- Select the option ‘Restore My Computer To An Earlier Time’. Next to continue further with restore process.
Solution 3:
Troubleshoot the issue by booting the OS with the Last Known Good Configuration feature:
To boot the OS with Last Known Good Configuration:
- Press [Ctrl][Alt][Delete] to restart the system.
- Press F8 to open the Advanced Options.
- From the menu, choose the Last Known Good Configuration
- Hit Enter
Solution 4:
Troubleshoot the issue by booting from the Windows XP CD:
You can use the recovery console feature to fix the issue, to do so:
- Insert the XP CD. Reboot the system by pressing [Ctrl][Alt][Delete].
- Load all basic Setup files.
- At the ‘Welcome To Setup screen’ press R.
- This will start the Recovery Console.
- When you are prompted for, select the desired OS.
- To open recovery console select from desired option from the menu number
- Fill the login credentials. The recovery Console will prompt, continue with the recovery process.
Solution 5:
Troubleshoot the issue using a Windows startup disk:
To create a Windows startup disk:
- Insert a floppy drive into another XP computer (that has same configurations as your problem system)
- After inserting the disk, Go to: My Computer> right-click the floppy disk icon> Format command. This will open the format dialog box. Click Start.
- Once the format is done close all open windows. Go to C drive and copy the Boot.ini, NTLDR and Ntdetect.com file to the floppy drive
- Insert the floppy drive to the problem system. Reboot the system using [Ctrl+Alt+Delete] command. Boot the OS from Windows startup disk to start Windows normally
Solution 6:
Troubleshoot the issue by using Bootcfg tool:
Use Bootcfg tool to fix a corrupt Boot.ini:
- Boot the system using the Windows XP CD
- Open the Recovery Console.
- Open the Recovery Console command prompt
- Run the command: Bootcfg /parameter
- /Add--Checks for all OS installations on the disk. And let you add a new installation in the Boot.ini file.
- /Scan--Scans all Windows OS installations on the disk.
- /List—shows all the parameters listed in the Boot.ini file.
- /Default--Using this option you can set the default OS as the main boot entry.
- /Rebuild—Let you re-create the Boot.ini file.
- /Redirect— using this option (with tow parameters Port Baudrate] | [UseBiosSettings]) you can redirect the boot operation to a specific port under the Headless Administration feature.
- /Disableredirect--Disables the redirection.
Solution 7:
Troubleshoot the issue by using Fixboot Recovery Console tool
Fix a corrupt partition boot sector using Fixboot:
- Boot the system using the Windows XP CD
- Open the Recovery Console.
- Open the Recovery Console command prompt
- Run the command: Fixboot [drive]
Here, [drive] is the drive letter where a new partition boot sector is to be written.
Solution 8:
Troubleshoot the issue by running the Fixmbr tool:
To run the Fixmbr tool:
Solution 8:
Troubleshoot the issue by running the Fixmbr tool:
To run the Fixmbr tool:
- Boot the system using the Windows XP CD
- Open the Recovery Console.
- Open the Recovery Console command prompt
- Run the command: Fixmbr [device_name]
Here, [device_name] is the drive device pathname where a new master boot record is to be written. For example: DeviceHardDisk0
Solution 9:
Troubleshoot the issue by disabling automatic restart
To do so:
Solution 9:
Troubleshoot the issue by disabling automatic restart
To do so:
- At the Windows XP boot screen, Select the operating system to start or press [F8] (if hear beep and open Windows Advanced Options
- Choose the option to ‘Disable The Automatic Restart On System Failure item’
- Hit [Enter].
Solution 10:
Troubleshoot the issue by performing an in-place upgrade
To perform an in-place upgrade:
To perform an in-place upgrade:
- Insert the Windows XP CD.
- Restart the system, Select to boot from the CD.
- The Windows XP Setup screen will open. Press Enter to continue.
- On the License Agreement page and press [F8] to agree and continue.
- First Setup will search the previous installation, after that you can see a Setup screen with two options.
- Option 1: repair the selected installation by pressing R
- Option 2: install a fresh copy of Windows XP by pressing ‘Esc’.
- To perform an in-place upgrade, press R.
- After the in-place upgrade is done, reinstall all the Windows updates.
I hope this article will prove helpful for those who are facing the unbootable Windows XP problem.
Available link for download
Friday, February 10, 2017
3 Things to Do When Windows 8 Computer Won’t Boot
3 Things to Do When Windows 8 Computer Won’t Boot
Windows 8 is designed to run smoother and perform better even in the critical situations. However, as like other operating system problems, it may also run into problems and might prevent you to access your computer normally.
Luckily, Windows 8 is furnished with many advanced tools and automatic repair options to heal common issues which causes defective performance, booting failure, freezing etc. Manually looking for problems with your Windows 8 computer is time consuming and comprises lot of computer knowledge.
To make the troubleshooting process simpler, Windows 8 has introduced these tools to automatically find and repair problems and let you use your computer as before. Coming straight to the point, let’s discuss about those tools and how you can use it if facing similar situations:
#1 Use Automatic Repair option
Windows will automatically launch self recovery tool like Automatic Repair to address issues with your Windows 8 computer. It can repair unbootable computer, freezes, inaccessibility and thus, allows user to recover deleted hard disk partitions and data.
What it scans:
- Configuration options
- Various settings
- Corrupt system files that causes damages
What it Repairs:
- Damaged system files and registries
- Removes malware and boot sector virus
- Unwanted settings
- Makes file system stable to boot
- To access automatic repair, simply press ‘Windows + Q’ button and type ‘Advanced’ in the search text bar. Tap on ‘Settings’ and then click on ‘Advanced Startup Options’ from the search results appear at the left side of the window.

- On the ‘General PC Settings’ screen, scroll down your window to bottom and locate advanced startup. Click on the restart now button placed just below the advanced startup option. Windows 8 will begin restarting and take you to the advanced startup options menu.

- Click on Troubleshoot from choose an option screen and then advanced options button. Next screen will open with an option to begin Automatic repair. Once you click on it, Windows 8 will prepare automatic repair environment. In between, you’ll need to enter Administrator password for your account that you’re trying to repair.

Note: While performing automatic repair, your computer will restarts. So be calm and stay relax as it may take time, sometimes longer than expected.
Once automatic repair completed its intended tasks, you can see what it has already repaired and what it can’t. In case automatic repair can’t able to repair any problems, it’ll show you an option to shut down your computer or use even more advanced tools.

#2 Use System Restore
This is the second place you should look if automatic repair can’t find any problems. System restore works well if your PC run into unknown problems and can’t be repaired manually or by using third party tools. It’ll simply restore everything back to any previous date (known as restore point) when you know that the system was performing well. You can easily access this option from Windows 8 recovery environment.
Follow step 1 and step 2 as you did while accessing Automatic repair option to get to the ‘Choose an option’ screen. Now click on ‘Troubleshoot’ button and then ‘Advanced option’. Next screen will include ‘System Restore’ option, click on it to let windows prepare for restoring the system. You’ll reach to screen where you may require to enter administrator password. After entering the password, click on ‘Continue’ button and the system will begin ‘Restore’.

Click on the ‘Next’ button and wizard will comes with list of restore points currently available. Choose any date which you think that the system was working well. Be careful to check for ‘Scan for affected programs’ which becomes visible only after choosing any date to restore your system. It’ll simply list all the programs or updates which will be removed when you choose to restore your system at that particular instant of time.

If you’re satisfied with it and wants to continue, click on ‘Next’ to begin restoring your system to that particular date. Click on ‘Yes’ when the confirmation box appears to ask you about confirmation of this task.

After restoring process finished, it’ll display a confirmation box stating that the restoring process has been completed successfully.
Click on the ‘Restart’ button to restart your system and see if you may able to use your Windows 8 computer as before.
#3 Refresh or Reset your Windows 8 computer
Refresh or Reset option is introduced with Windows 8 computer to address almost any technical glitches and brings back PC to perfectly working state. These are the different Windows 8 healing method from the aforementioned and may involves pros hands to care of everything and make sure that you’re not running into any additional difficulties.
Refreshing Windows 8 computer will simply revive system from freezing, booting failure and similar difficulties without removing your apps (only apps that came with Windows 8 when shipped) and files. However, you’ll need to reinstall all your desktop apps customize your PC settings. So be careful while performing this step unlike the other two mentioned previously.
In simple terms, refresh will simply removes nearly all the minor or major problems with your operating system without making it as fresh it was before. From the ‘General PC settings page’, you can find the option to ‘Refresh your PC without affecting your system files.’ Click on the ‘Get Started’ icon located just below this option and windows 8 will begin refreshing your computer.

Next screen will simply contains each and everything you need to know about what happens if you choose to refresh your PC. Once assured, click on ‘Next’ and Windows 8 will perform refresh.

You’ll also need to insert Windows 8 installation or recovery media to complete this task as it’s not a standalone process. At that stage, if you don’t have any such media, consider borrowing it from your friends or make one by using different Windows 8 computer. Just few more steps after inserting the desired media and you’ll ready again to sign in with your Microsoft account and begin exploring your computer as before.
Note: List of removed apps will pop up as soon as the system restarts. Here you’ll get a detailed idea about which apps you may need to reinstall and later, perform one by one installation.
Unlike refresh, resetting your PC will simply remove everything from the system and make it as fresh as when shipped. You can adopt this idea too when thinking about disposing or selling out your Windows 8 computer as it’ll make you free from any trouble of your data from being stolen or misused.
Again, from the ‘General PC settings’ screen you can find option to ‘Remove everything and reinstall Windows’. Click on ‘Get started’ button and then ‘Next’ on the blue ribbon pop up message stating further details about this process. On the next screen, you’ll get two option just remove my files (quick method) and fully clean the drive (usually takes longer time than the first one). Choose any one based on your requirement and within moments, Window will restart and asks you to follow steps exactly as you did on the first time.

Surely, this isn’t a good idea when you wants your apps and data to be intact. However, if no other ways has been left or none of them working in fixing problems with your Windows 8 computer, adopt any of these two options and it’ll do the trick for sure.
Have you faced similar Windows 8 booting failure issues in the past and was able to recover from it using different method or tools, we would love to hear!!
Available link for download
Wednesday, November 2, 2016
How do I get my First job
How do I get my First job
My First Job
I think first job will be one of the best and memorable job for everyone. First job provides us with some bucks in our pocket which is hard earned and which can be spent free without fear of asking parents/siblings. Though the salary which I got from my first job is less, I enjoyed the job. My first job taught me many things and it exposed me to the corporate world.
I completed my graduation in 2009 and left my home in search of a job. This is the first time in my life leaving my native place for a long period. I went to Bengaluru, Karnataka for my job search.
Available link for download
Subscribe to:
Posts (Atom)