Showing posts with label repair. Show all posts
Showing posts with label repair. Show all posts
Monday, March 20, 2017
3 Possible Things You Can Do to Repair Hard Drive Bad Sectors
3 Possible Things You Can Do to Repair Hard Drive Bad Sectors
Traditional hard drive carries multiple mechanical parts which degrades over time and affect its standard operation. Hard disk platter is one such equipment which plays the crucial role in saving and transferring the stored data. Due to its magnetic nature, the surface of the platter starts wearing out more often than normal. Once the magnetic area of the hard disk platter becomes damaged, it can’t be used by the system to store further data as well as the existing data become corrupt or damaged. Damaged area on the platters are known as Bad sectors of hard drive which will result in data loss of that particular area.
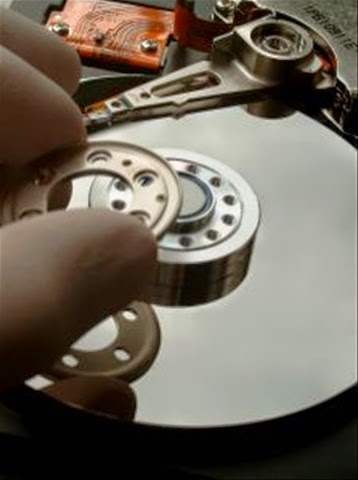
Bad sectors can also surfaced by physical damage delivered by dropping or throwing it on the floor. It is impossible to repair the damaged sectors physically, there are still some way out to repair it if the corruptions are logical (soft bad sectors) by running disk error checking tool in Windows or running disk utility in Mac. These utilities are designed to cooperate bad sectors smoothly so that it won’t hamper the saved data consistency and not damage its nearby sectors.
There are specially two types of bad sectors on the hard disk which may ends up in making your data corrupt or unreadable.
Soft bad sectors: Such problems arises due to software malfunction, read/write head problems which scratched the data area of the hard drive and makes data become unreadable by the operating system. These bad sectors are fairly common and can happen with hard drive of any age. The easiest possible solution to get rid of the soft bad sectors is by completely formatting or erasing the hard drive. Formatting will fill zero bytes on each and every sectors of the hard drive and make it ready to be used once again.
Hard bad sectors: Any mechanical problems with the hard drive itself can result in hard bad sectors. Such bad sectors has tendency to damage its nearby sectors and soon, makes the entire hard drive with loads of bad sectors enough for making it completely failed. Hard bad sectors can’t be repaired and the best bet is to copy/move all your data immediately and purchase another hard drive to continue using your system without any trouble. Using hard drive recovery software will not help at all in such circumstances as the drive already becomes unreable by the BIOS and therefore, recovery software too cant read it anymore.
Investigating Bad Sectors
There are few simple steps to find out whether your hard drive having bad sectors; however we suggest you to follow the extensive method of pin pointing the bad sectors on your hard drive.
Disk error checking: Windows have inbuilt utility that performs detailed analysis for files and folders and check for their consistencies. In case you’re experiencing problem with scan such as crashing, showing error while checking disk, freezing etc. , it might be a sign of failing hard disk as the bad sectors might preventing the normal operation of disk error checking operation.
Surface scan test: This test is performed on the hard drive with suspected with bad sectors symptoms. While checking, it’ll check and mark the bad sectors and use spare sectors to replace them.
SMART Tool:It performs the series of test on the problem hard drive and gives exact record of health status of problem hard drive including the bad sectors count.
Once you found that the hard drive has fairly large number of bad sectors, you should immediately start seeking for alternative options to repair it or replacing the whole hard drive (if your budget allows).
Repairing bad sectors
Bad sectors can result in major disaster and all your hard disk data soon become inaccessible. While it’s almost impossible to get back data from the damaged sectors, you can try repairing the logically damaged bad sectors so it won’t affect the remaining area of the hard drive.
Follow steps carefully mentioned below and see if you can overcome with any or all the bad sectors you may have found during scanning.
#1. Check Disk Utility
Microsoft Windows comes with an inbuilt disk repair utility to fix minor or major problems with the system such as problems with the volume, cross linked files, bad sectors, directory related errors and more.
You can run this utility directly from ‘My Computer’ > Windows Explorer or using elevated command prompt window. Below are the steps to run this utility from ‘My computer’:
- Open ‘My Computer’ by double clicking on it or directly press ‘window’ button + E.
- Right click on desired hard disk volume/partition and choose properties for which, you want to check errors. In case you are not sure which volume to select first, start by selecting any volume and if the problem is not resolved, follow the same procedure to check errors for another volume.
- On the Tools tab, click on Check Now button located under error checking section.
- Pop up window will open and ask you to choose the desired task to perform. Ensure that you’ve check mark the two boxes stating ‘Automatically fix file system errors’ and ‘Scan for and attempt recovery of bad sectors’.
- Click on Start to begin the scanning procedure.
Note: This utility wants exclusive access on the volume you’ve chosen to perform disk error check function. Also, the whole procedure may takes little longer time depending on the size of the targeted volume.
#2. Utilities provided from hard drive manufacturer
Famous hard drive manufacturer such as Western Digital, Seagate or Maxtor provide their own drive check utility such as Data Lifegaurd Diagnostics, Seatools for Windows and PowerMax.
These utilities were designed to perform error check function on the hard drive of only relevant manufacturer except WD Data Lifegaurd Diagnostics which generally detects hard drive from any manufacturers and attempt to repair bad sectors.
These utilities are fairly easy to use and runs in wizard based interface. Users with basic to advanced computer knowledge can efficiently use these tools.
#3. Disk Checkup from PassMark
It is a little different and comparatively easy to use utility which clearly draws barrier between normal and problem hard drive by executing tests based on the series of attributes. It comes with prebuilt SMART diagnostic tool which fetch all the required details from the hard disk and later, compares it with any normal hard drive which has nearly new or in perfect condition.
#2. Utilities provided from hard drive manufacturer
Famous hard drive manufacturer such as Western Digital, Seagate or Maxtor provide their own drive check utility such as Data Lifegaurd Diagnostics, Seatools for Windows and PowerMax.
These utilities were designed to perform error check function on the hard drive of only relevant manufacturer except WD Data Lifegaurd Diagnostics which generally detects hard drive from any manufacturers and attempt to repair bad sectors.
These utilities are fairly easy to use and runs in wizard based interface. Users with basic to advanced computer knowledge can efficiently use these tools.
#3. Disk Checkup from PassMark
It is a little different and comparatively easy to use utility which clearly draws barrier between normal and problem hard drive by executing tests based on the series of attributes. It comes with prebuilt SMART diagnostic tool which fetch all the required details from the hard disk and later, compares it with any normal hard drive which has nearly new or in perfect condition.
Available link for download

Thursday, February 9, 2017
How to boot repair or Flash Redmi Note 2 Prime Dual Sim 4G Model 2014912 with Flash tool Tested
How to boot repair or Flash Redmi Note 2 Prime Dual Sim 4G Model 2014912 with Flash tool Tested
This tutorial tested by me without any error some time we are flashing this device so many time take in flashing so we are search other tool for flashing and easy to flash this device from the many time i search but after many time i found other flash tool and i try this device in this tool so easy procedure easy or not was give many time for flashing so this tool with i have experience so here post new with different tool but here some different procedure from the before flashing tool this tool you can use if before post not success then you can use this tool if you want to first try use so dont worry because this is tested by me its very easy to flash and just remember of required for flashing if any issue in required from yours so first prepare to required after try in flash and we are mention which need to flashing in below and also must remember before use this tutorial which one first read all carefully this tutorial after try in flash because if you read tutorial then you can easy flashing this device this my own experience and must be working well micro USB cable if any issue in this then you cant connect device with computer or laptop also must be working device charging socket if any issue so also you cant connect with computer or laptop must be installed driver in your computer or laptop if not install in your computer or laptop then device not connect so you cant flash see below description about firmware.
If you want to repair your device, you can try to repair it by you.
You have to charge your battery with any charger and charged it by 70%, Your data is very important for you so it is good to do a backup of your data it may consist like your contact details, your important messages, your emails or any other important thing which you feel to be the backup in your device, this backup can be done on another device. we have to do the backup because after a format of your device, all your data will be gone and it will not be recovered. For backup in other devices you can use other external device like your hard drive, sd card or any other suitable devices. If you are doing by your own.do it at your own risk as we dont take any responsibility if your device is damaged.Required for flash:
- Redmi Note 2 Prime (Dual Sim 4G) Model : 2014912 device with well battery charged, and do not try with low battery
- Redmi Note 2 Prime (Dual Sim 4G) Model : 2014912 Stock ROM Firmware (tested) | Download Mirror-1, Mirror-2
- Redmi Note 2 Prime (Dual Sim 4G) Model : 2014912 USB (Flashing) OR Dead Boot Repair driver | Download here
- Redmi Note 2 Prime (Dual Sim 4G) Model : 2014912 Flash Tool | Download here
- Good Quality Micro usb cable
- Computer or Laptop
Procedure:
- First download tested Firmware, Flash tool or driver from above link (if link not working just leave your comment on below comment box i will soon fix it)
- Extract to all are zip files to desktop or as you like path (must be installed winrar software to Extract)
- Open Driver folder and choose Qualcomm_USB_Driver_Setup.exe file and wait until finish installation
- Open QPST.WIN.2.7_Installer-00430.1 folder and chose setup.exe file and open and install it
- Now open QFIL from the "C:Program FilesQualcommQPST in" path
- Tick on Flat Build option
- Go to Programmer Path and click on Browse.. button and choose prog_emmc_firehose_8916.mbn file
- Click on Load XML.. button and choose rawprogram_unsparse.xml file and second choose patch0.xml file from the Firmware folder
- Insert USB cable and wait until driver install
- After drier installed just Click on Download button and wait until finish procedure
- Congratulation you are done
Redmi Note 2 Prime Dead Boot Repair done Screenshot:

Available link for download
Tuesday, February 7, 2017
InDesign document corruption and repair suggestion
InDesign document corruption and repair suggestion
What is an InDesign file?
An InDesign file is creation of Adobe file systems, which is used to develop creative workflow such as Posters, Brochures, Flyers and books. Adobe InDesign is desktop publishing software released for both Mac OS X and Windows OS. During recent years, InDesign has gained much popularity due to rise in creative workflow & monitoring magazines, books and postcards etc.
The file extension of an Adobe InDesign file is denoted by .INDD
 |
A typical UI of an InDesignfile |
How to open .indd file on Mac?
A .indd file will be opened by an Adobe InDesign application and no other similar utility will help user launch this desktop publishing file. So, one has to download the Adobe InDesign to launch the file. The 30 day trial download of Adobe InDesign is available for both lines of OS. This download will help user read, edit and save an InDesign files on their respective system.
Uses of InDesign file
InDesign tool empowers user to be more creative in their work. It can also establish a link with its sibling software such as Photoshop & Illustrator.
Being a layout application, InDesign also facilitates both graphics (to be imported) & texts to combine creating layouts for printing. One can prepare Graphics in either Photoshop or Illustrator & then import them in InDesign for merging with text & layouts.
Adobe InDesign also masters professionalism by providing powerful text tools & style sheets to make typesetting operations much easier tasks.
Its ability to rapidly layout multiple documents like books, magazines, newspaper and catalogues makes it one of the most recommended utility for layout designing.
Compared to Photoshop, the InDesign lacks several power-packed features such as making color correction in a graphic.
Compatibility Issues with Mac OS X &InDesign file
Interestingly, InDesign and Mac OS X 10.5 didn’t co-operated well as the software would quit unexpectedly causing serious damaged & loss to the running file. However, the issue was fixed when Apple released the OS X update 10.5.4.
Later, InDesign software had a stable run on upcoming Mac OS X updates and works perfectly fine.
Corruption of .INDD file
Just like any other file is subjected to corruption, similarly an InDesign file is no exception. However, the application itself is robust and tries every possible method to save an InDesign file from corruption.
Frequent causes of corruption:
Software Conflict – The application conflict with the executable files of other apps causing the InDesign to malfunction.
Low Disk Space – Graphical software do require large amount of free spaces to run normally. In an event of low disk space the software might not get enough room to stretch its functionalities causing abrupt errors. Large RAM sizes are also a requirement for graphical tool such as InDesign Repair.
Viruses – Trojans & Malware have the ability to corrupt any media file including the .INDD file type.
Built-in Recovery of .INDD file:
Though, the software fails to protect itself from above mentioned causes of corruption, however, it possess some inbuilt methodology to safeguard itself. The ‘DocumentRecovery’feature can prevent damaged ceased by a computer crash or abnormal power surge.
Repairing the damaged .INDD file
Use Disk Management – To repair minor corruption in system, make use of Disk Utility. Sometimes, a damaged preference file could be fixed by running Disk utility, thus making indesign application to run without hassle.
Cloud Storage – Make sure you upload the Indesign file to a cloud service like Dropbox or iCloud itself. Upon any damage or system failure, you still be able to retrieve the file on a healthy system.
Updates – Allow automatic updates to save on Mac OS X regarding the InDesign application. At times, the update alone resolves the flaw of an running application on Mac.
To know more about resolving an corruption, follow the link http://helpx.adobe.com/indesign/kb/troubleshoot-damaged-indesign-documents.html
3rd party Software to repair InDesign file:
- Stellar Phoenix InDesign Repair for Mac
- RecuvaAdobe Indesign File Recovery
Both of the software helps users to repair/recover InDesign document on Mac as well as Windows system. Also free demo of the software available for trial, so you can check your luck with free software and buy it after surety of file repairing.
Available link for download
Thursday, February 2, 2017
CHKDSK How to Use This Evergreen Disk Repair Command in Windows 8
CHKDSK How to Use This Evergreen Disk Repair Command in Windows 8
Often times, we need to repair hard disks to overcome from various errors and problem that we might face almost every day. Check Disk utility in Windows is still a winner among various other free utilities provided from Microsoft that we use to check hard disk errors and repair them, even in Windows 8.
Previously, Disk Check utility comes with slight differences and limitations that may have lifted in Windows 8. Checking your hard disk in Windows 8 through CHKDSK command every once in a while will ensures healthy performance of your PC. You can use it anytime to deal with various problems such as improper shutdown, third party hefty software, file system corruption, disk structure corruption etc.
How to run CHKDSK in Windows 8
Microsoft has completely redesigned Check Disk utility in Windows 8 to meet the growing needs of user who found themselves incapable to deal with various hard disk issues such as bad sectors and blocks, freezing issues, automatic restart etc. Microsoft has also introduced Automatic Maintenance to run in the background and repair errors if it founds any. However, if you want to run check disk command at any particular instant or to address any particular issues, you can do so by following the steps below:
- Simply right click on any drive listed under ‘This PC’ window and choose ‘Properties’
- Navigate to ‘Tools’ tab and click on ‘Check’ button listed under ‘Error Checking’ rectangular box.

- System error checking process will begin immediately and will report any errors that it founds. In case, check disk utility don’t found any errors you will get a confirmation dialog box stating ‘You Don’t need to scan this drive’. Still not satisfied, you can proceed to perform disk error check by clicking on ‘Scan Drive’ button.

- Disk scanning for errors and corruption is faster than ever. The whole system check can be performed in minutes.

- Once the Scanning is completed, you’ll get a confirmation dialog box stating ‘Your Drive was successfully scanned. Now Errors were found. ’

- You can also choose an option to scan and repair drive together. This option is limited to Window default bootable drive containing your system files.

- You can also chose to repair the problem drive on next restart. Additionally, if the drive you’re trying to repair is default windows drive, Windows will ask to repair this drive on the next restart to make sure that nothing bad will happen.

- That’s it. Check disk utility perform well and helps you deal with any minor or major disk related errors or problems.
Steps to deal with disk related errors and problems
There are number of Disk related errors exist and one can happen anytime on your system. Some error sounds not that typical and can be dealt and fixed easily. However, most of the time not. Below mentioned are few particular type of disk related problems that may occur on your system:
A disk read error occurred
Disk Read or write error
A disk read error occurred. Press Ctrl+Alt+Del to restart.
Once such error strikes to your system, you’ll face freezing, interrupted shutdowns, slow system processing while accessing any files etc. Besides number of reasons that could cause this, first things you’ll need to do is to perform disk check. Follow the steps described above to check hard disk for errors and problem on your Windows 8 PC. In case you are using older version of PCs i.e. Windows 7, Vista, XP etc., you can still use the same operations except #1 (This PC was entitled as ‘My Computer’ previously).
To deal with such hard disk related problems, you’ll need to perform few others troubleshooting steps like testing your memory, replacing the problem drive, resetting or updating the BIOS etc.
If the above problems continue to exist even after following all the above troubleshooting steps, you’ll need to proceed with installing a fresh copy of Windows or even worse, have to format the drive completely. This could permanently delete files that you’ve stored on the problem drive or volume and will found no way back to restore it other using standard hard disk recovery tools provided by various software vendors across the globe, see some disk recovery tools here. It is specifically designed to handle data loss situations carefully and restore files with their actual names.
Benefits of using Disk Check Utility against various other disk repair tools
You may find number of tools designed to address disk related issues. These tools can check your hard disk for possible causes and may repair them immediately. However, you’ve to use such tools with caution as it may harm your computer and make the situation worse.
Running disk check utility provide no harms to your system whatsoever is completely safe. It’ll do no harm if no good. It’s also recommended that running check disk operations once in a while will make your PC functioning smoothly and avoid crashes or sudden system restarts.
Available link for download
Subscribe to:
Posts (Atom)