Showing posts with label hard. Show all posts
Showing posts with label hard. Show all posts
Monday, March 20, 2017
3 Possible Things You Can Do to Repair Hard Drive Bad Sectors
3 Possible Things You Can Do to Repair Hard Drive Bad Sectors
Traditional hard drive carries multiple mechanical parts which degrades over time and affect its standard operation. Hard disk platter is one such equipment which plays the crucial role in saving and transferring the stored data. Due to its magnetic nature, the surface of the platter starts wearing out more often than normal. Once the magnetic area of the hard disk platter becomes damaged, it can’t be used by the system to store further data as well as the existing data become corrupt or damaged. Damaged area on the platters are known as Bad sectors of hard drive which will result in data loss of that particular area.
Bad sectors can also surfaced by physical damage delivered by dropping or throwing it on the floor. It is impossible to repair the damaged sectors physically, there are still some way out to repair it if the corruptions are logical (soft bad sectors) by running disk error checking tool in Windows or running disk utility in Mac. These utilities are designed to cooperate bad sectors smoothly so that it won’t hamper the saved data consistency and not damage its nearby sectors.
There are specially two types of bad sectors on the hard disk which may ends up in making your data corrupt or unreadable.
Soft bad sectors: Such problems arises due to software malfunction, read/write head problems which scratched the data area of the hard drive and makes data become unreadable by the operating system. These bad sectors are fairly common and can happen with hard drive of any age. The easiest possible solution to get rid of the soft bad sectors is by completely formatting or erasing the hard drive. Formatting will fill zero bytes on each and every sectors of the hard drive and make it ready to be used once again.
Hard bad sectors: Any mechanical problems with the hard drive itself can result in hard bad sectors. Such bad sectors has tendency to damage its nearby sectors and soon, makes the entire hard drive with loads of bad sectors enough for making it completely failed. Hard bad sectors can’t be repaired and the best bet is to copy/move all your data immediately and purchase another hard drive to continue using your system without any trouble. Using hard drive recovery software will not help at all in such circumstances as the drive already becomes unreable by the BIOS and therefore, recovery software too cant read it anymore.
Investigating Bad Sectors
There are few simple steps to find out whether your hard drive having bad sectors; however we suggest you to follow the extensive method of pin pointing the bad sectors on your hard drive.
Disk error checking: Windows have inbuilt utility that performs detailed analysis for files and folders and check for their consistencies. In case you’re experiencing problem with scan such as crashing, showing error while checking disk, freezing etc. , it might be a sign of failing hard disk as the bad sectors might preventing the normal operation of disk error checking operation.
Surface scan test: This test is performed on the hard drive with suspected with bad sectors symptoms. While checking, it’ll check and mark the bad sectors and use spare sectors to replace them.
SMART Tool:It performs the series of test on the problem hard drive and gives exact record of health status of problem hard drive including the bad sectors count.
Once you found that the hard drive has fairly large number of bad sectors, you should immediately start seeking for alternative options to repair it or replacing the whole hard drive (if your budget allows).
Repairing bad sectors
Bad sectors can result in major disaster and all your hard disk data soon become inaccessible. While it’s almost impossible to get back data from the damaged sectors, you can try repairing the logically damaged bad sectors so it won’t affect the remaining area of the hard drive.
Follow steps carefully mentioned below and see if you can overcome with any or all the bad sectors you may have found during scanning.
#1. Check Disk Utility
Microsoft Windows comes with an inbuilt disk repair utility to fix minor or major problems with the system such as problems with the volume, cross linked files, bad sectors, directory related errors and more.
You can run this utility directly from ‘My Computer’ > Windows Explorer or using elevated command prompt window. Below are the steps to run this utility from ‘My computer’:
- Open ‘My Computer’ by double clicking on it or directly press ‘window’ button + E.
- Right click on desired hard disk volume/partition and choose properties for which, you want to check errors. In case you are not sure which volume to select first, start by selecting any volume and if the problem is not resolved, follow the same procedure to check errors for another volume.
- On the Tools tab, click on Check Now button located under error checking section.
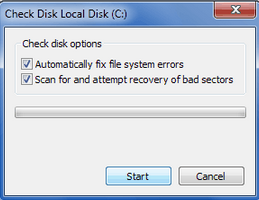
- Pop up window will open and ask you to choose the desired task to perform. Ensure that you’ve check mark the two boxes stating ‘Automatically fix file system errors’ and ‘Scan for and attempt recovery of bad sectors’.
- Click on Start to begin the scanning procedure.
Note: This utility wants exclusive access on the volume you’ve chosen to perform disk error check function. Also, the whole procedure may takes little longer time depending on the size of the targeted volume.
#2. Utilities provided from hard drive manufacturer
Famous hard drive manufacturer such as Western Digital, Seagate or Maxtor provide their own drive check utility such as Data Lifegaurd Diagnostics, Seatools for Windows and PowerMax.
These utilities were designed to perform error check function on the hard drive of only relevant manufacturer except WD Data Lifegaurd Diagnostics which generally detects hard drive from any manufacturers and attempt to repair bad sectors.
These utilities are fairly easy to use and runs in wizard based interface. Users with basic to advanced computer knowledge can efficiently use these tools.
#3. Disk Checkup from PassMark
It is a little different and comparatively easy to use utility which clearly draws barrier between normal and problem hard drive by executing tests based on the series of attributes. It comes with prebuilt SMART diagnostic tool which fetch all the required details from the hard disk and later, compares it with any normal hard drive which has nearly new or in perfect condition.
Available link for download
Monday, March 13, 2017
How To Hard Unbricked LG G2 All Variants Fix Qualcomm HS USB QDLoader 9006 mode
How To Hard Unbricked LG G2 All Variants Fix Qualcomm HS USB QDLoader 9006 mode
After Read This Guide You Will Fix These Situations.
No Recovery Mode.
No Download Mode.
No Boot.
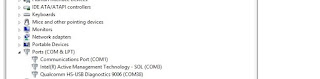
Showing Qualcomm HS-USB QDLoader 9006 mode In Device Manager.
Showing Unknown Device In Device Manager.
Require Tools.
Download Latest SRK Tool From Here
Qualcomm Drivers From Here
Now Solve This Problem.
Step 1.
If Your Phone Show Qualcomm HS-USB QDLoader 9006 mode in Device Manager You Can Skip This Step.
If Your Phone Showing Qualcomm HS-USB QDLoader 9008
And Any Another So Enter Your Phone In 9006 Mode By Follow These Instructions.
If Your Phone Are Not On Qualcomm HS-USB QDLoader 9006 mode So Follow These Instructions To Enter Into Qualcomm Mode.
a) Disassemble Your Phone
b) On Motherboard Navigate "eMMC" Chip. You Can See In Picture.
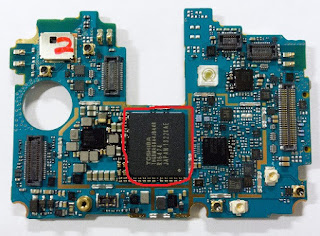
c) Now Connect USB With Battery Short Cut These Points With Cooper Wire That Shown In Picture Under The eMMc Chip.
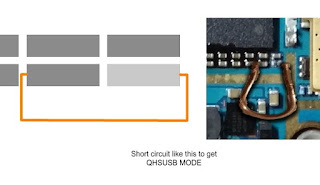
d) Now Your Device Shows In Device Manager As "Unknown Device" Then Install Drivers Which Given In Tools Section.
e) Your Device Will Shows Up.
Step 2.
1 : Download And Extract SRK Tool.
2 : Run SRK Tool.
3 : Press 4 Then 5.
4 : Select Your Device Model Number.
5 : Now Y For Yes, Then Again Y.
6: Then Disk Management Windows Pop-Up Then Select Disk Number Will Shows After Connecting Your Phone.
Note : Select Chose Correct Disk Which Shows lots Of Paritions.
7: Then Enter Disk Number.
8: Then Press Y And Wait
9: After Complete Your Phone Can Boot Into Download Mode.
10 : Then Boot into Download Mode And Flash kdz/tot File.
11 : Finished.... :)
7: Then Enter Disk Number.
8: Then Press Y And Wait
9: After Complete Your Phone Can Boot Into Download Mode.
10 : Then Boot into Download Mode And Flash kdz/tot File.
11 : Finished.... :)
Available link for download
Tuesday, February 21, 2017
How to Manage Hard Disk Partitions in Linux
How to Manage Hard Disk Partitions in Linux
A logical disk/partition is a logical division on the hard disk. The partition table stores the info about various partitions on the disk. In Linux system, one partition is required as a root file system and the second partition as swap partition. In case of large disk sizes, often you can find a partition that stores the kernel image, data needed by BIOS at BIOS and some other auxiliary files. This partition is mounted on location /boot and carries the information required at boot time.
About Fdisk: While Fdisk prints a partition table it matches the physical and logical start and end points. After verifying that those parameters are equal, the partition list is printed.
Fdisk is a text based utility to manage Linux partitions. It is also known as Partition table manipulator for Linux. Using the tool, you can perform various operations such as: viewing existing partitions, new partition creation, add a partition, partition deletion or modification. The utility let you create primary and logical partitions on the disk. The maximum allowed number of primary partitions is four; the number of logical partitions may vary according to disk size.
First create a disk partition, after that you can install your operating system. After you create a hard disk partition you should now use the format tool for formatting them.
To make Linux partitions, you can use the Linux fdisk or Linux cfdisk program. Using the Fdisk utility, you can create four primary partitions. Open command prompt, run fdisk command. To make changes to the partition table, first you need to issue the write (w) command. The Fdisk option ‘w’ let you to write the new partition table and exit. If you want to quit without saving changes then use the fdisk command with q option.
For a hard disk larger than 512 megabytes (MB), you have two format options. You can choose either FAT16 or FAT32 file systems. Using the ‘File Allocation Table’ file system, data can be stored/accepted/retrieved in the hard disk. In case of FAT 16, the maximum allowed space for a drive letter is 2 GB. In case of FAT 32, the maximum size of drives can be up to 2 terabytes and minimum 512GB.
Below given are some options with the fdisk command:
1 View partition:
# fdisk -l: This command will let you view all partitions on all the hard disks connected to your system.
The partition list will be displayed along with the device name.
If you want to view partitions on a specific device only then you can do by mentioning the device name along with fdisk -l command.
e.g. # fdisk -l /dev/sda
Here /dev/sda is the harddisk name
The Fdisk option ‘p’ lets you print the partition table.
Run the Fdisk command:
# fdisk /dev/hdb
Command (m for help): p
The above command will print the partition table.
2 Delete partition:
First delete all exiting partition using the command:
# fdisk -d
Now run the below command to create new partitions
# fdisk -n/dev/sda
Create a new partition: fdisk n
3 fdisk –s:
Let you view the size of partition
# fdisk -s /dev/sda7
-s partition let you print the partition size (in blocks) on the standard output.
4 fdisk Expert Command f:
You can enable or disable the boot flag for a partition.
While you delete partitions and create new ones. The partition order of the new partitions may get un ordered. You can ‘Fix the Partition Table Order’.
5 -b sectorsize: This option let you specify the sector size of the disk.
6 -h: This option let you print help and then exit.
7 -c: This option let you switch off DOS-compatible mode.
8 -C cyls: This option let you specify the number of cylinders of the disk.
9 -H heads: This option let you specify the number of heads of the disk. (Not the physical number, of course, but the number used for partition tables.) Reasonable values are 255 and 16.
10 -S sects: This option let you specify the number of sectors per track of the disk.
11 -u: This option let you view sizes in sectors instead of cylinders while listing partition table.
12 –v: This option let you Print version number of fdisk program and exit.
Note: While using fdisk command, perform the actions carefully and prejudicially. Because once you format or delete a Linux partition using the command there is no direct way to get the data back. Whether its accidental or intentional deletion, if you want to get you lost Linux data back you will have to run some Linux recovery software that let you scan your drive for the lost partition data and save the recoverable items at your desired location.
Available link for download
Monday, February 20, 2017
How to fix hard drive missing In Windows7
How to fix hard drive missing In Windows7
A Windows partition is simply a logical volume for storing data. There can be several scenarios when you can face the missing partition problem such as: while installing, re-installing or updating the Operating system.
Sometimes it happens that the partition is not visible to you (.i.e. missing partition) or you can see it but cannot access its contents (.i.e. inaccessible partition). Majority of Windows 7 users have to face this issue after they have reinstalled Windows 7.
In this article, I am going to discuss the way to fix “Missing hard drive/partition in Windows7”.
Hard drive partition can be missing/accessible/lost due to several reasons such as:
- Corrupt logical structure of the hard drive.
- Partition header corruption due to virus or malware
- Power surges while working on the system
- Partition corruption due to hardware issues
- Bad sectors in hard drive
- Bad RAM etc.
Consider one of the commonly faced problems with Windows 7 users: While installing the Windows 7 operating system, I have formatted my drives (named D :). I installed the OS then. But after the process is done, I cannot find one of my drives, it’s missing.
How to get it back?
Solution:
First check your disk status with Device Manager and ensure that everything is fine with drive, it’s not going to die soon. Simply, go to My Computer->Manage and Select Disk Management. This will enlist information about installed disks.
If everything is fine then go ahead with the next step.
Check whether the partition exists in "Disk Management" or not.
To do so:
- Open the Run dialog box by holding the “Windows” key & pressing the "R" key.
- Run diskmgmt.msc. This will open "Disk Management".
- Check if there is any partition without a drive letter
- If there is such partition then do:
- Right-click it
- Go to "Change Drive Letter and Paths..." > "Add" button --> Add --> Select the drive letter -->
- Finally Click OK.
See if this helps. If the problem still exists, opt another possible way for fixing the issue.
Fix the issue by running diskpart.
To do so:
- Open command window.
- Type diskpart and enter. This will open the disk partition manager window.
- In the command prompt window type list volume and enter. The output will be the list of hard disk volumes. There, type “select missing_volume(eg. D:/ drive)”. Hit enter.
- After selecting the missing volume, Type assign and Open my computer to check whether the drive is visible or not.
If the problem still exists, try changing ‘partition Drive Letter and Paths’.
To do so:
- Go to> Control Panel> select ‘All Items view’ > Administrative Tools> Computer Management
- If the UAC window prompts, select ‘Yes’.
- Close the Administrative Tools window.
- From the left pane go to Storage> Disk Management. Here, all connected hard drives and partitions will be shown. From the enlisted partitions, choose the missing one.
- Click ‘Change Drive Letter and Paths’.
- Click Add
- Click ok
You can also open Disk Management by running diskmgmt.msc command.
To do so:
- Go to start > search bar> run diskmgmt.msc command. The Disk Management interface will be opened.
- From lower half of your disk management interface, select Drive without any drive letter.
- Now choose the option “Change Drive Letter and Paths”.
- Click the Add button. Choose a drive and click OK to assign selected drive letter.
- Now restart and check whether the missing drive is shown or not?
If you are still not able to access your Windows drive data then, try using standard hard drive partition recovery tools. These software are a kind of Do-It-Yourself utility that can scan your windows for the missing hard drive partitions and let you recover the data back along with the lost or inaccessible partitions. If the lost partition isn’t shown in the scan result, you will not be able to recover it. Try out various software, opt the one that provides the best results. If still nothing helps, No Good luck then! Your drive might be beyond recovery. You may require sending it to some professional recovery company that can anyhow recover your lost data and send it back to you. er
Available link for download
Sunday, January 15, 2017
How To Recover Data From Corrupted Hard Disk USB Drive
How To Recover Data From Corrupted Hard Disk USB Drive
Requirements
MiniTool Power Data Recovery
Download From HERE
For Instruction Follow This WebSite
https://www.powerdatarecovery.com/powe
Dear sir/madam,
Thank you for participation. Following is the license code
======================================================================
Product name: MiniTool Power Data Recovery
License Code:
OGQxMTQwZmItZTJlNjFlNmYtZGM5ZTUzNWEtNWMwZGFiNjMtZDdlNDI4MmUtZDJmN2IyZDQtZTIzZjkxYTI=
License type: Personal License
Available link for download
Saturday, January 7, 2017
Fix External Hard Drive Error The Disk Structure is Corrupted or Unreadable in Windows 7
Fix External Hard Drive Error The Disk Structure is Corrupted or Unreadable in Windows 7
External hard drive are more popular these days because of their portability and availability in verity of sizes (still growing). It offers flexibility to carry large amount of data as well as helps you restore data if the primary location becomes inactive or seriously damaged. However, at times, external hard drive itself becomes inaccessible or prevent users to access the stored files. Be it virus infection, directory structure corruption, file system damages etc.
Once such external hard drives holding GB’s of valuable stuff, you may become panicked and frustrated as you’d have no idea about how to deal with such problems. Disk Structure corruption is yet another common error that comes whenever you tries to access your external hard drive and prevent users to access or copy the stored files.
As all of your files were stored there, formatting will permanently wipes your important files and make it permanent non recoverable even by using professional recovery tools. We’ll go through series of steps mentioned in this tutorial to fix this error easily (if you are lucky) and retrieve all of your important files as well as make the external drive usable again.
Below are the common error types you’ll see once similar situation strikes to your external hard drive:
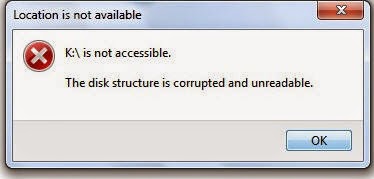
Error 0x80070571 : The disk structure is corrupted or unreadable
This disk in the drive is damaged
Please format this disk!!
The Drive isn’t accessible
The disk in drive is not formatted. Do you want to format it now?
Common reasons behind this error
External hard drive is created using moving mechanical moving parts which will may fails either sooner or later. Some unavoidable instances makes these drive inaccessible or damaged immediately and makes user data beyond the reach of known recovery software. Below are the some common reasons responsible for this situation:
- Improperly connecting or removing the drive
- The file system itself become damaged cannot be used to access the drive
- File system has become RAW which cannot be used any longer to access, manage or format the drive. In most instances, those drives becomes completely unusable.
- Large number of bad sectors and blocks has been emerged which prevents externally drive to perform normally. You’ll get freezing, hanging, corrupt files or similar issues when bad sectors took place on your drive.
Troubleshooting steps
As the drive is going through serious damages, there is no guarantee that any specific or subsequent steps could help you fixing the problem. However, let’s follow the standard procedure to deal with this error and see if we may able to resolve it:
- Right click on My Computer and choose Manage.
- Enter administrative details if asked and hit enter
- Go to Disk Management located under Storage at the left hand side menus.
- From the image below, check and make sure that any or all the volumes is listed along with the drive that’s connected externally. If you’ve recently faced the above mentioned error, you’ll see the volume status as RAW or offline
- Right click on that drive and choose to format it. As stated earlier, formatting will permanently wipes off all your important files and folders and your hope to get it back ever.
- Alternatively, you can right click on the external drive from Windows explorer interface and go to its properties.
- Choose the Tools tab and hit enter after selecting the check box stating ‘Check this disk for errors’.
- Once the operation completed successfully, try restarting your system and see if the error resolved.
Nothing helps, still can’t able to retrieve files?
Many times, the error will continue to persist even after following all the troubleshooting steps carefully. Additionally, nothing matters except your precious files that still clicking somewhere on your hard drive, right?? Don’t worry, as we are covering up some really useful utility that helps windows enthusiasts in getting back their data from various crucial situations of data loss like above.
Stellar Phoenix Partition Recovery is a life savior utility that can easily detect drives (both internal and external) going through serious damages and later, allows you to safely restore all your important files. Download the software from here and install it on your PC. Once installed, start the software from the desktop or installed software location. Make sure the drive is connected properly and shown in the software interface.
This tool offers powerful recovery options to recover data even from the severely damaged or inaccessible drives. As talked in the situation above and if the problem drive status is shown as RAW, you’ll still be able to recover data from RAW drives using this efficient partition recovery tool.
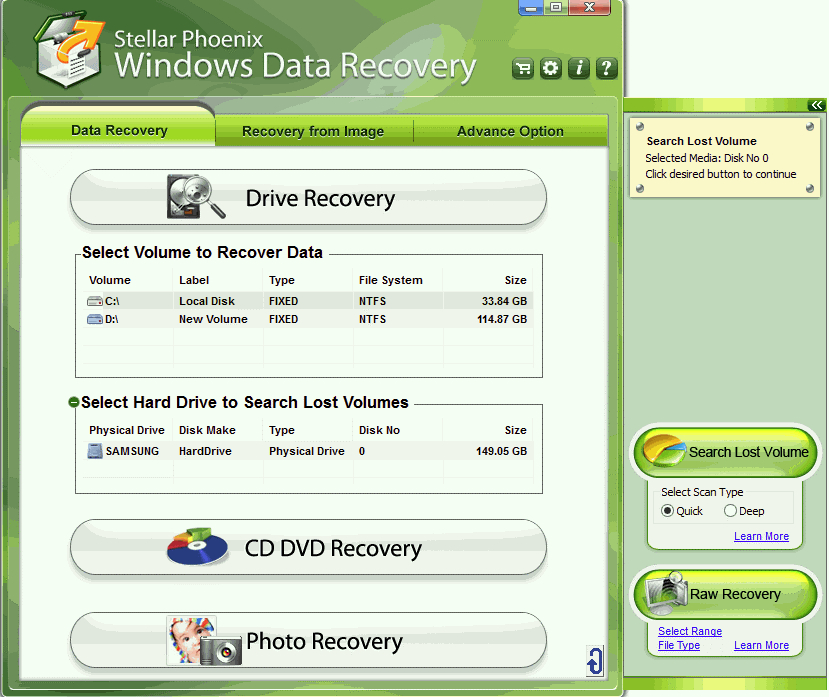
Click on the problem drive, listed under ‘Data Recovery’ > ‘Drive Recovery’ tab. The subsequent recovery methods will pop up as soon as you click on any particular drive or volume. Choose ‘Advanced Recovery’ from the available methods and let the software scans your drive completely (do not stop scanning at mid). Don’t panic if the software is taking too long to scan your problem drive. It may also possible that sometime the whole system freezes and needs you to restart the it. That’s because of the data recovery tools limitations and drive nature (RAW status) which takes really tough luck to getting detected on the system and recover data off the drive.
Once the scanning is completed, you’ll be able to see preview of any or all the recoverable files and folders using the preview pane, located at the top right corner. Chose or select desired files for recovery and click on Recovery button. Make sure that you’ve activated the software before start recovering your files as saving is disabled in demo version.
Do let us know your feedback or your particular situation if the error still persists!!
Available link for download
Tuesday, December 27, 2016
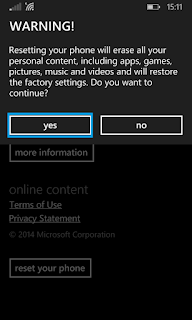
How To Hard Reset Nokia Lumia 520
How To Hard Reset Nokia Lumia 520
Nokia Lumia 520 hard reset Windows Phone 7
1. Turn off your Windows phone 7 .2. Press and hold the Volume down and Camera keys.
3. Press and hold the Power key.
4. When you feel the phone vibrates, release the power key, but keep pressing the volume down and camera keys, until the phone reboots. All data will be lost!
Nokia Lumia 520 hard reset Windows Phone 8
1. Turn the power Off.
2. Press and hold the Volume down and connect the charger or the USB cable with PC, for about 8 seconds, you will see anexclamation mark (!) on the screen. Note: If you do not press any of the following keys, then the phone wp8 will starts boot normally.
Then press the keys in this exact order:
1. Volume up
2. Volume down
3. Power
4. Volume down
The phone will reset and restart. Please note this may take a few minutes.
All data will be lost!
Factory Reset Nokia Lumia 520 from the menu
On the start screen Scroll down to the bottom of the screen. Tap the arrow icon.
- On the Start screen, tap
 .
. - Tap Settings > about phone.
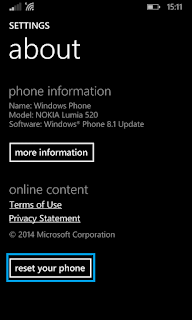
- Tap reset your phone, and then tap yes and again yes.
Available link for download
Sunday, December 4, 2016
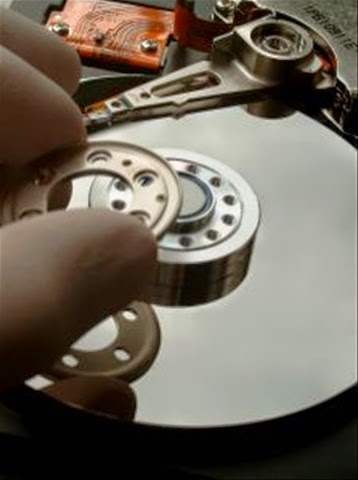
How to Recover Files After Hard Drive Reformatting
How to Recover Files After Hard Drive Reformatting
Hard drive usually stores all the user data and operating system that allows user to read, write, access or share information with other users or group. Sometime, when hard drive error blow in or malware spread among PC, users needs to format their partition or whole hard drive in order to make it fresh or bug free. However, formatting will erase all the hard drive data and make it like a brand new as you use it at the very first day. Though, deleted files from hard drive or similar storage devices werent deleted permanently and likelihood, you might able to reconstruct the deleted data back to its previous condition with the help of hard drive recovery program.
 |
| Image Credit : Livingstudios |
Formatting will only erases the address location or pointer of files situated in the hard drive and actual data will continue to exist in the hard drive till its not written over with different files. So, its highly recommended to avoid using the problem drive till you successfully reclaimed deleted or formatted stuff. Remember, formatting or reformatting will not change the status of deleted files or overwrites data, so beware if you think that reformatting will wipes off your data from the hard drive to let you safely dispose it off.
Note: Formatting done using command or in GUI mode, the source data will continue to exist in the storage media and file system will stores record of it into Master File Table (MFT).
Why hard drive needs to be formatted?
At many occasions, hard drive throws list of errors and ask users to format before they can use it. The same error would continue to arise till the formatting is done. It happens usually because of bad or failing hard drive components like platter, heads, PCB or firmware, virus/malware outbreak, power surges, human mistakes etc.
When hard drive faces any of the situations mentioned above, itll start to throw errors or performs abruptly. The following symptoms will help you discover that hard drive suffers from serious errors and needs to be replaced.
1. Operating system not found
2. Hard Drive Goes Bad, Backup and Replace
3. Booting media failure
4. Disk Read Error
5. Non system disk or Non Booting Media
How Hard Drive Recovery Program Works?
Professional hard drive recovery utility will deeply scan hard drive up to the mark and find all traces of deleted documents from all over the hard disk platters. These disk recovery software is built using special technique and runs only in read-write mode to protects deleted stuff from being overwritten and recovers the original data as its in previous state.
First of all, youll need to use different PC or Laptop to scan and recover data from the problem storage media. You can unplug the problem device from the computer and connect it externally using IDE/SATA cable. Data recovered from the problem media should be saved on the targeted PC to prevent overwriting of deleted files.
Getting your data auspiciously recovered through using hard drive recovery programs?
Once you downloaded and installed hard drive recovery software on your PC, double click on its icon from the desktop to start it. Recovery program has simple Do-It-Yourself recovery wizard and makes your data recovery process lot more easier.
Recover programs should have hard drive recovery option or similar at the home screen where itll automatically list the discovered storage media. Most probably, there youll find your problem media listed along with drive name, size and status information.
Once you click to choose any specified media, recovery options will pop up like Quick Recovery, Advanced Recovery (FAT or NTFS) , Deleted File Recovery, RAW Recovery. All options have unique capability to search and find traces of deleted files within the specified storage media. You just need to select any one of them and start scanning the media. Depending on the drive size or level of corruption, scan process will takes time and soon flashes the scan results.
Navigate to your deleted or formatted media along with a red cross signs to it. Check mark the box and hit on Recover button to recover any or all your stuff at once.
Thats it. Recovering precious files is never been easier but the moder techniques and growing advancement in data recovery industry lets user overcome from the troublesome situations without needing any professional help.
Available link for download
Tuesday, November 15, 2016
How to Declutter and Revive Your Mac Hard Drive Back
How to Declutter and Revive Your Mac Hard Drive Back
While working on Mac, all of a sudden a dialog box starts appearing on your screen: Your Startup Disk is full. Its the final confirmation of what youve been afraid off - your hard drive has finally ran out of space and now you will have to do something to overcome it.

The question arises, how to make space on HD?
When you started up your shiny new Mac for the first time, you might have thought about the hard drive space although you were confident that it won’t ever fill it up. But, now after few months you have filled every troy of your hard drive capacity.
No need to panic, because here we will discuss every feasible measure to solve this problem. This will help you to identify the causes of rapid filling up of your hard drive, plus discover which files causes disaster on your drive. Let’s discuss some tips which will help you to recover some free space on your Mac drive. Reviving a Mac hard drive is quite simple process, but not a short one. If your hard drive space is vanishing or getting filled rapidly, then you need to know the consequences which make your hard drive fill up to its capacity.

How Hard drive space get consumed.
User install a fair number of applications on their Mac, some time just to try them but forgets to uninstall them during their busy day schedules and thinking that hard drive space would last forever. This thing may eat your few gigabytes of space easily. Where as files downloaded via browser or an email attachment pile ups on your hard drive, but yet again more Gigabytes of the drive are gone.
Moreover, Users personal files like photos, videos are the biggest drains on your hard drive space. Every 10 megapixel photo consumes about 4MB in JPEG format, which makes around 400MB to 1.5GB of space for storing 100 photos on your hard drive. The average one hour HDV video holds 13GB of data , so its better not to keep on pilling your videos on your hard drive.
Its not over yet, iTunes library can consume plenty of space on your hard drive with your music collection, podcasts, movies and TV shows. You will be surprised to know that duplicate files existing on your hard drive consumes enough space but if it’s of small size then you need not to bother.
Activity Monitor plays vital role in analysing the application which are consuming space on your hard drive. Some programs automatically starts up when you log onto your Mac. Check Login items in System Preferences so that all the listed app are of use and needed. If not then just select it and click the minus (-) sign.

Ways To Revive Space Back on Your Mac Hard Drive.
Uninstall Unwanted Apps:- Like Login items, through Application folder you can uninstall anything which is no more useful to you. It wont fasten up your Mac but it will reclaim your hard drive space back. You can simply uninstall application by dragging and dropping them to trash.
Check For Some Maintenance:- You should check whether your hard disk is fine or not. To diagnose simply run Disk Utility (in Applications > Utilities) to verify and repair disk permissions. This helps in determining which app can do what with files on your Mac. It also verify and repair the disk itself.
Troubleshoot you Battery and Memory:- If user owns a Mac notebook and having problem with the battery. If you want to get longest life of your battery, fine-tune it so that it gives optimal battery life out of it. If your draining rapidly, then its a warning. You need to reset the SMU or PMU. Some problems are resolved by resetting your Macs PRAM and NVRAM.
Reclaim Your Hard drive Space Back :- While you are cleaning your hard drive, try to figure out exactly which app is taking most of your space on your Mac with a visual tool that will represent everything on your hard drive for example Disk Inventory it creates a “tree map” of hard drive and will reveal all the files on your hard drive. So with help of such tool you can delete the unwanted files and can get back free space on your hard drive.
Empty Your Trash :- User must delete unnecessary or duplicate files from their Mac systems because these files contains same content and waste the precious disk space, user must give a check on such kind of files and should not forget to empty the trash.
It will help in getting back the disk space.

Delete Unused Languages Drivers:- If your startup disk is full? Then you must check whether your system (Mac) speaks too many languages. User must keep languages of its use only and should remove the unknown languages. By doing this user can save around 3 GB of disk space, but be warned because getting back those deleted languages files is not an easily reversible process.
These were few tips which can help user to regain some free space back, whereas there are many tools which can help users to clean their cluttered Mac OS X.
Third party tools that can help clean a cluttered Mac OS X :–
- Stellar SpeedUp Mac
- Clean My Mac
- DetoxMyMac
- MacKeeper’s ‘Mac CleanUp
These steps are all well and good to keep your Mac optimized and running smoothly, and do run periodic cleanups like these to get everything back at their respective top shape.
Available link for download
Friday, November 11, 2016
Causes Fixes Prevention of Bad Sectors in Your Hard Drive
Causes Fixes Prevention of Bad Sectors in Your Hard Drive
A sector in a hard drive platter is a small cluster or area where actual data is stored. Normal hard drive can have from 1 to 6 platters and a single platter can have over millions of sectors. Including platter, any hard drive will also have heads, spindle motor, firmware, PCB etc. responsible for its smooth functioning. However, being an electronic device, hard drive may have one or more failing mechanical equipments which gives birth to data inaccessibility, permanent hard drive failure or system startup failure etc. After which, one may not able to retrieve the stored content as well as permanently looses accessibility to their system.
Bad sectors on the hard drive platter could be developed throughout its lifespan which may make OS unable to read or write information on that particular section. Moreover, bad sector would stress the read/write head of hard drive and causes subsequent delays in accessing the memory/information. As a result, hard drive will start failing, throwing system freezes or sometime gives black or blue screen of death (BSOD).
What causes bad sectors?
Sector is usually a block of information stored on the hard disk and having standard size of 512 bytes. These sectors can easily become bad due to imperfections of this real world. Though, you can found some most common causes which contributes heavily towards building bad sectors and blocks on the hard drive platter,
- System infected with Virus / Trojan / Malware – Any malicious computer program can physically harm your computer and damage surfaces of the platter or inject wrong information on the sector. However, Some DOS attacks were used to misguide operating system to treat sector as bad even if they werent.
- Abnormal Shutdown: Not properly shutting down the PC may results in wrong positioning of read/write head which tends to move around the platters when system is running. Sometime, sudden system shutdown due to power failure could make platters to get in contact with the read/write arm and damage that area called sectors.
- Power Surge: Improper power supply or not using the reliable electricity medium causes hard drive equipments to be overheated sometime and thus, damages the magnetic area around the hard drive platter.
- Aging Equipments: Being an electronic device, hard drive equipments may start wearing out and bad sectors were created over time. As this process seems bit natural and depends on the overall hard drive age, these cases are least considered but worth checking.
- Faulty Heads: Heads plays crucial role in retrieving or storing information on/from the platter. It keeps rotating over platter without making contacts to the platter but when it does, produces bad sectors. Shaking or moving hard drive while any ongoing operation could make the head to get in contact with the platter and again, produces bad sectors.
- Manufacturer faults: Bad supplier or low quality manufacturer could deliver hard drive with poor quality equipments which reduces overall lifespan of your hard drive. Bad sectors were developed quite frequently on hard drive with bad equipments. Most often, bad sectors were already created when the drive is first manufactured.
Once the bad sector is developed, it starts damaging nearby sectors and soon make your whole hard drive with thousands of bad sectors. You can use various hard disk checker utility like S.M.A.R.T. To check hard drive for bad sectors as well as other crucial parameters like spin rotation, heat, equipments status and many more.
Type of Bad Sectors
There are usually two types of bad sectors took place in modern as well as traditional hard drives:
Hard or Mechanical or Physical are the one caused by heads after coming in contact with platter surface of the hard drive. For ex, if the computer is bumped or dropped while reading/writing data from/to the disk would make hard drive heads to crash or damage the area. Extreme heat, faulty heads, dust or other ageing equipments could also contributes heavily towards hard bad sectors.
Once the hard bad sectors is created, it can only be prevented, neither removed or reformed. Best bet is copy/save all your important stuff into another hard drive and replace the drive as soon as possible to stay away from various catastrophic data loss situations.
Though, if your hard drive fails due to hard bad sectors and youve lost any or all your important data, using data recovery services would be the last hope. Highly cleaned room with skilled equipments where special treatments were used to carefully open hard drive equipments and recover data from the storage area.
Soft or logical bad sectors are less drastic and delivers minimum harm to your PC or the stored data. It is created when an error correction code of a sector cant verify the content of the same sector due to virus/threats injection on the BIOS section, improper system shutdown or directory structure corruption.
Soft bad sectors can be repaired by using low level formatting (quick format) or disk check/repair tools which fills zeros in all the soft bad sectors. Disk wiping process is pretty effective and completely removes soft bad sectors around the hard drive, however you might permanently lose the stored data and data recovery isnt possible even by using professional recovery program.
How to repair bad sectors?
There are choices to repair bad sectors by using either inbuilt utility or software provided from third party. As there is no guarantee of repairing bad sectors, you can still try any of the options mentioned below.
Using Inbuilt Utility
Various inbuilt check disk utility is available to check hard drive health status or any running issues and repair them immediately. Microsoft provided this utility for free of cost with Windows to help troubleshoot file system errors, scan and fix bad sectors found around the hard drive.
Running check disk utility is completely safe and doesnt harm overall functioning of your PC. As check disk utility will perform scan and recovery concurrently, this process might takes time little longer than usual.
Heres how you can start check disk utility in your PC:
- Double click on My Computer from the desktop or press window button + E.
- Right click on the desired drive you want to check and choose properties. Note:You cant check and repair all the drive at once.
- From the opened properties window, select Tools tab and click on Check Now.
- Check disk box will open containing options like Automatically fix file system errors and Scan for and attempt recovery of bad sectors. Mark both the options or can leave the first one only if you wants to check only hard drive for bad sectors and repair it.
- Click on Start to initiate check disk operation.
- Enter administrator password if requested and click OK.
- Wait for sometime and then restart PC once the operation is completed successfully.
Using third party software
Spinrite is a professional hard disk check and repair utility suitable for all the latest Windows operating system and works effectively on FAT, NTFS and Linux formatted volume. The software is self explanatory and requires simple steps to boot from DOS environment and repair almost any kind of bad sectors.
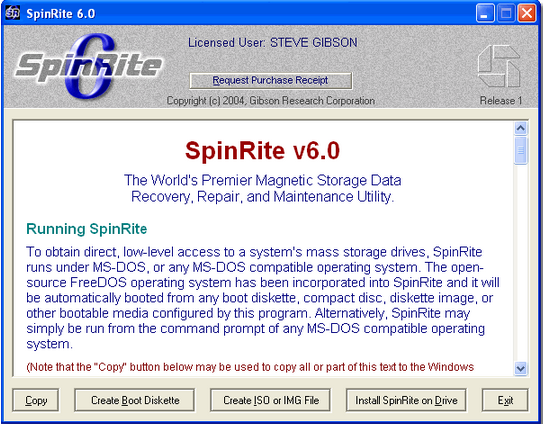
Note: Spinrite could costs your around $ 89 USD.
Preventing bad sectors in future
Below are the precautions steps you could take to avoid bad sectors from being developed around your hard drive,
- Use inbuilt disk defragmenter utility to stabilize operations and reduces stress from heads. Run this utility at least once or twice in a month or schedule it to run periodically. It also helps in managing disk spaces and thus, reducing overall burden from the heads.
- Always use, professional and recommend anti virus software to keep your system clean and malware free.
- Avoid bumping or throwing during ongoing operations.
- Use system in cooled and dust free environment.
- Use standard cables or connecting media for longer durability.
- Use proper shutdown or standard way to turn your system off. Use UPS or similar power backup devices to make sure that you always have enough time to safely shutdown your PC when the power is absent.
- Running OS repair utility could also shorten the occurrences of bad sectors around the hard drive.
Have you found bad sectors in your hard drive or planning to check, what utility youre using or the way youll recommend to repair bad sectors? Dont forget sounds all this using the comment form below.
Available link for download
Tuesday, October 4, 2016
A Look Into Causes Of Hard Drive Crash And Possible Data Recovery
A Look Into Causes Of Hard Drive Crash And Possible Data Recovery
We all are well aware that Hard Disk drive is a storage device used for storing and retrieving digital information using rapidly rotating disks known as platters coated with magnetic material. A HDD preserve its data even when it is powered off or not in use. Data is read in a random manner that means particular single blocks of data can be stored, retrieved or accessed in any order somewhat sequentially.
It consist of one or more hard swiftly rotating platters having magnetic heads, arranged on a moving actuator arm to read and write data to the surfaces.

What is a HDD Failure ?
A hard disk drive failure occurs when the drive malfunctions and the stored information cannot be accessed with a properly configured computer. A disk failure may also occur in between of normal operation, or due to an external factor such as exposure to fire or water or high magnetic fields, suffering a sharp impact , environmental contamination which leads to a head crash.
Causes of the HDD Failure
As discussed above, the most notorious cause of hard-drive failure is the head crash. The internal read-and-write head of the device usually just flying above the surface touches a platter, or scratches the magnetic data-storage surface. A head crash leads to severe data loss and data recovery attempts may cause further damage if not done by a specialist with proper equipment. Hard-drive platters are coated with a very thin layer of non-electrostatic lubricant, so that the read-and-write head will simply rebound the surface of the platter so that a collision occur.
Whereas, this head Flickr only nano-meters away from the platters surface which confirms the risk of collision. Another cause of failure can be a defective air filter. The air filters regulates the atmospheric pressure and moisture between the hard-drive cage and its outside environment. If the filter fails to catch a dust particle, then that tiny dust particle can cause a head crash if the head reach over it. After a hard-drive crash, each particle from the damaged platter and head media can cause a bad sector. In such cases, it may be possible to recover all data.

Types of HDD Failures:-
As discussed above, the most notorious cause of hard-drive failure is the head crash. The internal read-and-write head of the device usually just flying above the surface touches a platter, or scratches the magnetic data-storage surface. A head crash leads to severe data loss and data recovery attempts may cause further damage if not done by a specialist with proper equipment. Hard-drive platters are coated with a very thin layer of non-electrostatic lubricant, so that the read-and-write head will simply rebound the surface of the platter so that a collision occur.
Whereas, this head Flickr only nano-meters away from the platters surface which confirms the risk of collision. Another cause of failure can be a defective air filter. The air filters regulates the atmospheric pressure and moisture between the hard-drive cage and its outside environment. If the filter fails to catch a dust particle, then that tiny dust particle can cause a head crash if the head reach over it. After a hard-drive crash, each particle from the damaged platter and head media can cause a bad sector. In such cases, it may be possible to recover all data.
Types of HDD Failures:-
Operating system crash and a hard drive crash both are different from each other
If your are using Mac, Windows or Linux and your operating system crashes then it is called as a Logical Failure.
And, If your hard disk is not functioning properly or having some physical issues and if hard drive itself malfunctions, then such situation is known as Physical Failure.
In both the ways the data is not easily accessible but still present on the hard drive.
Of course, you should have a backup or an image of your computers hard drive and if you dont have backup, still there is hope to get back precious Gigabytes of data through a data recovery solution.
The best way to prevent damage from a hard disk crash is to take a cautious approach and back up the data stored on the drive.
Logical Failure:- Logical failure is when your computer BIOS can identify your hard drive but unable to access it then this sort of failure is known as logical failure. It may not be able to mount the partition or Operating system can simply report that no drive is present at all. In a logical failure the hard drives electronic and mechanical components are all working properly. But the failures occur due to defective media/bad platter or data corruption.
In some cases of logical failure a hard drive that rotates fine, but is not even recognized by the computer’s BIOS as being present.
Almost all logical failures can be retrieved without opening the hard drive. Whereas there are a number of logical data recovery software programs available in market. But, its important to know why your drive had a logical failure before you proceed further to recover your data.
Physical Failure?
A physical failure is any time a drive can not be accessed because of electronic malfunction or internal hardware failure.
These failures results as drive being not recognized by the computer’s BIOS or operating system, as well as repetitious clicking or grinding noises. If your hard disk is producing such kind of unusual sound, the you must power off your PC and don’t attempt to use it again until you sent your HDD to a recovery center.
The noises which a hard drive is producing is due to a head crash. A head crash happens with the arms that read the data on the surface of your hard drive’s platters smash into the rotating platter instead of gliding across it on a cushion of air like they are supposed to.This results in physical damage to that platters and can cause a complete and permanent data loss.
The only way to recover your data after a physical failure is to either replace the damaged hard drive integral or move the data platters to a donor drive where they can be recovered to a stable destination drive. This kind of recovery process is performed in a cleanroom with a special handling.

Hard Drive Failure – Resolutions.
It is not easy to fix a damaged Hard Disk Drive, there are a number of things that you have to look into when it comes to hard drive recovery. This is because hard drive problems could involve issues with the logical and physical areas. Damage on the electronic circuit board can leads to hard disk problems. Some cases of hard drive failure requires several years of experience on hard disk recovery. Consulting a hard disk recovery expert is the best way to get back your data. You will have to pay for the hard disk repair service. But if you are going to think about it, paying the services of an expert is more sensible than threaten the condition of the device and data. The hard disk recovery expert will go through the condition of the device first. He will determine if the damage is still within control and if the data can still be retrieved or not.
You Can try following mentioned Free data Recovery Tools
1) TestDisk(Windows/Mac/Linux)
2) Recuva(Windows)
3) PhotoRec(Windows/Mac/Linux
4) Restoration(Windows)
5) Undelete Plus(Windows)
Available link for download
Subscribe to:
Posts (Atom)