Showing posts with label guide. Show all posts
Showing posts with label guide. Show all posts
Wednesday, February 8, 2017
LG G4 H815 Android 6 0 Marshmallw Flash guide here
LG G4 H815 Android 6 0 Marshmallw Flash guide here
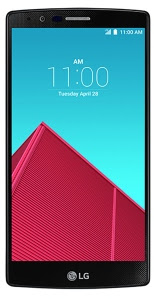
This Firmware file you can use this flash file when your device hang on logo problem, restarting problem, security lock problem, password lock problem, pattern lock problem etc software related problem and you can use this tutorial without any box and this is free for all who know about software in mobile, impotent for flashing first must check your micro usb cable if not good then you cant flash it so check micro usb cable second check your device battery that is impotent for flashing if your device battery low so stop your device between flash so this is impotent for flash, before you flash save your data like contact, photos, videos etc because this is factory flash file so you cant save after full flash so must remember all are impotent notes.
Download Link
LG G4 Firmware or Flash tool Download here
Required for flashing:
1. LG G4 device with good battery charged2. LGH815V20A 6.0 Firmware
3. Lg Flash Tool
4. LG Drivers
5. Micro usb cable
6. Computer or Laptop
Procedure:
1. Download firmware or flash tool from above link (if link not working just write down comment on below comment box)
2. Extract to both files to desktop or as you like path (must be installed to winrar in your computer or laptop)
3. Turn off device if your device on
4. Press and hold both Volume keys and Connect Micro usb cable screen will show Download Mode
5. Update the driver if not installed in your computer or laptop
6. Open LG Flash tool 2014
7. Choose CDMA option from Select Type
8. Choose CS_EMERGENCY option from PhoneMode
9. Click on Select KDZ File and choose H81615xxx_00.kdz file
10. Click on CSE Flash button (See below image for more know)

11. Now open second windows screeen
12. Click on Start button (see below image)
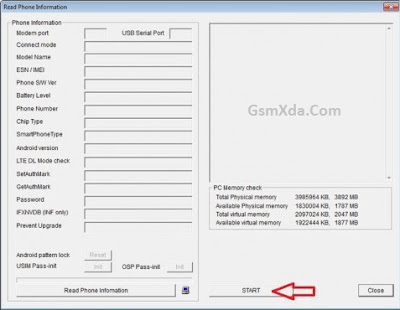
13. Wait until full install (do not unplug while your device in download mode)
14. Congratulation you are done
Available link for download

Friday, January 13, 2017
Root Guide How to Root Micromax Unite 2 A106 By PC Or By Apk
Root Guide How to Root Micromax Unite 2 A106 By PC Or By Apk
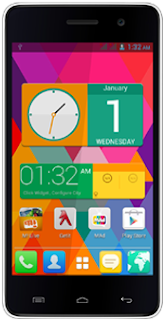
Micromax Unite 2 A106 is a budget smartphone which was launched by Micromax. It is packed with quite good specifications. Before going further I’ll like to point a thing that Rooting voids phone’s warranty but once you have rooted it you can unroot it anytime too.
Before You Start
- Make Sure that the battery level on your Micromax Unite 2 is 75 percent or more.
- Take backup of all your important data, files and documents.
- Please enable USB debugging mode on your phone. For that, go into the settings > about and keep on tapping “build number” 5-6 times. You’ll get a toast notification – “You’re now a developer”. You’ll now be able to see the option of USB debugging. Go into the settings > Developer options and tick the check box for “USB Debugging”.
- Please be aware that rooting voids warranty.
Method : - 1
Downloads
- Boot Image and CWM Recovery
- SP Flash Tool
- SuprSU
- USB Drivers for MTK Devices
- Scatter File
Instructions
- Install the USB Drivers If they are not already installed on your PC.
- Copy the SuperSU File on your device’s internal memory, don’t keep it in any folder just let it be there.
- Pull out the device’s battery, and while it’s turned off connect it to your computer via USB cable.
- Extract out all the files of SP flash too, and double-click on Flash_Tool.exe to open it.
- Click On the scatter loading button and select the “Scatter File” that you just downloaded. The real name of the file is “MT6582_Android_scatter_emmc.txt”.
- This will then load up a new section in the region below where you’ll be able to see a lot of check boxes just click on BOOTIMG text and select the boot image you just downloaded and then follow the same procedure for RECOVERY text and select the recovery.
- Click on the download button and there will be a warning popped up but don’t worry about it and Congratulations you have successfully installed CWM Recovery on your Unite 2.
- Now all you have to do is boot up into recovery and you can do that by pressing and holding Volume up+Volume down+power key simultaneously. Then select the recovery mode and select install ZIP from SD card and then use the volume rockers to scroll up and down and power button to make a selection.
- Select the SuperSU.zip that you placed in your phone.
you can successfully root your device.
Method : - 2
Method : - 2
Downloads
Kingo Root APK
Lets Start
1. Connect your device to your PC using the USB cable.
2. Copy the Kingo Root APK from your desktop over to the root of your SD card.
3. Once it’s copied, disconnect your device from your PC.
4. Head to Menu > Settings > Security on your device and enable the Unknown sources option.
5. Open File Manager and tap on the APK you just copied to your device. It’ll start to install.
6. Once installed, launch the app from your App Drawer.
7. Click ON ROOT.
8. Root Proccess Started Please wait After Complete
You’re done!
Your Device is now rooted Successfully
Available link for download
Sunday, November 20, 2016
Know to Configuration of Windows 8 Virtual Machine Step By Step guide
Know to Configuration of Windows 8 Virtual Machine Step By Step guide

With the launch of Windows 8s Consumer Preview, youre probably itching to spend some quality time with Microsofts latest operating system. Although you may have already downloaded the ISO, we bet some of you havent decided how youre going to install it.
Considering youve just met, we assume most of you arent ready to clear a dresser drawer for Windows 8. Overwriting your current stable OS with pre-release code could be a recipe for disaster, though at least one TechSpot staffer is taking the plunge.
Dual booting is popular, but in our experience, rebooting into a separate environment is more trouble than its worth when youre just trying to sample beta (err, "preview") software. The same could be said for using the OS on a secondary PC near your primary rig.

This write-up wont have much to offer folks experienced with virtual machines, but many users are still intimidated by them. We hope to demystify the process with a guide that installs a fully functional, commitment-free copy of Windows 8 inside your main OS.
So, what do I need?
Not much! You probably want 1-2GB of RAM and 20-30GB of storage allocated to the Windows 8 VM. You need a processor that supports virtualization (basically any major chip from Intel or AMD released since 2006). In other words, you need a semi-modern PC.Accompanying said hardware, you need to download a copy of Windows 8 (either 32-bit or 64-bit will work fine, but the former calls for half the RAM and 4GB less storage). You also need virtualization software. Were using VirtualBox, a free solution from Oracle.
Got it. Lets do this!
Honestly, by the time youre done, youll probably wonder why you even consulted a walkthrough. Configuring a basic virtual machine is a lot easier than it might seem if youve never done it. Start by clicking New in VirtualBox and click Next on the first prompt.Youll be asked to name your virtual machine. The name is purely for identification purposes, so you know exactly what the machine is later on. Were using Windows 8 CP 64-bit. You also have to choose the OS youre installing (hint: Windows 8 or Windows 8 64-bit).

Assuming this is your first VM youll have to choose "Create new hard disk" on the following screen. In doing so, youll be asked to pick a format. You can leave VDI (VirtualBoxs own format) selected unless you want to run the VM with other virtualization software.

By default, the virtual disk will be created in C:UsersUSERNAMEVirtualBox VMs. If your C: drive is short on space or if you simply want the VM stored elsewhere, you can set it now. My C: drive is an 80GB SSD, so Im creating the virtual disk on a secondary HDD.

Wait. What about Windows 8?
Youre only moments away from installing Windows 8. Right click your new VM and open Settings. In the left column, click Storage > Empty (under IDE Controller) > the CD/DVD icon (under Attributes) > Virtual CD/DVD disk file and navigate to the Windows 8 ISO.

Youll be prompted to set your language, time and currency format, and input method. Youll also have to supply a product key (DNJXJ-7XBW8-2378T-X22TX-BKG7J). Agree to the terms, choose a Custom setup and install Windows 8 to the only unallocated space.

Son of a... this wont work!


Available link for download
Subscribe to:
Posts (Atom)