Showing posts with label by. Show all posts
Showing posts with label by. Show all posts
Wednesday, March 8, 2017
How to Flash HTC Desire 820 820MU dual sim by using Fastboot code Tested
How to Flash HTC Desire 820 820MU dual sim by using Fastboot code Tested
HTC Desire 820 Dual Sim to be different Stock ROM Firmware in this method using stock rom model of A31_DTUL, Build : 1.01.709.1, CID : 11111111, HBoot : 3.19.0.0000, MID : 0PE621000, Security : OFF, Region : Super_CID, if you want to use this method first check this mention model number if not then do not try with this Stock ROM Firmware but you can use this guide if you want to correct Stock ROM firmware put on fastboot mode and readinfo using HTX Multi Tool.exe software and this software also available in this guide.
HTC Desire 820 in any type issue software related you can easy solve using this method and this is for everyone who new fresher technician or experience technician in android software related, before use remember of must be working well all are required which you can see in this method it below to be mention, different to be error when you try to flash or upgrade first of USB not recognized this error possible when micro USB not working, battery not charged, phone USB socket not working properly so if you fail with this method just write down your comment on below comment box i will soon possible to fix it, first take backup into device if live otherwise dead you cant take backup, this guide you can use when device in dead condition also but must be in software related issue otherwise if any hardware then you can solve that.
If you want to repair your device, you can try to repair it by you. You have to charge your battery with any charger and charged it by 95%. Your data is very important for you so it is good to do a backup of your data it may consist like your contact details,your important messages, your emails or any other important thing which you feel to be the backup in your device. This backup can be done on another device. we have to do the backup because after a format of your device, all your data will be gone and it will not be recovered. For backup in other devices you can use other external device like your hard drive, SD card or any other suitable devices. If you are doing by your own. do it at your own risk as we dont take any responsibility if your device is damaged
This method you can use without any box its done from flash tool its also available here, and impotent of must be installed phones driver, you cant flash or upgrade if not installed in your computer or laptop it must be installed and also available in this post, here all are linked that tested and working fine just in one try, you can use this guide when your device in hang on logo, restarting, auto turn on internet connection, auto turn on wifi connection, auto apk installing, auto gone balance, pattern lock, screen lock.
Requisite for HTC Desire 820MU
- HTC Desire 820 (820MU) dual sim with well battery charged, do not try with low battery
- HTC Desire 820 (820MU) dual sim Stock ROM tested | Download here
- HTC Desire 820 (820MU) dual sim HTC Fastboot Driver spl | Download here
- HTC HTX Multi Tool | Download here
- HTC Desire 820 (820MU) sual sim fastboot code | Download here
- Good Quality Micro USB Cable
- Computer or Laptop
Procedure for HTC Desire 820 (820MU) dual sim
- Download needed files from above link, if link not working just leave your comment on below comment box i will soon fix it if possible
- Install WinRAR in your Computer or Laptop if already installed ignore this
- UnZip to Desktop or as you like path from the WinRAR
- Install HTC USB (Flashing) Driver already installed ignore this
- Unplug battery socket wait few second and gain Insert battery socket
- Press and hold Volume Down + Power button and choose Fastboot mode and Insert Micro USB Cable into device
- Open RBSoft folder and choose HTX Multi Tool.exe file and open it
- Go to Fastboot Tab and click on Read Boot Info button and wait until full readinfo to your device
- If above mention model to be in your device then use this Stock ROM Firmware, if different readinfo then just write down your info on below comment box i will give you correct stock ROM firmware link
- Rename Stock ROM Firmware 0PE6IMG_A31_DTUL_K44_DESIRE_SENSE60_HTCCN_CHS_CMCC_1.20.1403.1_R6_Radio_01.01.110_U1030481_08.01.1119_F_release_414395_combined_signed to 0PE6IMG and do Copy
- Open htc fastboot driver spl folder and Paste there Stock ROM Firmware
- Right click with Shift key on White area and choose Open command windows here option (see below image)
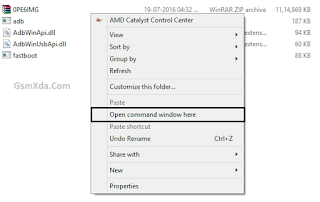
- Write down there first command of "fastboot devices" and press Enter key
- Write down again "fastboot oem rebootRUU" and Press Enter key
- Write down "fastboot flash zip 0PE6IMG.zip" and Press Enter key and wait until full installed Stock ROM Firmware
- After finished Stock ROM Firmware flashing procedure and use last command "fastboot reboot" and Hit Enter key
- Congratulation you are done
Available link for download

Monday, February 27, 2017
How to install Kitkat 4 4 2 and ubrick Motorola droid razr m xt907 step by step
How to install Kitkat 4 4 2 and ubrick Motorola droid razr m xt907 step by step

Requirements :
Download firmware file VZW_XT907_4.4.2-KDA20.62-15.1_1FF.xml.zip from
https://www.androidfilehost.com/?fid=24269982087012609
RSD lite tool from
https://drive.google.com/file/d/0B9MQDcmmYShvaXlCVFNRcGFtcWc/edit
https://drive.google.com/file/d/0B9MQDcmmYShvaXlCVFNRcGFtcWc/edit
Download RSD drivers from Motorola site
Installing :
1 : install RSD tool And drivers on your Computer
2 : Run RSD lite program
3 : Extract firmware file
4 : on RSD tool Select this xml file VZW_XT907_4.4.2-KDA20.62-15.1_1FF.xml from firmware extracted folder
5 : put your phone in fastboot mode by power off your phone and press and hold these keys (power+volume up and down) then a new screen appears navigate ap fastboot select it with volume up key And connect with computer Note: make sure drivers installed on your
6: on Rsd tool your device appears
7 : click on start and wait until RSD lite tool pass your phone
8 : if your phone again goes in fastboot mode then press power for 3 sec after off press power+volume up+down and select normal power with volume up key
9 :After reboot set your setting
10: D:)one
Keep visiting for more informations
Take care Good bye and like my facebook page :)
Available link for download
Saturday, January 14, 2017
How to Improve the Efficiency of Mac OS X by Finding and Removing the Useless Apps
How to Improve the Efficiency of Mac OS X by Finding and Removing the Useless Apps
If you are a passionate user of Mac like me and want your system to always be fast, then you should look through your hard drives regularly and remove all the useless files. Today, majority of Mac devices provide up to 800 GB+ hard drives but as we have lots of data to store, it also fills very rapidly. So, instead of increasing your Hard Drive space, it is better to get some spaces by deleting these unwanted files. Now the question is how to check these useless files and folders from your Mac OS X.

First, find the used space according to applications such as iMovie’s, iPhoto etc. To do so, go to the Apple Menu and select About This Mac option and select More Info button, which is followed by the Storage tab. You can try some manual approaches, which might be helpful for you in removing these unwanted apps.
1. Delete all the Duplicate Files: -
Delete useless files is the first priority as these files took so much spaces without any use. To identify these duplicate files you can use professional tool like Stellar Speedup Mac, which analyze your Mac system and provide all the necessary information about your duplicate apps. These duplicate file finder software’s are very fast and affordable, which not only identify your duplicate applications but also remove them safely without any changes in the original file system.
2. Empty the Mac OS X Trash Folder: -
Emptying trash is the second most important step, which you can use to initiate in order to remove unwanted apps in Mac hard drive. There are applications having their own Trash so it is better to remove all the trash application from your Mac OS.
3. Clean up Mac OS: -
If you have an advanced version of Mac like Mac OS X 10.10 (Yosemite) then there must be many new ways to free more drive space. Clean Web browser and application caches, which grows with time and take valuable disk space. Usually caches and browser history increase the speed and saves re-downloading content time for frequently visited websites, however if the information become outdated it is better to remove it for new entries. Cleaning up cache can contribute few more free GBs for sure. And when you visit new websites then it will automatically generate new optimized cache files.
4. Remove Unwanted Files Daily/Weekly:-
There must be many files in your Mac that are of no use but still have occupied spaces so it’s better to find out all those files and remove them as per your suitability. Junks files are also included in unwanted files so it is better to clear your old junk or unused file regularly. Additionally remove application’s leftovers as well, which can be available on your HDD or SSD even after you had uninstalled those files. It will not only make space for new applications but also improve the efficiency of your Mac OS.
5. Move Old Files into a new Storage Device:-
There are many photos, videos and movies which we do not want to remove and always wanted to keep with on our system. So, it is highly advisable that you must store these files and folders into a new storage device so that you can keep them safer for later use. This process will free up more space on your Mac OS and you do not have to upgrade your hard drive to get more space and also your mac will remain fast as it was, when you purchased it.
Final Conclusion:-
If despite implementing all the above mentioned the efficiency of your Mac OS doesn’t improve, then I suggest you to give a try to some software like Stellar Speedup Mac. This software will definitely do its task and you will see a great improvement in your Mac.
Available link for download
Friday, January 13, 2017
Root Guide How to Root Micromax Unite 2 A106 By PC Or By Apk
Root Guide How to Root Micromax Unite 2 A106 By PC Or By Apk
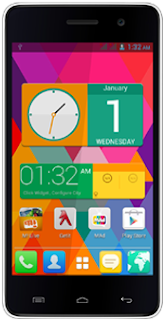
Micromax Unite 2 A106 is a budget smartphone which was launched by Micromax. It is packed with quite good specifications. Before going further I’ll like to point a thing that Rooting voids phone’s warranty but once you have rooted it you can unroot it anytime too.
Before You Start
- Make Sure that the battery level on your Micromax Unite 2 is 75 percent or more.
- Take backup of all your important data, files and documents.
- Please enable USB debugging mode on your phone. For that, go into the settings > about and keep on tapping “build number” 5-6 times. You’ll get a toast notification – “You’re now a developer”. You’ll now be able to see the option of USB debugging. Go into the settings > Developer options and tick the check box for “USB Debugging”.
- Please be aware that rooting voids warranty.
Method : - 1
Downloads
- Boot Image and CWM Recovery
- SP Flash Tool
- SuprSU
- USB Drivers for MTK Devices
- Scatter File
Instructions
- Install the USB Drivers If they are not already installed on your PC.
- Copy the SuperSU File on your device’s internal memory, don’t keep it in any folder just let it be there.
- Pull out the device’s battery, and while it’s turned off connect it to your computer via USB cable.
- Extract out all the files of SP flash too, and double-click on Flash_Tool.exe to open it.
- Click On the scatter loading button and select the “Scatter File” that you just downloaded. The real name of the file is “MT6582_Android_scatter_emmc.txt”.
- This will then load up a new section in the region below where you’ll be able to see a lot of check boxes just click on BOOTIMG text and select the boot image you just downloaded and then follow the same procedure for RECOVERY text and select the recovery.
- Click on the download button and there will be a warning popped up but don’t worry about it and Congratulations you have successfully installed CWM Recovery on your Unite 2.
- Now all you have to do is boot up into recovery and you can do that by pressing and holding Volume up+Volume down+power key simultaneously. Then select the recovery mode and select install ZIP from SD card and then use the volume rockers to scroll up and down and power button to make a selection.
- Select the SuperSU.zip that you placed in your phone.
you can successfully root your device.
Method : - 2
Method : - 2
Downloads
Kingo Root APK
Lets Start
1. Connect your device to your PC using the USB cable.
2. Copy the Kingo Root APK from your desktop over to the root of your SD card.
3. Once it’s copied, disconnect your device from your PC.
4. Head to Menu > Settings > Security on your device and enable the Unknown sources option.
5. Open File Manager and tap on the APK you just copied to your device. It’ll start to install.
6. Once installed, launch the app from your App Drawer.
7. Click ON ROOT.
8. Root Proccess Started Please wait After Complete
You’re done!
Your Device is now rooted Successfully
Available link for download
Saturday, December 24, 2016
Asus Flash tool by Daniel Punk free download here
Asus Flash tool by Daniel Punk free download here

Download Link
Asus Flash tool by Daniel_Punk Download here
Feature :
ADB Options
Phone Info
Droid Mode
Recovery Mode
Ceck Sideload
Backup Boot 1
Backup Boot 2
Backup ex_Csd
Backup RPMB
Root
Backup Config
Backup Factory
Restore Config
Restore Factory
Un_Root
Reboot
Fastboot Option :
Phone Info
Reboot Droid
Reboot Normal
Load Recovery
Load Fastboot
Load Boot
Load Sflash Boot
Load System
Raw Update Single Sim
Raw update All
Wipe Cashe
Wipe Factory Reset
Wipe System
Save erase
Wipe Userdata
Available link for download
Sunday, December 4, 2016
HTC Smart Tool V3 0 by Habeeb Kambrath
HTC Smart Tool V3 0 by Habeeb Kambrath

This tool useful for everyone who have htc device or technician who in mobile software related this tool many issue solve using this tool and which feature supported we are mention in below feature lists before use this tool must remember your device usb debugging enable also must be installed driver in your computer or laptop without usb debugging enable or without install driver you cant connect with this tool so this is most impotent if you want to use this tool also remember must be working well micro usb cable or device usb socket if in your device usb debugging enable or installed drier so you cant connect because your device socket not working so this is most impotent for that if in your computer or laptop virus issue first remove all virus in your PC after try in this tool.
Download Link
HTC Smart Tool V3.0 by Habeeb Kambrath Download here
Feature:
1. You can do Connect Devices via from ADB2. You can do put Fastboot mode from Reboot
3. You can do Read Info via from Fastboot mode
4. You can do Read Unlock Token
5. You can do Submit token
6. You can Flash Unlock tocken
7. You can Flash Custom / Stock Recovery
8. You can Flash Zip file
9. You can Relock Boootloader
10. You can do Factory reset
11. You can S-ON
12. You can wite super CID
13. You can put Download Mode from the reboot device
14. You can do RUU from Reboot
15. You can do Normal to Reboot
16. You can Fastboot Non ADB from reboot
17. You can see HTC CIDE list
18. You can know HTC correct firmware
19. You Can learn how to HTC flash
Note
If you want to flash Recovery zip file or unlock Token so just Copy file and paste HTC Smart tool folder by name
Example
Recovery File = recovery.img
Unlock Tocken File = Unlock_code.bin
Zip file = update.zip
Available link for download
Friday, November 25, 2016
NEW Android Virus Remover tool v1 0 by Easy Team
NEW Android Virus Remover tool v1 0 by Easy Team

This android virus remove tool by Easy_Team this tool you can use any android devices but remember must be rooted device if device not root then you cant remove so this is impotent and second thing must installed android DRIVER in your computer or laptop if not install so first install driver after use this tool this is simple just click and start button use so you can easy virus here first of scan device and after you can remove
If you use this tool so your devices save from flash, technician mostly remove virus from flashing but some time in device to be most impotent data like contact, photos, notes, videos etc data if you use this tool so you can save data, do not try with low battery because if low device you can try to remove virus so your device switch off so first charged your battery after try using this tool here some picture of success remove virus using this tutorial you can see below.
Download Link
Easy Team Virus Remover 1.0 Download here
Screenshot:


Easy Firmware Virus Remover tool video
Available link for download
Sunday, November 20, 2016
Know to Configuration of Windows 8 Virtual Machine Step By Step guide
Know to Configuration of Windows 8 Virtual Machine Step By Step guide

With the launch of Windows 8s Consumer Preview, youre probably itching to spend some quality time with Microsofts latest operating system. Although you may have already downloaded the ISO, we bet some of you havent decided how youre going to install it.
Considering youve just met, we assume most of you arent ready to clear a dresser drawer for Windows 8. Overwriting your current stable OS with pre-release code could be a recipe for disaster, though at least one TechSpot staffer is taking the plunge.
Dual booting is popular, but in our experience, rebooting into a separate environment is more trouble than its worth when youre just trying to sample beta (err, "preview") software. The same could be said for using the OS on a secondary PC near your primary rig.

This write-up wont have much to offer folks experienced with virtual machines, but many users are still intimidated by them. We hope to demystify the process with a guide that installs a fully functional, commitment-free copy of Windows 8 inside your main OS.
So, what do I need?
Not much! You probably want 1-2GB of RAM and 20-30GB of storage allocated to the Windows 8 VM. You need a processor that supports virtualization (basically any major chip from Intel or AMD released since 2006). In other words, you need a semi-modern PC.Accompanying said hardware, you need to download a copy of Windows 8 (either 32-bit or 64-bit will work fine, but the former calls for half the RAM and 4GB less storage). You also need virtualization software. Were using VirtualBox, a free solution from Oracle.
Got it. Lets do this!
Honestly, by the time youre done, youll probably wonder why you even consulted a walkthrough. Configuring a basic virtual machine is a lot easier than it might seem if youve never done it. Start by clicking New in VirtualBox and click Next on the first prompt.Youll be asked to name your virtual machine. The name is purely for identification purposes, so you know exactly what the machine is later on. Were using Windows 8 CP 64-bit. You also have to choose the OS youre installing (hint: Windows 8 or Windows 8 64-bit).

Assuming this is your first VM youll have to choose "Create new hard disk" on the following screen. In doing so, youll be asked to pick a format. You can leave VDI (VirtualBoxs own format) selected unless you want to run the VM with other virtualization software.

By default, the virtual disk will be created in C:UsersUSERNAMEVirtualBox VMs. If your C: drive is short on space or if you simply want the VM stored elsewhere, you can set it now. My C: drive is an 80GB SSD, so Im creating the virtual disk on a secondary HDD.

Wait. What about Windows 8?
Youre only moments away from installing Windows 8. Right click your new VM and open Settings. In the left column, click Storage > Empty (under IDE Controller) > the CD/DVD icon (under Attributes) > Virtual CD/DVD disk file and navigate to the Windows 8 ISO.

Youll be prompted to set your language, time and currency format, and input method. Youll also have to supply a product key (DNJXJ-7XBW8-2378T-X22TX-BKG7J). Agree to the terms, choose a Custom setup and install Windows 8 to the only unallocated space.

Son of a... this wont work!


Available link for download
Wednesday, November 16, 2016
Protect your Eyes By Automatically Adjusting Computer Screen Brightness Based On Time of the Day
Protect your Eyes By Automatically Adjusting Computer Screen Brightness Based On Time of the Day
Today Most of the youngsters using their computers at night very long time rather than using in the daytime. Staring at your computer screen for the long time could lead to some physical problems, that is eye related diseases. Especially at night the eyes may go rough. At the end you might suffer with dry problems or may be with some serious eye problems.
To get rid of this problems while you are working late night, you have the option to adjust your screen brightness manually in any systems. This remedy work for some time but not greater extent. Also dimming your screen alone won’t protect your eyes. It needs much more tweaking in your computer screen to get the perfect screen that will fit for eyes.
What is it and How it will help
F.lux is the light weight utility that automatically adjusts your computer screen brightness depending on the time of the day with some advanced tweaking facilities. It makes the color of your computers display adapt to the time of day, warm at night and like sunlight during the day.
Most Useful Features
- It makes you sleep better and Protect your eyes
- it makes your computer screen look like the room you’re in, all the time. In day time It gives you the bright screen like sun, in night-time it gives you the best night screen
- It has the Change location option enter your GPS Co-ordinates to make things better for adjusting your screen brightness based on the time automatically.
- If you want to do Color-sensitive work, You can disable this app for one hour to give you the default brightness
- You can also control the transition of your screen brightness in the transition speed settings: fast 0r slow.

Just download and install this application, it will run in the background all time. Only uses just 3.3 MB RAM in my system when I have tested this little handy utility. Double click to open this program in your computer as a window. Click the 24 hour preview to know that how this app changes your computer screen based on the time.
Enter GPS Co-ordinates
This application isn’t suitable for the individuals doing color sensitive works like Graphical design at night. Because this app changes your screen brightness and colors. So that your screen will look orange or light pinkish color. So It will not be suitable for any color sensitive work. Apart from that anyone can use this app to protect their eyes from bright light.
Conclusion
My Personal Experience about this app is good. I work a lot at night. And this app helps me a lot to protect my eyes during night-time when I have written articles for this blog or doing some other activities Online. If you are like me, Just try this app and post your opinions here.
This app supports Windows, Mac OS X, Linux, iPhone and iPad. I have tested this app in Windows 8, and it works without any problem.
Update :
F.lux 3 beta Released. Here’s a quick look of F.lux 3 Beta
- Warmer colors, down to 2700K
- f.lux for Philips Hue
- Support for calibrated monitors
- Movie mode (partially disable to watch a movie)
- Disable until morning
- Screen warms as you dim it
- Fixes for Intel chipsets
- Ffixes for Windows 7+
Download: f.lux 3.0 BetaDownload F.lux (HomePage)
Available link for download
Wednesday, October 26, 2016
Moto Auto Flash Tool v6 5 By Jamesjerss
Moto Auto Flash Tool v6 5 By Jamesjerss
This tool supported in Moto all gen and in this also Root or Bootloader unlock available here some procedure for that please all are carefully read and following this tutorial because if some one missing then you cant flash, root, bootloader unlock here some need for that first of must installed ADB driver of Motorola and second must working well of micro USB cable also must work device USB socket or computer or laptop also must be working well
Procedure:
1. Most impotent of do not try to edit or rename any folder or file name2. If you want to flash device then copy all file in firmware folder and paste to Firmware folder in flash tool and then Press 1 button and hit enter key
3. If flash to custom recovery file, stock recovery file, boot file or modem files separately drag on it
4. if system file not found error while flashing dont worry Ignore it

Note : This is supported only 4.x.x to 5.x.x if try in 6.x.x then Stoped Updating
Features:
1. You can Flash Stock Recovery or Custom Recovery2. You can Flash Boot.img or Modem.bin file
3. In this tool Reboot Menu or Wipe Menu
4. You can Downloading Firmware
5. You can Remove FRP but Need to USB debugging enables
6. You can Unlocked Bootloader with Warning
7. You can update of Script
8. You can Root in All generation
9. You can Unlock Bootloader
Download Link
Moto Auto Flash Tool v6.5 Download here
Moto Auto Flash Tool v6.5 Screenshot:


Credit to Mr. : Jamesjerss
Available link for download
Subscribe to:
Posts (Atom)