Showing posts with label x. Show all posts
Showing posts with label x. Show all posts
Monday, February 20, 2017
Mac OS X How to manually add a Windows shared printer
Mac OS X How to manually add a Windows shared printer
Mac OS X: How to manually add a Windows shared printer
In some situations, you may be unable to locate a Microsoft Windows shared (SMB) printer while adding a printer, yet you can still add the printer manually if you know the name or address of the Windows computer sharing the printer and the name of the shared printer.
Mac OS X v10.5 or later
- Choose System Preferences from the Apple menu.
- Choose Print & Fax from the View menu.
- Click the + button to add a printer.
- Press the Control key while clicking the "Default" icon (or any other icon on the toolbar), then choose Customize Toolbar from the contextual menu that appears.
- Drag the Advanced (gear) icon to the toolbar.
- Click Done.
- Click the Advanced icon that was added to the toolbar.
- Choose Windows from the Type pop-up menu.
- In the URL field, type the printers address in one of the following formats:
smb://workgroup/server/sharename
smb://server/sharename
Note: "workgroup" is the name of the Windows workgroup that the computer sharing the printer belongs to. "server" is the name of the computer sharing the printer (or its IP address). "sharename" is the shared Windows printers share name. If the share name contains spaces, replace each space with "%20" (without quotation marks).
Tip: You dont need a "workgroup" when specifying the IP address of the computer (such as when the printer is on a different subnet), or if your Mac belongs to the same Windows (SMB) workgroup.
- In the Name field, type the name you would like to use for this printer in Mac OS X.
- Choose the appropriate PPD or printer driver from the "Print Using" pop-up menu.
- Click Add.
Mac OS X v10.3 through v10.4.11
- Open Printer Setup Utility (located in /Applications/Utilities).
- Mac OS X 10.4.x: Choose Add Printer from the Printers menu, then hold the Option key while clicking the "More Printers" button.?
Mac OS X 10.3.x: Hold the Option key while choosing Add Printer from the Printers menu.
- Choose Advanced from the first pop-up menu.
- Choose "Windows Printer via SAMBA" from the Device pop-up menu.
- In the Device Name field, type the name you would like to use for this printer in Mac OS X.
- In the Device URL field, use one of the following formats to link to the printer:
smb://user:password@workgroup/server/sharename
smb://user:password@server/sharename
smb://workgroup/server/sharename
smb://server/sharename
Notes: "user" is the name of a Windows user who has privileges to use the printer. "password" is the password of that Windows user. "workgroup" is the name of the Windows workgroup to which the computer sharing the printer belongs. "server" is the name of the computer sharing the printer or its IP address. "sharename" is the shared Windows printers share name.
Tip: You dont need a "workgroup" when specifying the IP address of the computer (such as when the printer is on a different subnet), or if your Mac belongs to the same Windows (SMB) workgroup.
- Choose the appropriate PPD or printer driver from the "Printer Model" pop-up menu.
- Click Add.
Available link for download

Saturday, February 18, 2017
Frequently asked questions Time Machine on Mac OS X
Frequently asked questions Time Machine on Mac OS X
A real Time Machine is still to be invented by our Scientists so that we can travel back or move ahead in time. However, Geniuses at Apple Inc. invented such a machine that can take your system back in time. Mac OS X goes back in time so that a user can restore an important file that was modified or deleted. Though Time Machine on Mac is real, some users may not wish to use. Moreover, few of them don’t know how to use it and are interrogated by several questions that look too technical for them. So. To ease them out, I am writing some basic & technical faqs related to Time Machine backup on OS X Mac.
1. How and When to set-up Time Machine disk and why?
A Time Machine disk can be setup any point of time on an Intel Mac with OS X Leopard (10.5) or later. The purpose of Time Machine is to take incremental back up of all the partitions including the OS X start-up disk. The data backed by the Time Machine can be easily restored to its location on some later time period. In case a file was modified, deleted or formatted, Time Machine proves to be extremely helpful or more correctly powerful tool that allows restoration of data to its location immediately.
To setup Time Machine, simply allocate a separate partition for it.
· Go to Disk Utility and create a new partition on it.
· Name this partition as Time Machine.
· Now goto System Preferences<<Time Machine and click on ‘Select Disk’ button. Another window will appear showing all partitions. Select your newly created partition and click on ‘Use Disk’.
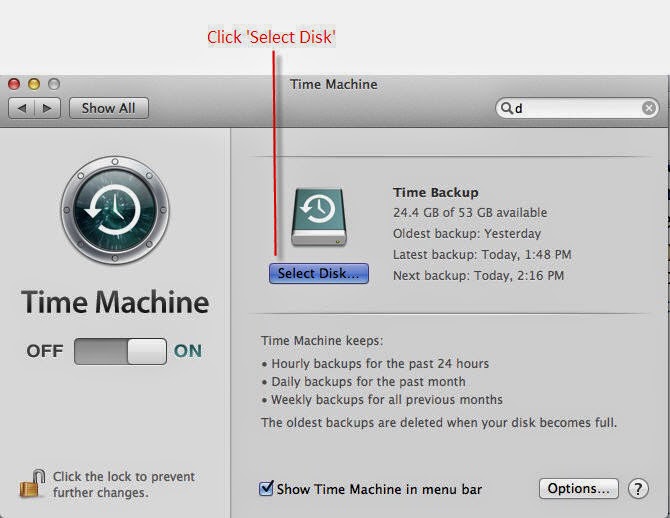
Please Note: Since, you are creating a Time Machine backup on the same hard drive, so you will receive a following warning message.
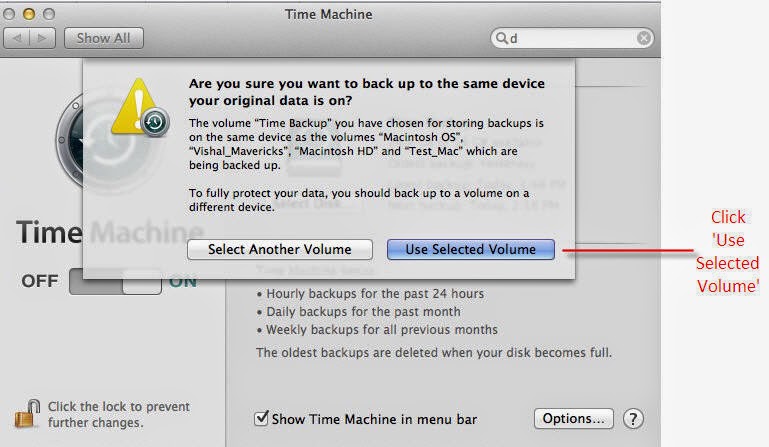
Click ‘Use Selected Volume’ to proceed. This message actually suggest to backup data through Time Machine on a separate device.
If you wish to add an external device such as another HDD, Time Capsule then you can select that particular disk for Time Machine backups.
There is a major disadvantage on setting a Time Machine disk on the same hard drive. And, which is, if the entire drive fails the TM along with the drive will fail too. So, no point of restoration arises in such case. However, using a little space from the HDD and using for TM is not a bad idea either. One can always protect its personal data from being erased for life-long.
2. What space to allow for Time Machine disk?
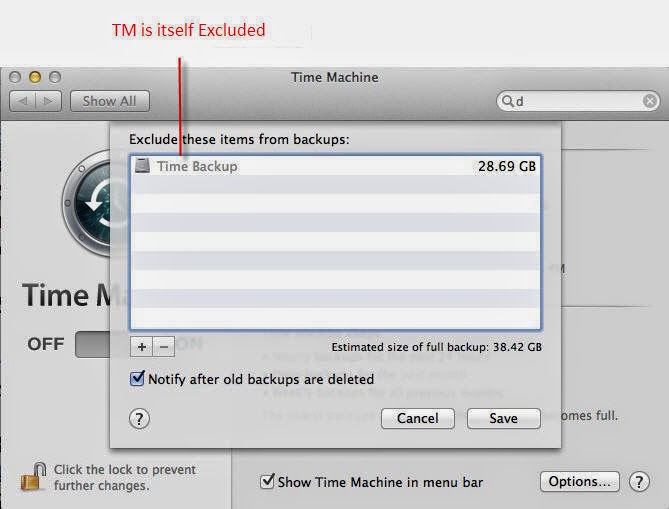
This window arises when the Option button from Time Machine is clicked. The Exclude window itself holds Time Machine disk from backing itself. So, after Time Machine exclusion, the space needed to backup entire hard drive is only 38.42 GB. So, a partition having size of 50-60 Gb is good enough to hold data from all other drives.