Showing posts with label an. Show all posts
Showing posts with label an. Show all posts
Thursday, March 9, 2017
How to Set up an FTP Server in Ubuntu Linux
How to Set up an FTP Server in Ubuntu Linux
Steps
- 1Boot up Ubuntu Linux.
- 2Go to Application, then select Accessories and chose Terminal
- 3Enter the following command: “sudo apt-get install vsftpd” (without quotation marks). This will install the FTP server on your system. If you are logged in as the root user, the "sudo" command will not be necessary, since this command is used to give administrative privileges to the user. In this case, you will only need the command "apt-get install vsftpd".
- 4Open the FTP server configuration file. To do so, go to Places and click on Computer.
- 5In the file browser, click the “File System” icon.
- 6Click on the “etc” folder.
- 7Double-click the “vsftpd.conf” icon.
- 8Alter anonymous access. Enter "anonymous_enable=YES" (without quotation marks) to allow anonymous FTP access. The hash (#) at the beginning of each line indicates that this line is commented out and will be ignored. To enable this line, you must remove the hash (#). The parameter "write_enable=YES" (without quotation marks) will allow changes to the filesystem, such as uploading.
- 9Rename the FTP welcome banner. Uncomment it by removing the hash (#), and enter the welcome message. For this example its "ftpd_banner=Welcome to FTP Server!" (without quotation marks).
- 10Click on Save and close the file. (Note: You may need to login as root, then only you will be able to open file in edit mode or else the file will open in read-only mode)
- 11To restart the FTP service, type the following command: “sudo /etc/init.d/vsftpd restart” (without quotation marks). Again, you will only need to use "sudo" if you are no logged as the root user.
- 12Place files on the FTP server. To move files to the server, access the FTP Folder from the command in the image below.


Available link for download

Friday, February 24, 2017
CCNA Cisco IOS An Introduction
CCNA Cisco IOS An Introduction
CCNA: Cisco IOS An Introduction
| Cisco IOS (short for Internetwork Operating System) is the software used on a majority of Cisco Systems routers and switches. IOS consists of routing, switching, internetworking and telecommunications functions in a multitasking operating system. Cisco IOS has uses command line interface (CLI), and provides a fixed set of multiple-word commands. A Cisco IOS command line interface can be accessed through either a console connection, modem connection, or a telnet session. The set of commands available at any particular level is determined by the "mode" and the privilege level of the current user. Cisco IOS follows a command hierarchy, with each level offering different set of commands All commands are assigned a privilege level, from 0 to 15, and can only be accessed by users with the necessary privilege. Through the CLI, the commands available to each privilege level can be defined. |
User EXEC level: This is the level that a connected user is allowed initially. User EXEC allows access to a limited set of basic monitoring commands. A ">" sign denotes User EXEC mode.
Privileged EXEC level: Privileged EXEC level allows access to all router commands including router configuration and management commands. This level is usually password protected for security reasons. A "#"sign denotes privileged EXEC mode.
When a user is connected to a Cisco IOS, a User EXEC prompt appears. Now, the user can enter privileged EXEC mode by typing the password shown as below:
Router> enable
Password: [enable password]
Router# configure terminal
Router(config)#
Global configuration mode: "Global configuration mode" provides commands to change the systems configuration. This is typically represented by "(config)#" sign as shown in the above example.
Interface configuration mode: "Interface configuration mode" provides commands to change the configuration of a specific interface of the router. An interface configuration mode is denoted by "(config-in)#".
A summary of Cisco IOS router command prompt is given below:
| Prompt | Explanation |
| Router> | User EXEC mode |
| Router# | Privileged EXEC mode |
| Router(config)# | Global configuration mode. # sign indicates this is only accessible at privileged EXEC mode. |
| Router(config-if)# | Interface level configuration mode. |
| Router(config-router)# | Routing engine level within configuration mode. |
| Router(config-line)# | Line level (vty, tty, async) within configuration mode. |
Context Sensitive Help
Cisco IOS CLI offers context sensitive help. At any time during an EXEC session, a user can type a question mark (?) to get help.Two types of context sensitive help are available:
- Word help and
- Command syntax help.
Router# co?Command syntax help: Command syntax help can be used to obtain a list of commands, keyword, or argument options that are available starting with the keywords that the user had already entered. To use command syntax help, enter a question mark (?) after hitting a space. The router will then display a list of available command options with <cr> standing for carriage return. The following is an example of command syntax help:
configure connect copy
Router# configure ?Cisco IOS also allows abbreviated commands support. For example, consider the following:
memory Configure from NV memory
network Configure from a TFTP network host
terminal Configure from the terminal
<cr>
Router#configure terminalBoth the above commands to the same job. The IOS correctly interprets the full command words. However, if there is any ambiguity, an error message is generated as below:
Router(config)#
Router#config term
Router(config)#
Router(config)#cCheckout a ccna router simulator available from certexams.com.
% Ambiguous command: "c"
Example Question:
What is the command used to add a banner to a Cisco router configuration?
A. add banner
B. banner motd #
C. motd banner #
D. add banner #
Correct answer: B
Explanation:
The banner is displayed whenever anyone logs in to your Cisco router. The syntax is
"banner motd #
MOTD stands for "Message Of The Day".
# symbol signifies the start of the banner message to the router. You will be prompted for the
message to be displayed. You need to enter "#" symbol at the end of the message, signifying
that the msg has ended.
Alternatively, you can enter the banner in the same line as below:
"banner motd # your message here#
Available link for download
Thursday, January 19, 2017
How to Set up an Ftp Server on Windows Xp Professional
How to Set up an Ftp Server on Windows Xp Professional
Steps
- 1First, you should start by retrieving your Windows XP CD.
- 2Next, click the Start button and go to the Control Panel.
- 3After that, select "Add/Remove Windows Components."
- 4Select "Internet Information Services" under "Windows Components."
- 5Click "details" and select the "File Transfer Protocol (FTP)" service. (Remember that this will also automatically select "Common Files" and "Internet Information Services Snap-In.")
- 6Click OK and follow the instructions for the install Wizard (or you can just push next if you dont feel like reading). Be prepared with your Windows XP CD, because it might prompt you for it if you havent already installed it. Once it is done, you might have to restart your computer after this.
- 7After that, all you need to do is just paste the files you want to be public into "C:INETPUBFTPROOT." Note that by default, these files are read-only and public. Public meaning that anyone who knows the IP address may download copies from it.
- 8Theres more to go! Now, you need to configure your routers firewall to let FTP traffic through. This can be done through your routers administration menu. Note that this will vary depending on your router.
- 9After letting your router firewall let FTP connections in, you will have to configure your regular firewall to let FTP connections in through a certain port.
- 10Finally, after done with everything, you may access your FTP site through your browser. All you need to do is type ftp://xxx.xxx.xxx.xxx/ in the URL where "xxx.xxx.xxx.xxx" is the WAN address of your computer.


Available link for download
Saturday, January 14, 2017
How to Recover Lost iPod Data after an iPod Reset or Restore
How to Recover Lost iPod Data after an iPod Reset or Restore
IPod devices are widely used as a pocket computers and portable media players. You can use them as external data storage devices to carry files. Using the Apples iTunes, you can transfer data to and from the iPod device using Apple Macintosh and Windows operating systems.
Using the iTunes restore option, you can erase all data structure on the iPod drive. If you have those deleted files in your iTunes then you can re-synchronize your device to iTunes and restore your files back.
But in case, you don’t have backup and wants to restore files that accidentally deleted even from the iTunes backup folder, then there is no direct way to restore back the deleted files. In such situation, you would require data recovery software for iPod.
Note: If you have lost your iPod data, stop performing any action with it. As it may overwrite the deleted data and thus reduces the chances of recovery. Don’t even connect it with iTunes or any other app.
How to restore iPod to factory settings using iTunes?
You can restore your iPod to factory settings using the iTunes restore option. It let you erase all data (songs, videos, photos, calendar and contacts etc.) from the device and setup the device as new. If you want to restore some deleted data, you can so it by synchronizing g your device with ITunes data library.
If you want to restore your device using the iTunes Restore option keep in mind the following things.
You must have the latest version of iTunes on your device. Backup your device data using the iTunes backup or copy the device data to another device/computer.
Now follow the given steps to restore your device:
- Connect the iPod to the computer system
- From the list of available devices, select your iPod.
- Then click Restore from the Summary panel
- In the prompt windows, click restore to confirm. It will remove all data from you device and restore it to factory settings.
- After completion of the restore procedure, restart your device.
- After restart, the welcome screen will come up. From there you can setup the device as new or restore it from a previous backup.
Suppose you have erased all your IPod data using the factory reset and you don’t have any backup. Then how would you get it back. In such case you have to recover the lost IPod data using Stellar Phoenix iPod Data Recovery software.
Features of iPod recovery software:
- Let you recover the lost data, documents, songs, video files, podcasts, e-books, and graphic files from your iPod on Windows system.
- It performs iPod recovery in cases of file loss due to accidental /intentional deletion, iPod formatting, virus attack etc.
- Supports data recovery from iPod classic and iPod Shuffle on Windows based OS (Windows 7, Vista, XP, and 2000)
- Let you create image of the IPod so that you can perform recovery later, if required.
- The original format of the data is kept intact preserved after recovery.
- The software offers three options: Quick Recovery, Deleted File Recovery and Advance Recovery
- The data not available under the Quick Recovery option could be scanned using the Advance Recovery option.
- It let you preview the list of recoverable items.From the scan results, you can search the desired data item using the Find option. The File Mask and File Filter options let you search better from the scan results.
- Using the tool, you can perform selective iPod recovery using the filters scan results according to file types and set criteria. The supported file types are MIDI, AIFF, M4A, OGG, RPS, M4P, AU, AVI, MOV, ASF, WMV, MP4, WMA, MP3, MPG, MPEG, GIF, WAV.
- From the scan results, you can select the desired items and save them at your desired location.
- Using the Create Image feature, you can create a .dat image of the iPod data and then perform recovery from the image.
- It let you save the scan results so that you can resume the recovery process at later times.
How to perform recovery using Stellar Phoenix iPod Recovery – Windows
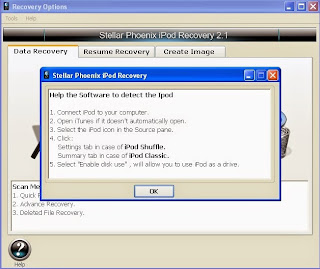
- Download and install the software. Connect the IPod to your system.
- Open the software. Click on the "Recovery" icon then click on Play button.
- Select your iPod from the dropdown list
- Click on Quick Recovery then click Play. You can also choose the Deleted File Recovery and Advance Recovery options according to needs.
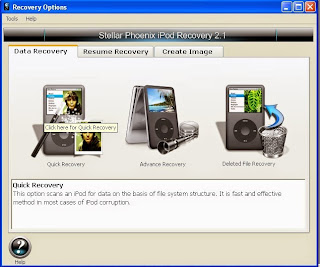
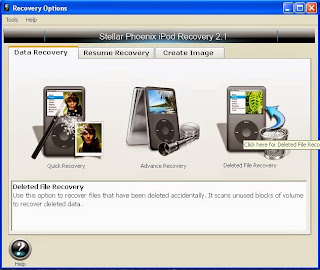
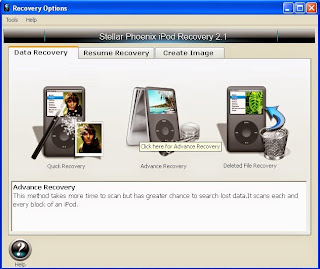
- This will begin the scan process.
From the scan result, select the folder that you want to recover and then click ‘Play’. Select the files to be recovered and save them at desired location.
Available link for download
Thursday, December 15, 2016
Know to enable SSH to an ESXi 5 Host
Know to enable SSH to an ESXi 5 Host
To enable the ESXi Shell from the Direct Console
1 | Access the direct console of the ESXi host, press F2, and provide credentials when prompted. |
2 | Scroll to Troubleshooting Options, and press Enter. |
3 | Select Enable ESXi Shell and press Enter. |
On the left, Enable ESXi Shell changes to Disable ESXi Shell. On the right, ESXi Shell is Disabled changes to ESXi Shell is Enabled.
4 | (Optional) Configure the time-out for the ESXi Shell |
a | Select Modify ESXi Shell timeout and press Enter. |
b | Enter the time-out value in minutes and press Enter. |
5 | Press Esc until you return to the main direct console screen. |
You can enable the ESXi Shell from the vSphere Client.
To enable the local or remote ESXi Shell from the vSphere Client
1 | Select the host, click the Configuration tab, and click Security Profile in the Software panel. |
2 | In the Services section, click Properties. |
3 | Select ESXi Shell and click Options. |
4 | Change the ESXi Shell options. |
? | To temporarily start or stop the service, click the Start or Stop button. |
? | To enable access permanently, click Start and stop with host. The change will take effect the next time you reboot the host. |
5 | Click OK. |
6 | (Optional) Configure the time-out for the ESXi Shell from the vSphere Client. |
a | In the Configuration tab’s Software panel, click Advanced Settings. |
b | In the left panel, click UserVars. |
c | Locate UserVars.ESXiShellTimeOut and enter the timeout value in minutes. |
d | Click OK. |
After you have enabled the ESXi Shell, you can use it from that monitor or through an out-of-band network connection.
Available link for download
Wednesday, October 26, 2016
Will Website Blog Name makes an impact on Google Search
Will Website Blog Name makes an impact on Google Search
Impact of Website/Blog name on Google Search
Recently I started a blog named varunonweb which is hosted on Google's blogger website. Initially I kept my blog name as TechnetSavy without searching whether there is any other name which resembles like this. I started writing articles on this blog but none of my articles are indexed and even they are not able to see in Google search. The content what I am writing is unique and it is of my own. Then I googled and find out that there is another website which resembles same like Technetsavy with a extra 'v'. Since this is the new website Google taught that the website which I created is of copy cat and so it is not showing in the Google search results.Available link for download
Friday, September 9, 2016
Mac Pro An Incredible Invention Of Apple
Mac Pro An Incredible Invention Of Apple
Keeping its promise, Apple released its new Mac Pro on Thursday, this Mac pro is a new revived mac desktops starting from $3,000. It is a completely renewed version of its forbear.

On Thursday, Apple finally allowed customers to order the new Mac Pro in retail stores, online, and through authorized re-sellers Although its quite possible to buy a computer with less money, but the Mac Pros design is something that is entirely unique and is one of the biggest selling reason.
Apples most awaited new high-end Mac Pro desktop, is a tremendously unique cylindrical design completely manufactured in America, will be at an entry price of $2,999.The previous Mac Pro was heavy, bulky and was not visibly pleading. This Mac Pro is something that user may want to purchase even if they do not need its power. "Redesigned from the inside to outside, the all-new Mac Pro is embedded with latest Intel Xeon processors, dual workstation-class GPUs, PCIe-based flash storage and its processing is ultra-fast.
Few peoples pockets will allow them to buy the new Mac Pro just for its unique, amazing design, whereas the average consumer will need a more peculiar reason to spent $3,000 for a computer when there are a plenty PCs costing around $1000 that will work same in most of the scenarios.

The structure of the new Mac Pro is not same like its older versions. The new Mac Pro includes a 3.7GHz quad-core Intel Xeon E5 processor, two AMD FirePro workstation GPUs,12GB of memory, and 256GB of flash storage.You won’t be switching 3.5mm HDDs out of bays, for example. But the outer shell of new Mac Pro slides off easily after unlocking it, and by removing the outer shell you get full access to the RAM bays, SSD units and the GPUs. The actual modification is the external I/O: Thunderbolt 2 which can display 4K video while simultaneously transferring a unified 20 Gbit/s throughput rate, and there are six ports on the back, combined with four for USB 3 make it happen with ease. The new Mac Pro supports the fastest 802.11 Wifi and 4.0 Bluetooth
New Mac Pros CPU power and GPU will definitely benefit the working professionals as it can perform any video editing task effortlessly and more efficiently.

Now the question which arises is- Will Mac Pro live up to the expectation?
The traditional Mac users was having a big wish list, the new Mac pro is a fascinating machine.
If we talk about expansion ports inside its cylindrical shell is four USB 3.0 ports six Thunderbolt 2 ports which is the latest emphasis of Intels technology which is just double the speed of Thunderbolt 1 and can support up-to 36 Thunderbolt peripherals. It is a highly configurable Mac for video professionals.
The Mac Pro is made up of aluminium and steel and the amount of material used is 74 % less than the previous Mac Pro.

However, from the above discussion its very cleared that new Mac Pro is an amazing high end and super powered machine or workstation with brilliant computer power with ultra high processing.
Available link for download
Subscribe to:
Posts (Atom)