Showing posts with label reset. Show all posts
Showing posts with label reset. Show all posts
Saturday, February 25, 2017
Lenovo K4 Note A7010a48 FRP Reset or Fix DL Mode done tested
Lenovo K4 Note A7010a48 FRP Reset or Fix DL Mode done tested
What is FRP Lock ?
This is new feature in all new modes when you new purchase device then first starting then asking enter your own gmail account and this account enter one time so remember it because in future device reset or upgrade then first asking device to enter your own gmail account or password after that go ahead otherwise device still but dont worry if forgot gmail account or password here solution for bypass gmail id its very simple if you better understand to this tutorial before use first charged device battery if low then device not properly working like restarting problem or other software related.
About Miracle box:
This tutorial done in miracle box if you have box then you can easy done but this dont have so you can use other box but option to be required in box.
About USB Driver:
For this tutorial must you have to usb driver for connect device with computer or laptop if not install then you cant connect if not connect so you cant done this job so must be installed in your computer or laptop, if you dont have driver so you can download from this post and update or install in your computer or laptop.
About Micro USB Cable:
Must be working well Micro usb cable this is also impotent of part for bypass gmail account (FRP reset) when micro usb cable not working then error like usb not recognized this error also if your device battery low means both reason of usb not recognized and also check device usb socket its must be working well if any problem in that then you cant connect with this box.
Download Link
Lenovo K4 Note A7010a48 Driver Download
Need for Gmail Account bypass:
1. Lenovo K4 Note A7010a48 device
2. Miracle box
3. Lenovo K4 Note A7010a48 usb driver
4. Micro usb cable
5. Computer or Laptop
How to Bypass Gmail Account in Lenovo A7010a48 ?
1. Download usb driver from above link (if link dead just leave your comment)
2. Extract to desktop or as you like path (must be installed winrar software)
3. Install usb driver if there .exe file
4. Open Miracle box
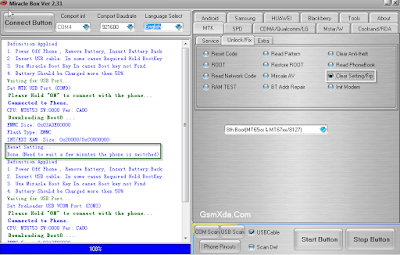
5. Go to MTK Tab and choose Unlock/Fix tab
6. Choose Clear Setting/Frp option
7. Select Boot : 8th Boot(MT65xx & MT67XX/8127) option
8. Tick on USBCable option
9. Click on Start button and Press and hold Volume Up button and insert usb cable
10. Wait until driver install, if driver installed then process start automatically
11. Congratulation you are done
FRP Reset done Screenshot:
How to Fix DL Mode in MTK device ?
1. Download usb driver from above link (if link dead just leave your comment)2. Extract to desktop or as you like path (must be installed winrar software)
3. Install usb driver if there .exe file
4. Open Miracle box
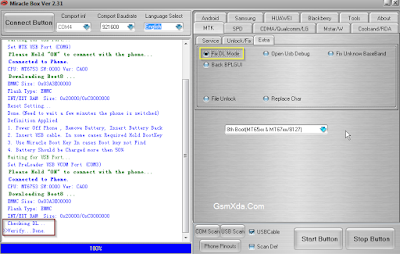
5. Go to MTK Tab and choose Extra tab
6. Choose Fix DL Mode option
7. Select Boot : 8th Boot(MT65xx & MT67XX/8127) option
8. Tick on USBCable option
9. Click on Start button and Press and hold Volume Up button and insert usb cable
10. Wait until driver install, if driver installed then process start automatically
11. Congratulation you are done
Fix DL Mode Screenshot:
Available link for download

Friday, February 24, 2017
Samsung FRP Reset Files Using Odin tool
Samsung FRP Reset Files Using Odin tool

This file you can use with an odin flash tool this files factory reset file this is different file this security you cant remove via hard reset or full flash but you can be done with this files here some model files available but some few day full model available in this list. This security how to make ? when you purchase device then first start device it asking to gmail id or password and this must remember that if forgot then device do hard reset or flash then it asked firsts enter email id or password if remember then first start wifi and enter it if forgot then use this file.
Android Factory Reset Protection (FRP) this is new feature for your device protect and this feature has been added to Android OS 5.1 or higher
New Method Google Bypass Gmail Account
Supported models : Samsung Galaxy A3, A5, A7, J1, J2, J3, J5, J7, S5, S6, Edge, Note, Tab series google bypass Gmail account (FRP) SEE HERE
Model
Samsung G550FY FRP Reset File
Download
Samsung G920T FRP Reset File
Download
Samsung G925i FRP Reset File
Download
Samsung J700F FRP Reset File
Download
Samsung N920G FRP Reset File
Download
Samsung FRP Reset File MODEM G920F OJ1
Download
Samsung FRP Reset File MODEM G920I OJ6
Download
Samsung FRP Reset File MODEM G920T1 OI5
Download
Samsung FRP Reset File MODEM G920T1 OJ6
Download
Samsung FRP Reset File MODEM G920T OJ7
Download
Samsung FRP Reset File MODEM G920w8 OJ7
Download
Samsung FRP Reset File MODEM G925F OJ1
Download
Samsung FRP Reset File MODEM G925I OJ6
Download
Samsung FRP Reset File MODEM G925T OJ7
Download
Samsung FRP Reset File MODEM G925w8 OJ7
Download
Samsung FRP Reset File MODEM G928C OJ5
Download
Samsung FRP Reset File MODEM G928F OJ5
Download
Samsung FRP Reset File MODEM G928G OJ4
Download
Samsung FRP Reset File MODEM G928I OJ4
Download
Samsung FRP Reset File MODEM G928T OJ5
Download
Samsung FRP Reset File MODEM G928w8 OGD
Download
Samsung FRP Reset File MODEM N920C OJ5
Download
Samsung FRP Reset File MODEM N920G OJ4
Download
Samsung FRP Reset File MODEM N920I OJ4
Download
Samsung FRP Reset File MODEM N920T OJ5
Download
Samsung FRP Reset File MODEM N920w8 OI1
Download
Samsung FRP Reset File SBOOT G920F OJ1
Download
Samsung FRP Reset File SBOOT G920I OJ6
Download
Samsung FRP Reset File SBOOT G920t1 OI5
Download
Samsung FRP Reset File SBOOT G920t1 oj6
Download
Samsung FRP Reset File SBOOT G920t oj7
Download-1 | Download-2
Samsung FRP Reset File SBOOT G920w8 OJ7
Download
Samsung FRP Reset File SBOOT G925F OJ1
Download
Samsung FRP Reset File SBOOT G925I OJ6
Download-1 | Download-2
Samsung FRP Reset File SBOOT G925t oj7
Download
Samsung FRP Reset File SBOOT G925w8 OJ7
Download
Samsung FRP Reset File SBOOT G928C OJ5
Download
Samsung FRP Reset File SBOOT G928F OJ5
Download
Samsung FRP Reset File SBOOT G928G OJ4
Download
Samsung FRP Reset File SBOOT G928I OJ4
Download
Samsung FRP Reset File SBOOT G928t oj5
Download
Samsung FRP Reset File SBOOT G928w8 OGD
Download
Samsung FRP Reset File SBOOT N920C OJ5
Download
Samsung FRP Reset File SBOOT N920G OJ4
Download
Samsung FRP Reset File SBOOT N920I OJ4
Download
Samsung FRP Reset File SBOOT N920t oj5
Download
Samsung FRP Reset File SBOOT N920w8 OI1
Download
Samsung FRP Reset File G550FY
Download-1 | Download-2
Samsung FRP Reset File G920T
Download-1 | Download-2
Samsung FRP Reset File G925i OJ6 SBOOT MODEM
Download-1 | Download-2
Samsung FRP Reset File J700F
Download-1 | Download-2
Samsung FRP Reset File N920G
Download
Samsung SM-N920W8 Galaxy Note 5 FRP Sboot
8VLU2AOK5_Sboot Download
8VLU2BPC5_Sboot Download
8VLU2BPD6_Sboot Download
8VLU2BPE3_Sboot Download
Samsung FRP Reset File MODEM G920F OJ1
Download
Samsung FRP Reset File MODEM G920I OJ6
Download
Samsung FRP Reset File MODEM G920T1 OI5
Download
Samsung FRP Reset File MODEM G920T1 OJ6
Download
Samsung FRP Reset File MODEM G920T OJ7
Download
Samsung FRP Reset File MODEM G920w8 OJ7
Download
Samsung FRP Reset File MODEM G925F OJ1
Download
Samsung FRP Reset File MODEM G925I OJ6
Download
Samsung FRP Reset File MODEM G925T OJ7
Download
Samsung FRP Reset File MODEM G925w8 OJ7
Download
Samsung FRP Reset File MODEM G928C OJ5
Download
Samsung FRP Reset File MODEM G928F OJ5
Download
Samsung FRP Reset File MODEM G928G OJ4
Download
Samsung FRP Reset File MODEM G928I OJ4
Download
Samsung FRP Reset File MODEM G928T OJ5
Download
Samsung FRP Reset File MODEM G928w8 OGD
Download
Samsung FRP Reset File MODEM N920C OJ5
Download
Samsung FRP Reset File MODEM N920G OJ4
Download
Samsung FRP Reset File MODEM N920I OJ4
Download
Samsung FRP Reset File MODEM N920T OJ5
Download
Samsung FRP Reset File MODEM N920w8 OI1
Download
Samsung FRP Reset File SBOOT G920F OJ1
Download
Samsung FRP Reset File SBOOT G920I OJ6
Download
Samsung FRP Reset File SBOOT G920t1 OI5
Download
Samsung FRP Reset File SBOOT G920t1 oj6
Download
Samsung FRP Reset File SBOOT G920t oj7
Download-1 | Download-2
Samsung FRP Reset File SBOOT G920w8 OJ7
Download
Samsung FRP Reset File SBOOT G925F OJ1
Download
Samsung FRP Reset File SBOOT G925I OJ6
Download-1 | Download-2
Samsung FRP Reset File SBOOT G925t oj7
Download
Samsung FRP Reset File SBOOT G925w8 OJ7
Download
Samsung FRP Reset File SBOOT G928C OJ5
Download
Samsung FRP Reset File SBOOT G928F OJ5
Download
Samsung FRP Reset File SBOOT G928G OJ4
Download
Samsung FRP Reset File SBOOT G928I OJ4
Download
Samsung FRP Reset File SBOOT G928t oj5
Download
Samsung FRP Reset File SBOOT G928w8 OGD
Download
Samsung FRP Reset File SBOOT N920C OJ5
Download
Samsung FRP Reset File SBOOT N920G OJ4
Download
Samsung FRP Reset File SBOOT N920I OJ4
Download
Samsung FRP Reset File SBOOT N920t oj5
Download
Samsung FRP Reset File SBOOT N920w8 OI1
Download
Samsung FRP Reset File G550FY
Download-1 | Download-2
Samsung FRP Reset File G920T
Download-1 | Download-2
Samsung FRP Reset File G925i OJ6 SBOOT MODEM
Download-1 | Download-2
Samsung FRP Reset File J700F
Download-1 | Download-2
Samsung FRP Reset File N920G
Download
Samsung SM-N920W8 Galaxy Note 5 FRP Sboot
8VLU2AOK5_Sboot Download
8VLU2BPC5_Sboot Download
8VLU2BPD6_Sboot Download
8VLU2BPE3_Sboot Download
Available link for download
Saturday, January 14, 2017
How to Recover Lost iPod Data after an iPod Reset or Restore
How to Recover Lost iPod Data after an iPod Reset or Restore
IPod devices are widely used as a pocket computers and portable media players. You can use them as external data storage devices to carry files. Using the Apples iTunes, you can transfer data to and from the iPod device using Apple Macintosh and Windows operating systems.
Using the iTunes restore option, you can erase all data structure on the iPod drive. If you have those deleted files in your iTunes then you can re-synchronize your device to iTunes and restore your files back.
But in case, you don’t have backup and wants to restore files that accidentally deleted even from the iTunes backup folder, then there is no direct way to restore back the deleted files. In such situation, you would require data recovery software for iPod.
Note: If you have lost your iPod data, stop performing any action with it. As it may overwrite the deleted data and thus reduces the chances of recovery. Don’t even connect it with iTunes or any other app.
How to restore iPod to factory settings using iTunes?
You can restore your iPod to factory settings using the iTunes restore option. It let you erase all data (songs, videos, photos, calendar and contacts etc.) from the device and setup the device as new. If you want to restore some deleted data, you can so it by synchronizing g your device with ITunes data library.
If you want to restore your device using the iTunes Restore option keep in mind the following things.
You must have the latest version of iTunes on your device. Backup your device data using the iTunes backup or copy the device data to another device/computer.
Now follow the given steps to restore your device:
- Connect the iPod to the computer system
- From the list of available devices, select your iPod.
- Then click Restore from the Summary panel
- In the prompt windows, click restore to confirm. It will remove all data from you device and restore it to factory settings.
- After completion of the restore procedure, restart your device.
- After restart, the welcome screen will come up. From there you can setup the device as new or restore it from a previous backup.
Suppose you have erased all your IPod data using the factory reset and you don’t have any backup. Then how would you get it back. In such case you have to recover the lost IPod data using Stellar Phoenix iPod Data Recovery software.
Features of iPod recovery software:
- Let you recover the lost data, documents, songs, video files, podcasts, e-books, and graphic files from your iPod on Windows system.
- It performs iPod recovery in cases of file loss due to accidental /intentional deletion, iPod formatting, virus attack etc.
- Supports data recovery from iPod classic and iPod Shuffle on Windows based OS (Windows 7, Vista, XP, and 2000)
- Let you create image of the IPod so that you can perform recovery later, if required.
- The original format of the data is kept intact preserved after recovery.
- The software offers three options: Quick Recovery, Deleted File Recovery and Advance Recovery
- The data not available under the Quick Recovery option could be scanned using the Advance Recovery option.
- It let you preview the list of recoverable items.From the scan results, you can search the desired data item using the Find option. The File Mask and File Filter options let you search better from the scan results.
- Using the tool, you can perform selective iPod recovery using the filters scan results according to file types and set criteria. The supported file types are MIDI, AIFF, M4A, OGG, RPS, M4P, AU, AVI, MOV, ASF, WMV, MP4, WMA, MP3, MPG, MPEG, GIF, WAV.
- From the scan results, you can select the desired items and save them at your desired location.
- Using the Create Image feature, you can create a .dat image of the iPod data and then perform recovery from the image.
- It let you save the scan results so that you can resume the recovery process at later times.
How to perform recovery using Stellar Phoenix iPod Recovery – Windows
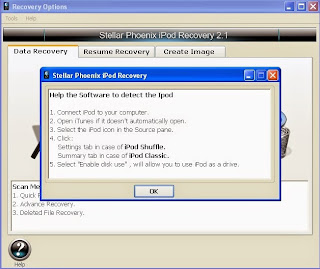
- Download and install the software. Connect the IPod to your system.
- Open the software. Click on the "Recovery" icon then click on Play button.
- Select your iPod from the dropdown list
- Click on Quick Recovery then click Play. You can also choose the Deleted File Recovery and Advance Recovery options according to needs.
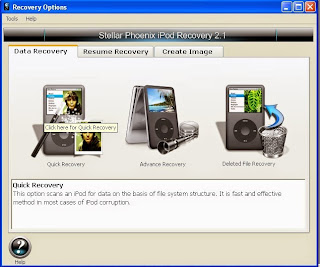
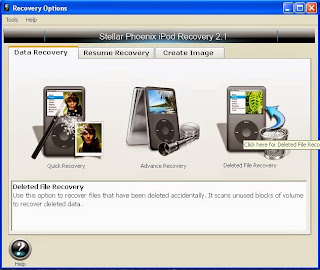
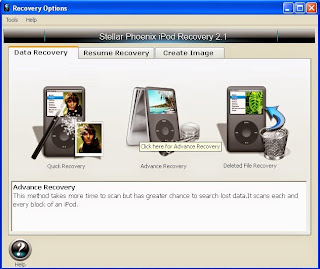
- This will begin the scan process.
From the scan result, select the folder that you want to recover and then click ‘Play’. Select the files to be recovered and save them at desired location.
Available link for download
Tuesday, December 27, 2016
How To Hard Reset Nokia Lumia 520
How To Hard Reset Nokia Lumia 520
Nokia Lumia 520 hard reset Windows Phone 7
1. Turn off your Windows phone 7 .2. Press and hold the Volume down and Camera keys.
3. Press and hold the Power key.
4. When you feel the phone vibrates, release the power key, but keep pressing the volume down and camera keys, until the phone reboots. All data will be lost!
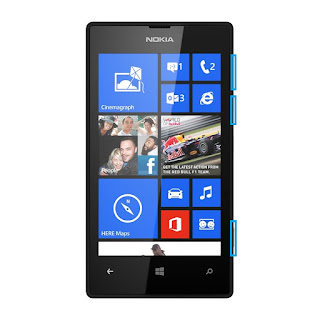
Nokia Lumia 520 hard reset Windows Phone 8
1. Turn the power Off.
2. Press and hold the Volume down and connect the charger or the USB cable with PC, for about 8 seconds, you will see anexclamation mark (!) on the screen. Note: If you do not press any of the following keys, then the phone wp8 will starts boot normally.
Then press the keys in this exact order:
1. Volume up
2. Volume down
3. Power
4. Volume down
The phone will reset and restart. Please note this may take a few minutes.
2. Press and hold the Volume down and connect the charger or the USB cable with PC, for about 8 seconds, you will see anexclamation mark (!) on the screen. Note: If you do not press any of the following keys, then the phone wp8 will starts boot normally.
Then press the keys in this exact order:
1. Volume up
2. Volume down
3. Power
4. Volume down
The phone will reset and restart. Please note this may take a few minutes.
All data will be lost!
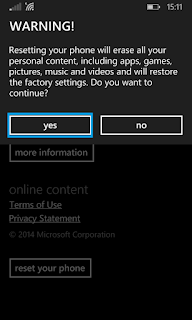
Factory Reset Nokia Lumia 520 from the menu
On the start screen Scroll down to the bottom of the screen. Tap the arrow icon.
- On the Start screen, tap
 .
. - Tap Settings > about phone.
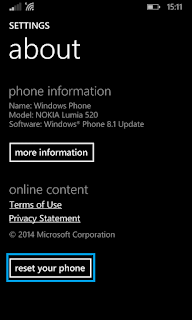
- Tap reset your phone, and then tap yes and again yes.
Available link for download
Saturday, December 10, 2016
Micromax Canvas Blaze 4G Q400 FRP Reset done without any box
Micromax Canvas Blaze 4G Q400 FRP Reset done without any box

This procedure in no need to any boxes or flashing just few minute you can done this job but need to must installed driver in your computer or laptop because without driver you cant done this job i suggest you before use this procedure first read all tutorial carefully after that following step by step and this content its very easy to understand because we are thing all are better understand without any issue because here not all are master visit this site but everyone visit who master or fresher technician this procedure not yet tested by me but i put here because this is tricks from Micromax service center must check your device USB socket if any issue also check computer or laptop USB port also check micro USB cable if any problem i mentioned then you cant done this job so please carefully following this tutorial
Required for FRP Reset:
- Micromax Canvas Blaze 4G Q400 device with good battery charged
- Driver download here
- Micro USB cable
- Computer or Laptop
Procedure:
- Turn off device with device on
- Press and hold Volume Down + Power For Fastboot Mode
- Insert usb cable to device
- Now go to RUN and type there cmd and then press Hit Enter key Shortcut key win.key + R
- Put ADB Driver into desktop
- Type : Cd desktopadb_drivers then Hit Enter key
- Type : Adb devices>fastboot oem unlock Hit Enter key
- Type : Fastboot -i 0x2a96 erase config Hit Enter key
- Type : Fastboot -i 0x2a96 reboot Hit Enter Key
- After reboot device google id will reset
- Congratulation you are done
Micromax Canvas Blaze 4G Q400 FRP Reset Done Screenshot

Available link for download
Friday, November 25, 2016
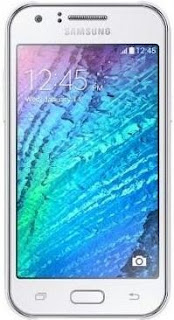
Samsung Galaxy J5 J500G FRP Reset done tested
Samsung Galaxy J5 J500G FRP Reset done tested
Must read users:
This tutorial tested by me without any error but remember here some impotent question for successfully done with this tutorial, must be working device sub socket, must be working micro usb cable, must be working volume up or down keys for boot device, must be working computer or laptop usb socket, this tutorial you can use without any box its simple.What happen if not ahead still Gmail Account ?:
When your new purchase device of any company like Samsung, Micromax, HTC, Intex, Lenovo any other company mostly new device then you start device and its asked you exiting gmail account after register exiting account then some few day you forgot pattern lock or security lock so without reset or flash device you cant solve that after new flash installed you have to start device then again asked device gmail account you was first time register in that device if you remember that gmail id or password so your are done but if not remember so you must factory reset to device so here solution if you forget gmail id or password so lets see how to solve that.Required for FRP Reset:
1. Samsung Galaxy J5 (J5500G) device with good battery charged2. Octoplus Box or Z3x box
3. Micro usb cable
4. Computer or Laptop
Procedure:
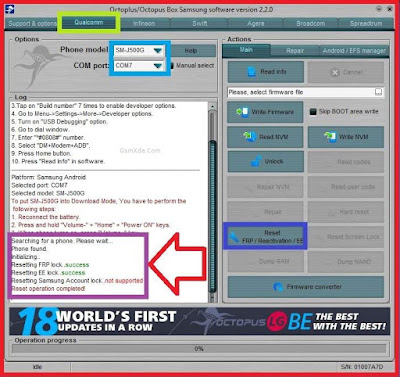
1. First open OctoPlus box (this tutorial in octoplus box so here full procedure of with octoplus)2. Go to Qualcomm CPU tab
3. Chose Phone Model : SM-J500G
4. Press and hold Volume Down + Home + Power button for Download Mode
5. Insert micro usb cable
6. Go to Main Section and click on Reset FRP / Reactivation /EE.. button
7. Wait until process
8. Congratulation you are done
Samsung Galaxy J5 (J500G) FRP Reset done screenshot:
Available link for download
Subscribe to:
Posts (Atom)