Showing posts with label data. Show all posts
Showing posts with label data. Show all posts
Sunday, January 15, 2017
How To Recover Data From Corrupted Hard Disk USB Drive
How To Recover Data From Corrupted Hard Disk USB Drive
Requirements
MiniTool Power Data Recovery
Download From HERE
For Instruction Follow This WebSite
https://www.powerdatarecovery.com/powe
Dear sir/madam,
Thank you for participation. Following is the license code
======================================================================
Product name: MiniTool Power Data Recovery
License Code:
OGQxMTQwZmItZTJlNjFlNmYtZGM5ZTUzNWEtNWMwZGFiNjMtZDdlNDI4MmUtZDJmN2IyZDQtZTIzZjkxYTI=
License type: Personal License
Available link for download

Saturday, January 14, 2017
How to Recover Lost iPod Data after an iPod Reset or Restore
How to Recover Lost iPod Data after an iPod Reset or Restore
IPod devices are widely used as a pocket computers and portable media players. You can use them as external data storage devices to carry files. Using the Apples iTunes, you can transfer data to and from the iPod device using Apple Macintosh and Windows operating systems.
Using the iTunes restore option, you can erase all data structure on the iPod drive. If you have those deleted files in your iTunes then you can re-synchronize your device to iTunes and restore your files back.
But in case, you don’t have backup and wants to restore files that accidentally deleted even from the iTunes backup folder, then there is no direct way to restore back the deleted files. In such situation, you would require data recovery software for iPod.
Note: If you have lost your iPod data, stop performing any action with it. As it may overwrite the deleted data and thus reduces the chances of recovery. Don’t even connect it with iTunes or any other app.
How to restore iPod to factory settings using iTunes?
You can restore your iPod to factory settings using the iTunes restore option. It let you erase all data (songs, videos, photos, calendar and contacts etc.) from the device and setup the device as new. If you want to restore some deleted data, you can so it by synchronizing g your device with ITunes data library.
If you want to restore your device using the iTunes Restore option keep in mind the following things.
You must have the latest version of iTunes on your device. Backup your device data using the iTunes backup or copy the device data to another device/computer.
Now follow the given steps to restore your device:
- Connect the iPod to the computer system
- From the list of available devices, select your iPod.
- Then click Restore from the Summary panel
- In the prompt windows, click restore to confirm. It will remove all data from you device and restore it to factory settings.
- After completion of the restore procedure, restart your device.
- After restart, the welcome screen will come up. From there you can setup the device as new or restore it from a previous backup.
Suppose you have erased all your IPod data using the factory reset and you don’t have any backup. Then how would you get it back. In such case you have to recover the lost IPod data using Stellar Phoenix iPod Data Recovery software.
Features of iPod recovery software:
- Let you recover the lost data, documents, songs, video files, podcasts, e-books, and graphic files from your iPod on Windows system.
- It performs iPod recovery in cases of file loss due to accidental /intentional deletion, iPod formatting, virus attack etc.
- Supports data recovery from iPod classic and iPod Shuffle on Windows based OS (Windows 7, Vista, XP, and 2000)
- Let you create image of the IPod so that you can perform recovery later, if required.
- The original format of the data is kept intact preserved after recovery.
- The software offers three options: Quick Recovery, Deleted File Recovery and Advance Recovery
- The data not available under the Quick Recovery option could be scanned using the Advance Recovery option.
- It let you preview the list of recoverable items.From the scan results, you can search the desired data item using the Find option. The File Mask and File Filter options let you search better from the scan results.
- Using the tool, you can perform selective iPod recovery using the filters scan results according to file types and set criteria. The supported file types are MIDI, AIFF, M4A, OGG, RPS, M4P, AU, AVI, MOV, ASF, WMV, MP4, WMA, MP3, MPG, MPEG, GIF, WAV.
- From the scan results, you can select the desired items and save them at your desired location.
- Using the Create Image feature, you can create a .dat image of the iPod data and then perform recovery from the image.
- It let you save the scan results so that you can resume the recovery process at later times.
How to perform recovery using Stellar Phoenix iPod Recovery – Windows
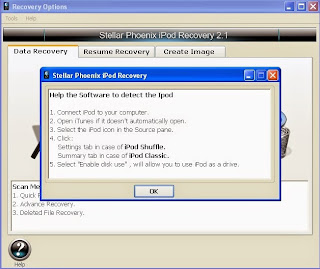
- Download and install the software. Connect the IPod to your system.
- Open the software. Click on the "Recovery" icon then click on Play button.
- Select your iPod from the dropdown list
- Click on Quick Recovery then click Play. You can also choose the Deleted File Recovery and Advance Recovery options according to needs.
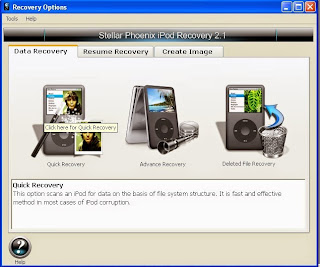
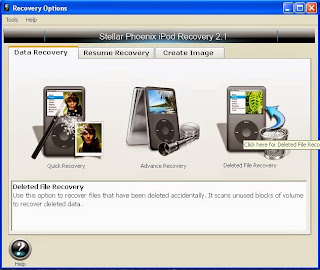
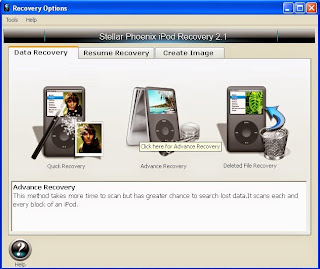
- This will begin the scan process.
From the scan result, select the folder that you want to recover and then click ‘Play’. Select the files to be recovered and save them at desired location.
Available link for download
How To Connect Nokia Lumia Mobile Devices With PC Via USB Data Cable Connection
How To Connect Nokia Lumia Mobile Devices With PC Via USB Data Cable Connection
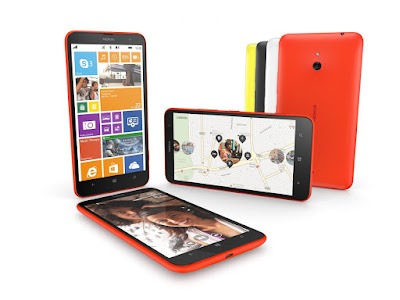
In this post, we trying to solve the most recent problem of Nokia Lumia mobiles connectivity with PC. If any one wants to connect their Nokia Lumia mobiles with their computers but they cant. So, this is your Nokia Lumia drivers problem. The driver is not installed on your PC windows operating system or it is in old version or it not working properly. So, the first problem is that the USB connectivity driver of Nokia Lumia devices is not installed in your windows operating system. You just download this USB driver of Nokia Lumia mobiles for your PC windows operating system and install it on your windows. Nokia Lumia USB driver is most important for connect lumia mobile devices with PC via USB cable connectivity. Download the latest version of Nokia Lumia devices USB driver and install it on your computer windows operating and then connect your Lumia mobile with a comfortable USB cable connection. I hope, now your Lumia devices would connect perfectly. To download the latest USB driver of Nokia Lumia devices. Just follow the provided download link is available below of this post.
Description: How To Connect Nokia Lumia Mobiles With PC
Nokia Lumia Mobiles USB Driver Download
Available link for download
Saturday, December 24, 2016
Easily Recover Data without using Undelete Software
Easily Recover Data without using Undelete Software
Data Recovery is a process to recover accidentally deleted or formatted files from your computer including common storage devices such as external or internal hard drive, USB, CD/DVD, memory card etc. Such files can be restored if proper actions are taken immediately or as soon as possible.
Data recovery software is indeed a great way to have your deleted files back, though it may require you to invest money and time. Recovery software can make use of sophisticated algorithm to deeply scan files that is mark as deleted or lost in MBR and treat them carefully to recover exactly as they were deleted.
However, we’ll discuss about some manual ways to recover your lost or deleted files without using such recovery software. It’s strongly advised to not to save or overwrite any more data on the problem storage device as it’ll make your attempts failed of recovering lost or deleted data.
Restore deleted files (Manual method)
Accidental deletion of files and folders- Perhaps, you’re cleaning your system by deleted unnecessary and junk files to free up some hard disk space. However, accidentally you may have deleted an important files or folders that you badly needed. Unluckily, you can’t file those files in the recycle bin as you’ve chosen to delete it permanently by pressing ‘shift + delete’.
Resolution: In some cases, you should see your computer recycle bin folder to see if the deleted files are there. You can right click on it and choose ‘Restore’ to save them back to their original destination. However, if you can’t found files what you’re looking for, try following the steps mentioned below:
a. Right click on folder containing your files deleted previously.
b. Choose ‘Properties’ and go to ‘Previous versions tab’.
c. This will list all the previous version of files existed previously (Before deletion). Select file which you want to restore and click on ‘Restore’ button to restore those files back to your system.
Data recovery software is indeed a great way to have your deleted files back, though it may require you to invest money and time. Recovery software can make use of sophisticated algorithm to deeply scan files that is mark as deleted or lost in MBR and treat them carefully to recover exactly as they were deleted.
However, we’ll discuss about some manual ways to recover your lost or deleted files without using such recovery software. It’s strongly advised to not to save or overwrite any more data on the problem storage device as it’ll make your attempts failed of recovering lost or deleted data.
Restore deleted files (Manual method)
Accidental deletion of files and folders- Perhaps, you’re cleaning your system by deleted unnecessary and junk files to free up some hard disk space. However, accidentally you may have deleted an important files or folders that you badly needed. Unluckily, you can’t file those files in the recycle bin as you’ve chosen to delete it permanently by pressing ‘shift + delete’.
Resolution: In some cases, you should see your computer recycle bin folder to see if the deleted files are there. You can right click on it and choose ‘Restore’ to save them back to their original destination. However, if you can’t found files what you’re looking for, try following the steps mentioned below:
a. Right click on folder containing your files deleted previously.
b. Choose ‘Properties’ and go to ‘Previous versions tab’.
c. This will list all the previous version of files existed previously (Before deletion). Select file which you want to restore and click on ‘Restore’ button to restore those files back to your system.
What if the files were deleted from the Desktop folder?
For example, if you have deleted files from the desktop folder named ‘XYZ’. Try creating a new folder with exactly the same name i.e. ‘XYZ’. Moving further, right click on the same and go to its ‘Properties’. Under ‘previous version’ tab, you should see all the deleted files located under the folder. Simply, choose any or all the files you want and hit on restore button.
However, make the system protection is set to turned on. Follow the steps below to check and make sure the system protection is ON:
For example, if you have deleted files from the desktop folder named ‘XYZ’. Try creating a new folder with exactly the same name i.e. ‘XYZ’. Moving further, right click on the same and go to its ‘Properties’. Under ‘previous version’ tab, you should see all the deleted files located under the folder. Simply, choose any or all the files you want and hit on restore button.
However, make the system protection is set to turned on. Follow the steps below to check and make sure the system protection is ON:
- Right click on ‘My Computer’ and select ‘Manage’.
- Navigate to ‘System Protection’ tab and see if the protection is set to ‘On’ or ‘Off’. To turn the protection ‘On’ for drive ‘D’ (See the image below), click on the drive and select ‘Configure’.

- Under ‘Restore Settings’ section, select the radio button stating ‘Turn on System Protection’ and set the ‘Disk Space Usage’ as per your convenient.

- Click on ‘Apply’ to make changes take effect.
Other type of deletion that can’t be addressed manually
Partition Format- If you’ve accidentally formatted or deleted an entire partition, you might be in trouble as you can’t be able to restore them manually. Instead, you should seek for professional and efficient partition undelete software that can scans and recover data from formatted or deleted partition.
Below are some common type of partition problem occurs in Windows OS:
2) File system damages - This kind of failure occurs due to hardware failure or registry corruption. Sometime logical damage is also caused by software failure. However, most modern file system has a high level of protection against file system.
3) Partition Corruption due to virus attack- This kind of corruption arises due to unknown malware or other type of threats that may leave partition inaccessible and all the data stored.
Conclusion
Data deleted from computer will keep residing on the memory till it’s not overwritten by some other data. In most cases, we simply delete any files that were no longer needed and can be restored from the recycle bin folder. If you can make use of manual tricks of restoring deleted files, you might not need to invest money on purchasing data recovery software.
However, if situations isn’t in your favor, choose efficient data recovery software might be your last resort. It’ll help you in recovering data from severely damaged or corrupt partitions as well as ensures you that it’ll be completely accessible and 100% working as before.
Available link for download
Thursday, November 24, 2016
SPD 7730 31 Read Pattern unlock code without any data loss tested
SPD 7730 31 Read Pattern unlock code without any data loss tested
If you have spd 7730/31 cpu related phone and in that issue of pattern lock then dont worry you can easy solve using this tutorial this is not only for spd 7730/31 but every spd cpu related you can done job using this tutorial but here some impotent notes this is working well if any issue in that so you cant solve problem so please read all type tutorial after try following step by step, some time what happen customer take device in office and asking please this problem can be solve ? but also required of customer please do not erase all data because its impotent if you solve as a customer required then customer trust in our office and second type any issue in device then will come to our shop.
Which box use for read unlock code without data loss ?
This tutorial done in Miracle box its version of 2.32 if you using this method then must check first version this option available in above mention version and in the new feature miracle box not supported of old version because technician cant know new feature in miracle box so i regular update and use this miracle box so i cant easy solve this problem so i request to everyone technician if you free then check our regular update forum and in check about box related there put of update in this box section.
What happen if required not working ?
Before use this tutorial must see and carefully read required for unlock this is most impotent and part in this tutorial first of device battery related its must be charged up to 80% and after try, second of box must be working well if not open box then you cant done this job, third of usb driver must installed in your computer or laptop if not installed then first install after try without usb driver you cant connect device with box, fourth of micro usb cable must be working well some device not connect with computer or laptop because here required good quality usb cable cause device always connected with box.
Download Link
SPD 7730/7731 USB Driver Download here
Need for Read Pattern Unlock code:
1. SPD 7730/7731 cpu based phone with good charged battery
2. Miracle box
3. SPD usb driver
4. Micro usb cable
5. Computer or Laptop
Procedure:
1. Download spd driver from above link (if link not working just leave your comment)
2. Extract and install driver (must be installed winzip in your computer)
3. Open Miracle box
4. Go to SPD tab
5. Choose Rd Unlock option
5. Choose Choose Boot type : SPD7730/31 EMMC option
6. Tick on USBCable option
7. Now Click on Start button
8. Press and hold Volume Down button and insert usb cable
9. Wait until driver installing, if driver not installed then update manual from above links
10. If driver installed then starting process automatically then wait until full process
11. Congratulation you are done
SPD 7730/7731 Read Pattern Unlock code Screenshot:

Available link for download
Tuesday, October 4, 2016
A Look Into Causes Of Hard Drive Crash And Possible Data Recovery
A Look Into Causes Of Hard Drive Crash And Possible Data Recovery
We all are well aware that Hard Disk drive is a storage device used for storing and retrieving digital information using rapidly rotating disks known as platters coated with magnetic material. A HDD preserve its data even when it is powered off or not in use. Data is read in a random manner that means particular single blocks of data can be stored, retrieved or accessed in any order somewhat sequentially.
It consist of one or more hard swiftly rotating platters having magnetic heads, arranged on a moving actuator arm to read and write data to the surfaces.

What is a HDD Failure ?
A hard disk drive failure occurs when the drive malfunctions and the stored information cannot be accessed with a properly configured computer. A disk failure may also occur in between of normal operation, or due to an external factor such as exposure to fire or water or high magnetic fields, suffering a sharp impact , environmental contamination which leads to a head crash.
Causes of the HDD Failure
As discussed above, the most notorious cause of hard-drive failure is the head crash. The internal read-and-write head of the device usually just flying above the surface touches a platter, or scratches the magnetic data-storage surface. A head crash leads to severe data loss and data recovery attempts may cause further damage if not done by a specialist with proper equipment. Hard-drive platters are coated with a very thin layer of non-electrostatic lubricant, so that the read-and-write head will simply rebound the surface of the platter so that a collision occur.
Whereas, this head Flickr only nano-meters away from the platters surface which confirms the risk of collision. Another cause of failure can be a defective air filter. The air filters regulates the atmospheric pressure and moisture between the hard-drive cage and its outside environment. If the filter fails to catch a dust particle, then that tiny dust particle can cause a head crash if the head reach over it. After a hard-drive crash, each particle from the damaged platter and head media can cause a bad sector. In such cases, it may be possible to recover all data.

Types of HDD Failures:-
As discussed above, the most notorious cause of hard-drive failure is the head crash. The internal read-and-write head of the device usually just flying above the surface touches a platter, or scratches the magnetic data-storage surface. A head crash leads to severe data loss and data recovery attempts may cause further damage if not done by a specialist with proper equipment. Hard-drive platters are coated with a very thin layer of non-electrostatic lubricant, so that the read-and-write head will simply rebound the surface of the platter so that a collision occur.
Whereas, this head Flickr only nano-meters away from the platters surface which confirms the risk of collision. Another cause of failure can be a defective air filter. The air filters regulates the atmospheric pressure and moisture between the hard-drive cage and its outside environment. If the filter fails to catch a dust particle, then that tiny dust particle can cause a head crash if the head reach over it. After a hard-drive crash, each particle from the damaged platter and head media can cause a bad sector. In such cases, it may be possible to recover all data.
Types of HDD Failures:-
Operating system crash and a hard drive crash both are different from each other
If your are using Mac, Windows or Linux and your operating system crashes then it is called as a Logical Failure.
And, If your hard disk is not functioning properly or having some physical issues and if hard drive itself malfunctions, then such situation is known as Physical Failure.
In both the ways the data is not easily accessible but still present on the hard drive.
Of course, you should have a backup or an image of your computers hard drive and if you dont have backup, still there is hope to get back precious Gigabytes of data through a data recovery solution.
The best way to prevent damage from a hard disk crash is to take a cautious approach and back up the data stored on the drive.
Logical Failure:- Logical failure is when your computer BIOS can identify your hard drive but unable to access it then this sort of failure is known as logical failure. It may not be able to mount the partition or Operating system can simply report that no drive is present at all. In a logical failure the hard drives electronic and mechanical components are all working properly. But the failures occur due to defective media/bad platter or data corruption.
In some cases of logical failure a hard drive that rotates fine, but is not even recognized by the computer’s BIOS as being present.
Almost all logical failures can be retrieved without opening the hard drive. Whereas there are a number of logical data recovery software programs available in market. But, its important to know why your drive had a logical failure before you proceed further to recover your data.
Physical Failure?
A physical failure is any time a drive can not be accessed because of electronic malfunction or internal hardware failure.
These failures results as drive being not recognized by the computer’s BIOS or operating system, as well as repetitious clicking or grinding noises. If your hard disk is producing such kind of unusual sound, the you must power off your PC and don’t attempt to use it again until you sent your HDD to a recovery center.
The noises which a hard drive is producing is due to a head crash. A head crash happens with the arms that read the data on the surface of your hard drive’s platters smash into the rotating platter instead of gliding across it on a cushion of air like they are supposed to.This results in physical damage to that platters and can cause a complete and permanent data loss.
The only way to recover your data after a physical failure is to either replace the damaged hard drive integral or move the data platters to a donor drive where they can be recovered to a stable destination drive. This kind of recovery process is performed in a cleanroom with a special handling.

Hard Drive Failure – Resolutions.
It is not easy to fix a damaged Hard Disk Drive, there are a number of things that you have to look into when it comes to hard drive recovery. This is because hard drive problems could involve issues with the logical and physical areas. Damage on the electronic circuit board can leads to hard disk problems. Some cases of hard drive failure requires several years of experience on hard disk recovery. Consulting a hard disk recovery expert is the best way to get back your data. You will have to pay for the hard disk repair service. But if you are going to think about it, paying the services of an expert is more sensible than threaten the condition of the device and data. The hard disk recovery expert will go through the condition of the device first. He will determine if the damage is still within control and if the data can still be retrieved or not.
You Can try following mentioned Free data Recovery Tools
1) TestDisk(Windows/Mac/Linux)
2) Recuva(Windows)
3) PhotoRec(Windows/Mac/Linux
4) Restoration(Windows)
5) Undelete Plus(Windows)
Available link for download
Saturday, September 17, 2016
How to recover data from RAID 0 1 5 6 10 configurations
How to recover data from RAID 0 1 5 6 10 configurations
The traditional data storage configuration system has been replaced by RAID in majority. The RAID configuration let you store large amount of data with enhanced features such as: data protection, reliability, availability, performance. Sometimes you may lose access to your RAID data due to various reasons such as: Hardware failure, drive corruption, array failure etc.
You can find here information about various RAID configurations and later on, we will discuss how to recover data once the RAID architecture fails or become inaccessible.
About RAID configurations:
The term RAID refers to redundant array of independent disks.
The configuration is based on the concept of storage virtualization. Virtualization means dividing the system resources among different applications. A storage system is basically a storage array or disk array or a filer. Storage virtualization uses virtualization to enable better functionality, data redundancy, performance improvement and more advanced features in computer data storage systems. RAID uses the concept of storage virtualization for combining multiple disk drive components into a logical unit.
Using this kind of methods, the computing and data processing gets faster. Along with these, it also provides better data protection, reliability, availability, performance, and capacity features.
Based on architectures, RAID is divided into different levels: RAID 0, RAID 1, RAID 2, RAID 3, RAID 4, RAID 5, RAID 6 and RAID 10 etc.
Different RAID levels are explained below:
RAID 0: It is also known as a stripe set or striped volume. Data is distributed evenly between two or more striped disks that act as a single large logical disk. No redundancy, mirroring, parity is used. As there is no redundancy, if one drive fails the whole RAID volume fails.
RAID 1: The data of the drives are copied/ mirrored exactly on two or more disks. If one drive fails the RAID still keeps working as the same data is present on the other mirrored copy of the disk from where it can be accessed. No parity or striping is used.
RAID 2: Bit-level striping is done rather than block level. The disks work in synchronization such that each sequential bit is on a different drive. Hamming code is used for error correction.
RAID 3: In this case, Byte level striping is done. The disks work in synchronization such that each sequential byte is on a different drive. For each corresponding byte parity is calculated and stored on a dedicated parity drive
RAID 4: It is based on block-level striping with dedicated parity
RAID 5: It is based on block-level striping with distributed parity among the drives. Minimum of 3 disks is required to create RAID 5. If a single drive fails, still it will be functioning.
RAID 6: It is based on block-level striping with double distributed parity thus provides fault tolerance up to two failed drives
Note: Data striping is a practice of saving consecutive segments of logical sequential data on different physical storage devices. disk mirroring is the replication of logical disk volumes onto separate physical hard disks in real time to ensure continuous availability A parity bit, or check bit is a bit added to the end of a string of binary code that indicates whether the number of bits in the string with the value one is even or odd. Parity bits are used as the simplest form of error detecting code.
Among the above RAID implementations, RAID 5 is the popular one.
Which one to choose?
In RAID 5 the data blocks and parity is striped among all disks. Though it offers good data protection, it has few drawbacks too.
Drawbacks:
- 20% of the disk space is allocated for parity.
- If the data blocks are large, the read performance will be slower.
- When a RAID 5 is to be rebuilt, a lot of complex parity calculations needs to be done for every block. Building the disk from scratch is quite sophisticated and time consuming. If a single sector on the RAID 5 array demise, the whole array needs to be rebuilt. As the size of disk will be more, the time taken for rebuilt will also increase accordingly. Comparatively RAID 6 is treated as a better choice in comparison to RAID 5.
If even a single disk fails, the whole RAID 5 array becomes erroneous. The problem disk hasn’t been repaired, Meanwhile a second disk demises. In such case, you may lose your important data. In such case the faulty drive needs to be rebuilt while it’s online and in production. If RAID has stopped working properly due to any logical issues, you can have a quick and easy RAID recovery by using the Stellar Phoenix RAID Recovery software. The software can recover raid data from various RAID configurations of RAID 0, 5, 6 and 10 servers.
Using the software, you can recover deleted documents, files, folder, multimedia files and emails from Windows drives, external media, and RAID 0, RAID 5, and RAID 6 arrays. It lets you recover lost/missing RAID logical volumes, FAT, exFAT, and NTFS partitions of size 2 TB or more. You can preview the list of recoverable items before actual recovery.
The software offers Remote Recovery feature to perform recovery over a network or remote location. To build the probable RAID construction, the software automatically matches patterns and parameters of the RAID configuration. If you don’t remember these details, simply select the Dont know option and parameter values (Strip Size, Parity Order, Parity Delay etc.).
If the software fails to build RAID construction then you can perform RAW recovery using virtual RAID construction. Using the tool, you can create image of your problematic hard drive volume or external media and perform recovery from the drive image. Signature based recovery comes handy if the quick recovery fails to recover the lost data. The software let you recover corrupt or incorrectly burnt CD DVD burnt on Windows, Mac, UNIX or Linux. You can benefit the S.M.A.R.T features using the Drive Status option of the tool. This feature let you gather the hard disk information about serial number, model number, size, status, temperature and firmware revision etc.
Available link for download
Tuesday, September 13, 2016
How to secure both a failing Mac volume data inside
How to secure both a failing Mac volume data inside
 This time again the Mac disk utility showed up several error codes that made the doubt clear in my mind about the failing volumes. Navigating through Utilities—Applications--DiskUtility--FirstAid--VerifyDiskPermissions ends up displaying the below outcome. At the first glance, these errors wont even look familiar or understandable to a moderate user. Either only a geek or a software developer for Mac systems would be able to hunt out its real meaning for permission error codes. A person like me or a non-geek would succumb to such errors even before giving it a last try for repair.
Fig (1)
I am clear on this; Permissions on Mac are predefined and associated with each and every single files/folders. To perform a read-write operation, the permissions should be clearly stated for users to execute without a halt. Any errors on Disk Utility would show up only after the permissions are either damaged or redefined for OS X to understand. Such a case would invite logical disaster either in no time or will slowly crawl the Mac to the ultimate logical failure. Since permission errors are reported on time still they could malfunction the Mac OS X, it is the need of time to repair the corruption with the help of an alternative solution.
“Had it been basic volume errors, Disk Utility must have fixed it.”
Further, the damaged hard drive (volumes) is at high risk of resulting in no mountable file systems, ceasing the user to access the data stored on the partition. This is a highly unfavorable situation where the drive along-with the data becomes prone to failure. The disk utility would let you know about the unmounted hard drive from the left panel by diminishing the hard drive icon. In this case, one can make attempts to at-least ensures the data recovery from unmounted drive with the help of an OS X file recovery program. Consider the below snapshot of a file recovery software that successfully scans an unmounted hard drive & previews the list of data to the user for recovery. If this attempt utilizes then trust this, user can feel bit relieved with securing the data from an unmounted hard drive. Otherwise, the integrity of the Mac hard drive is still in question which might demand for logical or physical repair.
Video:How to recovered unmounted data on Mountain Lion

Fig(2):-

An important point to be noted is, the volume repair utility would be only helpful in fixing out the logical damage done to the hard drive. Sadly, talking of a physical damage, no software would be of help other than the repair services. However, there are certain instances of hard drives which had bad sectors on their surfaces but with the help of Imaging, the data stored on the drive was successfully recovered although the drive still be required a helping hand.
Fig (3): - Fig (1) errors sorted out
Available link for download
Subscribe to:
Posts (Atom)