Showing posts with label your. Show all posts

Tuesday, March 7, 2017

10 tips for boosting your wireless router signal

10 tips for boosting your wireless router signal


10 tips for boosting your wireless router signal
4
Share
When it comes to "boosting" wireless speeds, there are actually two enhancements users typically seek: Distance and speed. Its great having a speedy wireless network, but if you only get great speed when you use a wireless client right next to the router and get no signal if you are 15 feet away, then speed doesnt mean so much. You need to boost the signals range. If your device can barely open friends Facebook pictures when youre in the same room as the router, then were talking about problems with speed.
In general, speed and range issues can all be lumped together as performance issues. You want both your speed and range to be as robust as possible. There are several factors that can impact both aspects of performance.
Distance can certainly impede performance. You may have a room in your home or office that is simply too far from your wireless router. Even the way your home or office is structured could be a culprit when it comes to poor wireless performance. If the signals have to bounce around too many corners to reach your wireless devices, that can cause problems (although a technology in newer premium routers called beamforming can help direct a routers signal to wireless clients).

Interference with the signal can be big factor in performance, too. If you live in an apartment building, your home might be inundated with signals from everyone elses routers. Maybe structural interference is the culprit. If your washing machine and dryer are between your router and your laptop, that doesnt help. Maybe its the software youre using. Routers need software updates just like everything else – and sometimes the firmware they initially ship with is improved with a later-released update.
These are just a few of the possible reasons your connection might be poor (or non-existent). Fortunately, there are many ways to extend your wireless signal, and most of them simply involve a bit of tweaking to your wireless network or adding some affordable components. In this article, we’ll walk you through ten of the most useful fixes for your connectivity woes.
Some of these suggestions require no additional hardware or software to purchase, while others may require a small or larger investment, depending on the particular performance problem youre experiencing. We’ll start off with free solutions, then move through the cheap to more expensive improvements.

1. Change the channel (free)

Not the TVs channel, but your routers. Wi-Fi routers operate on specific channels. When you set up a typical router, it usually chooses a certain channel by default. Some routers choose the least-crowded channel, but yours may not have. Check for yourself which Wi-Fi channel is the least crowded to boost the routers performance, perhaps boosting signal range. A good free tool to use is inSSIDer. Dont be put off by the graphs and excess information. What you want to focus on is the column "Channel." See how many routers in this area are on channel 6 in the image above? If your router is on the same channel, you want to switch it to a less-crowded one, like 4 or 1. You can change the channel of your router by going into its interface. All routers have different ways to access the interface, so check with your manufacturer on this score.


2. Update router firmware (free)

Updating router firmware is often overlooked by home users. Business networking devices usually display some sort of notification when newer software for the device is available for download. Consumer products such as home wireless routers, especially older routers, dont always offer this notification. Check often for firmware updates for your router. There is typically a section in the routers interface for upgrading the firmware. However, you often have to go to the router manufacturers website and search for the firmware (most vendors make searching for firmware pretty easy) and then upload it through the routers interface. Theres often accompanying release notes that tell you what the firmware helps to fix – and often the fixes are for connectivity problems.


3. Update adapter firmware (free)

Just like routers, network adapters on PCs and laptops are also subject to firmware updates. Remember, good wireless range and performance is dictated not just by the router but by the network adapter on clients (as well as other factors, but these are the two biggies.) Most laptops have on-board adapters. Go into your Network settings to find the name of the adapter (via the Control Panel in Windows) and then to that adapter manufacturers site to make sure you have the latest firmware.


4. Change position (free)

Do you have your wireless router nestled up against your broadband modem tucked away in your entertainment centre in your basement thats converted into the family den? Well, move it if you have range issues. It isn’t necessary to have the router in close proximity to your modem. Ideally, a Wi-Fi router should be in a central location. You can purchase custom length Ethernet Cat 5 cable from any computer store (although if you do that, technically this is no longer a free option) if you need more flexibility in centrally positioning the router.


5. DD-WRT (free)

This one is for the more adventurous: DD-WRT is open source software for routers. Its known to ramp up router performance and extend the feature set beyond what typically comes with most routers. Not every router supports it, but the number of routers that are supported keeps growing. A word of warning, though – installing DD-WRT could possibly invalidate your routers warranty. Many manufacturers will not help you troubleshoot router issues once you have DD-WRT on them. Hence, this is not a recommended option for routers under warranty or in a business network.
There are also no guarantees that DD-WRT upgrades wont negatively affect a router. However, many users are finding it a free way to trick-out their routers. So, if you have an older, spare router laying around, or want to take the plunge to see if DD-WRT firmware helps your range issues on a newer router, check if its supported on the DD-WRT site. Also note that its not easy to remove DD-WRT from some routers without doing a lot research.


6. Set up a second router as an access point or repeater (cheap)

You can set up just about any router as a wireless access point. To do so, you need to connect the second routers LAN port to the primary routers LAN port. On the second router, you will want to give it the same addressing information as the primary router. For example, if your primary routers IP address is 192.168.2.1 and its netmask is 255.255.255.0; then you could make the second routers IP 192.168.2.2 and use the same netmask. Its also important that you assign the same SSID and security on the second router, and turn DHCP off on the second one as well.
Newer routers make this process easier. If you have a second router thats only about a year old, most of them can be set to operate in "access point" or repeater mode. Configuring is as simple as clicking a button. Check with your routers manufacturer or documentation.


7. Antennas (cheap)

Newer routers are increasingly manufactured with internal antennas. There are some that still have or support external ones, and these antennas can often be upgraded. Consider a hi-gain antenna, which you can position so that the Wi-Fi signal goes in the direction you want. Hawking Technology offers the HAI15SC Hi-Gain Wireless Corner Antenna, which the company claims boosts wireless signal strength from a standard 2dBi to 15dBi. Antennas like these can attach to most routers that have external antenna connectors, and are relatively cheap upgrades.


8. Dedicated repeater/extender (more expensive)

Most major wireless networking vendors offer devices that act as repeaters or wireless extenders. While they can extend a Wi-Fi signal, they can be tricky to setup, and can cause interference with the signal. They can also be on the more expensive side. Note that if you choose this option the best bet is to use an access point made by the manufacturer of your router (see tip number 10 for further details).


9. New router/adapter (more expensive)

How about getting a new router and adapter(s) altogether? Upgrading your home network to one of the latest 802.11ac routers, or an 802.11n model using the 5GHz band should give a noticeable performance improvement. 2.4GHz is said to actually have greater range than the 5GHz band, but that only becomes apparent when supplying wireless coverage to large areas such as university campuses. In our testing, we’ve found that for smaller areas like a typical home network, 802.11n and the 5GHz band maintained better throughput than 2.4GHz with most routers, at greater distances. This is certainly a more expensive option, but if wireless connectivity is crucial for you, its a plausible one. If you’re pondering an upgrade to an 802.11ac device, we’ve got a group test of seven such routers you might want to check out (our benchmarks here show the benefit of ac, and indeed the benefit of 5GHz over 2.4GHz). Bear in mind that if you get a new router, to take full advantage of the speeds possible you’ll need to update client adapters to the same standard as well.


10. Stick to a single vendor (more expensive)

Vendors are quick to point out that their devices will work with other vendors products. But it just makes sense that Cisco network adapters will work better with Cisco routers; Belkin adapters work optimally with Belkin routers and so on. If possible, try to limit your network devices to one vendor – that means not only you


Available link for download

Read more »

Wednesday, February 22, 2017

Tools to Find and Change Your Windows and Microsoft Office Product Keys

Tools to Find and Change Your Windows and Microsoft Office Product Keys


Instead of cursing any one of them you can make use of some real nice tools to find or change your Microsoft Windows and Microsoft Office Product Keys, these softwares can easily help you find the product keys for any Microsoft softwares you may have installed on your system.
Why Should you need this software?
Well that’s a question many of you may ask but once you have lost a product key, you have effectively lost your license for the software. The software in itself will not be able to show you the product key you have used to register the software, so having a handy utility to retrieve those lost product keys are a must.
Also at times you may want to change the product key to use a new license you have just acquired, nevertheless these utilities allow you to both view and change your windows and office product keys.
Let us have a look at the numerous product key retrievers that are available to be used free of cost.

Windows and Office Product Key Finders

Magical Jelly Bean Keyfinder
This is one of the most popular softwares you can use to find and retrieve your Microsoft office or Windows product keys. It also allows you to easily change the product keys. The software works on Windows 95, 98, ME, NT4, 2000, XP, Server 2003, Windows Vista, Office 97, Office XP, and Office 2003.
More Info | Download
ProduKey
ProduKey is a software similar to Magical Jelly Bean and allows you to find keys for both Microsoft Windows and Microsoft Office.
More Info | Download
KeyFinder
KeyFinder can be used to retrieve your lost Windows XP Product Key. The page has a nice list differentiating between Product keys and OEM keys.
More Info | Download
CD Key Seizer
The software allows you to retrieve product keys for Windows 2000 and XP and Microsoft Office 2003 and 2007 along with Frontpage 2003.
More Info | Download
Other Softwares which will allow you to retrieve and change your CD keys
  • WinKeyFinder
  • Windows Key Finder
  • RockXP


If you are stuck at finding the product keys are dread to reinstall or buy the license again these softwares may come in quite useful to you. You may also at some time want to renew your licenses and these ease to use softwares can easily help you update your CD keys for both Microsoft Windows and Microsoft Office softwares.
I hope these softwares may very useful to us

Available link for download

Read more »

3 Best Apps To Remove Duplicate Files in your Windows 7 8 XP

3 Best Apps To Remove Duplicate Files in your Windows 7 8 XP


Is your computer’s Hard Drive filled with Many Duplicate Files ? Have you got the Low disk space error message ? “You are running Out of Space On Drive . To Free space on this drive by deleting old or unnecessary files”. You should remove unwanted files from your computer to gain disk space. Using the two fastest ways, You can gain the Hard Drive space. First one is, you have to delete the biggest files in your hard drive. The second one is,  You can remove the duplicate files to get some space easily. Use this post to Find Large Files and Folders in your Hard Drive very Fast.
The simple and easy way is deleting the duplicate files in your hard drive. The duplicate files are the replica of the same files in a different folder or in the same folder with a different name. Finding the every duplicate manually needs a lot of time and complex one. But you can gain more Hard disk space, if you remove duplicate files from your computer.
Here, I have picked the best 3 Duplicate finder tools that will find and remove duplicate files in no time.

1. Duplicate Cleaner Free

Duplicated Cleaner is the perfect tool to organize your files in a systematic way. Using that you can find the number of Duplicate or redundant files. This Application has nice Interface, you can find any options without any trouble. It deeply scans your Hard drive for redundant files with different search patterns like filenames, content and size. You can search for the photos, music, films, video, Word documents, PowerPoint presentations and text files. If the file appears twice, it will show you in the list.
Note: Uncheck the system files option, Before scanning for the duplicate files in this tool.
Download Duplicate Cleaner Free | 3.9 MB
//go.ad2up.com/afu.php?id=574996

2. Anti-Twin

Anti-Twin is the small, free application that finds the duplicate files or similar files in your Hard disk. The user Interface is simple, select the folder to find the duplicate files. You have to select two folders to compare the files. It is fast and efficient program to find the duplicate files in your computer
Download Anti-Twin | 800KB
//go.ad2up.com/afu.php?id=565926

3. Auslogics Duplicate File Finder

Auslogics is also a good application to search duplicate files in your Windows PC. You can use this tool to find identical pictures, documents and any other files. It compares the files with content, so you can get accurate similar files. You can use this program to organize your music collections.
Download Auslogics Duplicate Finder | 4.16 MB
//go.ad2up.com/afu.php?id=574996

Wrap Up

To run without any performance issues, Your computer needs some free Hard Disk space. For that, Organize the files and Folders in your computer regularly. Even though, your computer’s hard drive might be filled with Duplicate files. At that time, use this best Duplicate file finders to remove those duplicate files.
You can use all the above tools to find the similar or duplicate files in your computer. All applications support Windows 8, Windows 7 and Windows XP.
//go.ad2up.com/afu.php?id=574996


Available link for download

Read more »

Friday, January 27, 2017

How to activate two step 2 step verification in your Gmail account

How to activate two step 2 step verification in your Gmail account


Activating two step(2 step) verification in Gmail 


In this article I will explain the detailed procedure on how to activate the two step verification in Gmail account. Before activating two step verification one should know what is a two step verification.

What is a 2 step verification ?


Two step verification is one of the new and secured system of protection of your email account. 2 step verification process act as a second layer of protection in Gmail account. Typing password is a first layer of protection and two step verification is a second layer of protection. 


Read more »

Available link for download

Read more »

Sunday, November 20, 2016

HOW TO INCREASE SUBSCRIPTIONS TO YOUR YOUTUBE CHANNEL FAST Free Drivers Download

HOW TO INCREASE SUBSCRIPTIONS TO YOUR YOUTUBE CHANNEL FAST Free Drivers Download


HOW TO INCREASE SUBSCRIPTIONS TO YOUR YOUTUBE CHANNEL FAST !

https://www.youtube.com/channel/UCXjZ8CaodWf7tKiDQmYiLqQ?sub_confirmation=1


-------------------------------------------------------------
A YouTube channel without subscriptions is a show without an audience and it can quickly become disparaging uploading videos and getting no fans. In order to get more subscribers youve got to put yourself in their place. A subscriber is someone who enjoys your content so much they want to be informed every time your channel is updated with new content. Thats a big compliment to give someone, so its understandable that not everyone who views your videos is going to jump on the subscriber bandwagon. That being said, there are some things you can do to improve your turnover and start increasing your subscribers.
----------------------------------------------------
More Content
----------------------------------------------------
You guessed it; the easiest way to attract more subscribers is by consistently adding more content to your channel on a regular basis. The more you have out there in the sea of YouTube videos, the more likely someone is to run across one of them and find your channel.
----------------------------------------------
You will also want to set a schedule for when you release your videos. If people see you are adding new content on a regularly scheduled basis, they are much more likely to subscribe then if they see you havent added anything in a while and when you did it was sporadic.
------------------------------------------
Interact with Viewers
-------------------------------------------
Nothing builds a sense of community better then a content creator who responds and speaks with their audience. If someone comments on your video be sure to thank him or her. If a conversation breaks out in the comment section relating to what was posted, chime in and give your two cents. Even if the comments are less than friendly, thanks them for giving it a watch and ask for some constructive criticism (except if theyre trolling of course). Try ending your video with a call to the viewers asking their thoughts on something or even an idea for your next video. Getting your viewers involved will go a long way in building a relationship with them that will keep them around for a long time and spread the good word of mount about you.
----------------------------------------------------------
Reach Out
------------------------------------------------
Take a moment to research similar channels to yours that are already successful. Once youve found a few, compose a friendly message explaining a little about your channel and what you do. You may then want to suggest exchanging places on each others featured lists. Doing this will show a link to their channel from your channel and vice versa. Now this is a big choice for another YouTuber to make, and you may want to wait until you have a decent video library built up before you go around asking people. If they see you are committed and pumping out content regularly, they will most likely accept your invitation and your channel will gain that much exposure.
---------------------------------------------------
Another huge benefit of exchanging featured spots with someone in your same field is that you will be displaying yourself right to your targeted audience. If you were to create a lets play channel for Dead Space and exchanged featured spots with a well known YouTube knitter, chances are not many of their viewers would want to check your channel out.
--------------------------------------------
Asking for Subscriptions
--------------------------------------------
The line between asking genuinely for people to sub to your channel and coming off as begging for them to is a fine one. There are a couple different ways for asking viewers to sub, all of which should be placed at the end of your video. Starting off with a plea to subscribe to your channel is a terrible way to start off a video that is supposed to be entertaining/informative. Try to live by the golden rule of the Internet, never ask people for something unless you have given them something of value first (your video in this case).
After your main content has run its course, take a moment to kindle ask the viewer to consider subscribing to your channel if they enjoyed your video.
-----------------------------------
------------------------------------------
----------------------------------------------- 
THANK YOU.
PLEASE FEEL FREE TO CONTACT US @
www.rushikeshthawale.in

Available link for download

Read more »

Wednesday, November 16, 2016

Protect your Eyes By Automatically Adjusting Computer Screen Brightness Based On Time of the Day

Protect your Eyes By Automatically Adjusting Computer Screen Brightness Based On Time of the Day


Today Most of the youngsters using their computers at night very long time rather than using in the daytime. Staring at your computer screen for the long time could lead to some physical problems, that is eye related diseases. Especially at night the eyes may go rough. At the end you might suffer with dry problems or may be with some serious eye problems.
To get rid of this problems while you are working late night, you have the option to adjust your screen brightness manually in any systems. This remedy work for some time but not greater extent. Also dimming your screen alone won’t protect your eyes. It needs much more tweaking in your computer screen to get the perfect screen that will fit for eyes.

What is it and How it will help

F.lux is the light weight utility that automatically adjusts your computer screen brightness depending on the time of the day with some advanced tweaking facilities.  It makes the color of your computers display adapt to the time of day, warm at night and like sunlight during the day.

Most Useful Features

  •  It makes you sleep better and Protect your eyes
  •  it makes your computer screen look like the room you’re in, all the time. In day time It gives you the bright screen like sun, in night-time it gives you the best night screen
  •  It has the  Change location option enter your GPS Co-ordinates to make things better for adjusting your screen brightness based on the time automatically.
  • If you want to do Color-sensitive work, You can disable this app for one hour to give you the default brightness
  • You can also control the transition of your screen brightness in the transition speed settings: fast 0r slow.
flux
Just download and install this application, it will run in the background all time. Only uses just 3.3 MB RAM in my system when I have tested this little handy utility. Double click to open this program in your computer as a window. Click the 24 hour preview to know that how this app changes your computer screen based on the time.
Enter GPS Co-ordinates
This application isn’t suitable for the individuals doing color sensitive works like Graphical design at night. Because this app changes your screen brightness and colors. So that your screen will look orange or light pinkish color. So It will not be suitable for any color sensitive work. Apart from that anyone can use this app to protect their eyes from bright light.

Conclusion

My Personal Experience about this app is good. I work a lot at night. And this app helps me a lot to protect my eyes during night-time when I have written articles for this blog or doing some other activities Online.  If you are like me, Just try this app and post your opinions here.
This app supports Windows, Mac OS X, Linux, iPhone and iPad. I have tested this app in Windows 8, and it works without any problem.

Update :

F.lux 3 beta Released. Here’s a quick look of F.lux 3 Beta
  • Warmer colors, down to 2700K
  • f.lux for Philips Hue
  • Support for calibrated monitors
  • Movie mode (partially disable to watch a movie)
  • Disable until morning
  • Screen warms as you dim it
  • Fixes for Intel chipsets
  • Ffixes for Windows 7+

Download: f.lux 3.0 BetaDownload F.lux (HomePage)


Available link for download

Read more »

Tuesday, November 15, 2016

How to Declutter and Revive Your Mac Hard Drive Back

How to Declutter and Revive Your Mac Hard Drive Back


While working on Mac, all of a sudden a dialog box starts appearing on your screen: Your Startup Disk is full. Its the final confirmation of what youve been afraid off - your hard drive has finally ran out of space and now you will have to do something to overcome it.


The question arises, how to make space on HD?
When you started up your shiny new Mac for the first time, you might have thought about the hard drive space although you were confident that it won’t ever fill it up. But, now after few months you have filled every troy of your hard drive capacity.
No need to panic, because here we will discuss every feasible measure to solve this problem. This will help you to identify the causes of rapid filling up of your hard drive, plus discover which files causes disaster on your drive. Let’s discuss some tips which will help you to recover some free space on your Mac drive. Reviving a Mac hard drive is quite simple process, but not a short one. If your hard drive space is vanishing or getting filled rapidly, then you need to know the consequences which make your hard drive fill up to its capacity.

How Hard drive space get consumed.
User install a fair number of applications on their Mac, some time just to try them but forgets to uninstall them during their busy day schedules and thinking that hard drive space would last forever. This thing may eat your few gigabytes of space easily. Where as files downloaded via browser or an email attachment pile ups on your hard drive, but yet again more Gigabytes of the drive are gone.
Moreover, Users personal files like photos, videos are the biggest drains on your hard drive space. Every 10 megapixel photo consumes about 4MB in JPEG format, which makes around 400MB to 1.5GB of space for storing 100 photos on your hard drive. The average one hour HDV video holds 13GB of data , so its better not to keep on pilling your videos on your hard drive.
Its not over yet, iTunes library can consume plenty of space on your hard drive with your music collection, podcasts, movies and TV shows. You will be surprised to know that duplicate files existing on your hard drive consumes enough space but if it’s of small size then you need not to bother.
Activity Monitor plays vital role in analysing the application which are consuming space on your hard drive. Some programs automatically starts up when you log onto your Mac. Check Login items in System Preferences so that all the listed app are of use and needed. If not then just select it and click the minus (-) sign.


Ways To Revive Space Back on Your Mac Hard Drive.
Uninstall Unwanted Apps:- Like Login items, through Application folder you can uninstall anything which is no more useful to you. It wont fasten up your Mac but it will reclaim your hard drive space back. You can simply uninstall application by dragging and dropping them to trash.
Check For Some Maintenance:- You should check whether your hard disk is fine or not. To diagnose simply run Disk Utility (in Applications > Utilities) to verify and repair disk permissions. This helps in determining which app can do what with files on your Mac. It also verify and repair the disk itself.
Troubleshoot you Battery and Memory:- If user owns a Mac notebook and having problem with the battery. If you want to get longest life of your battery, fine-tune it so that it gives optimal battery life out of it. If your draining rapidly, then its a warning. You need to reset the SMU or PMU. Some problems are resolved by resetting your Macs PRAM and NVRAM.
Reclaim Your Hard drive Space Back :- While you are cleaning your hard drive, try to figure out exactly which app is taking most of your space on your Mac with a visual tool that will represent everything on your hard drive for example Disk Inventory it creates a “tree map” of hard drive and will reveal all the files on your hard drive. So with help of such tool you can delete the unwanted files and can get back free space on your hard drive.
Empty Your Trash :- User must delete unnecessary or duplicate files from their Mac systems because these files contains same content and waste the precious disk space, user must give a check on such kind of files and should not forget to empty the trash.
It will help in getting back the disk space.


Delete Unused Languages Drivers:- If your startup disk is full? Then you must check whether your system (Mac) speaks too many languages. User must keep languages of its use only and should remove the unknown languages. By doing this user can save around 3 GB of disk space, but be warned because getting back those deleted languages files is not an easily reversible process.

These were few tips which can help user to regain some free space back, whereas there are many tools which can help users to clean their cluttered Mac OS X.
Third party tools that can help clean a cluttered Mac OS X :–
  1. Stellar SpeedUp Mac
  2. Clean My Mac
  3. DetoxMyMac
  4. MacKeeper’s ‘Mac CleanUp
These steps are all well and good to keep your Mac optimized and running smoothly, and do run periodic cleanups like these to get everything back at their respective top shape.

Available link for download

Read more »

Friday, November 11, 2016

Causes Fixes Prevention of Bad Sectors in Your Hard Drive

Causes Fixes Prevention of Bad Sectors in Your Hard Drive


A sector in a hard drive platter is a small cluster or area where actual data is stored. Normal hard drive can have from 1 to 6 platters and a single platter can have over millions of sectors. Including platter, any hard drive will also have heads, spindle motor, firmware, PCB etc. responsible for its smooth functioning. However, being an electronic device, hard drive may have one or more failing mechanical equipments which gives birth to data inaccessibility, permanent hard drive failure or system startup failure etc. After which, one may not able to retrieve the stored content as well as permanently looses accessibility to their system.

Bad sectors on the hard drive platter could be developed throughout its lifespan which may make OS unable to read or write information on that particular section. Moreover, bad sector would stress the read/write head of hard drive and causes subsequent delays in accessing the memory/information. As a result, hard drive will start failing, throwing system freezes or sometime gives black or blue screen of death (BSOD).

What causes bad sectors?

Sector is usually a block of information stored on the hard disk and having standard size of 512 bytes. These sectors can easily become bad due to imperfections of this real world. Though, you can found some most common causes which contributes heavily towards building bad sectors and blocks on the hard drive platter,

  1. System infected with Virus / Trojan / Malware – Any malicious computer program can physically harm your computer and damage surfaces of the platter or inject wrong information on the sector. However, Some DOS attacks were used to misguide operating system to treat sector as bad even if they werent.
  2. Abnormal Shutdown: Not properly shutting down the PC may results in wrong positioning of read/write head which tends to move around the platters when system is running. Sometime, sudden system shutdown due to power failure could make platters to get in contact with the read/write arm and damage that area called sectors.
  3. Power Surge: Improper power supply or not using the reliable electricity medium causes hard drive equipments to be overheated sometime and thus, damages the magnetic area around the hard drive platter.
  4. Aging Equipments: Being an electronic device, hard drive equipments may start wearing out and bad sectors were created over time. As this process seems bit natural and depends on the overall hard drive age, these cases are least considered but worth checking.
  5. Faulty Heads: Heads plays crucial role in retrieving or storing information on/from the platter. It keeps rotating over platter without making contacts to the platter but when it does, produces bad sectors. Shaking or moving hard drive while any ongoing operation could make the head to get in contact with the platter and again, produces bad sectors.
  6. Manufacturer faults: Bad supplier or low quality manufacturer could deliver hard drive with poor quality equipments which reduces overall lifespan of your hard drive. Bad sectors were developed quite frequently on hard drive with bad equipments. Most often, bad sectors were already created when the drive is first manufactured.
Once the bad sector is developed, it starts damaging nearby sectors and soon make your whole hard drive with thousands of bad sectors. You can use various hard disk checker utility like S.M.A.R.T. To check hard drive for bad sectors as well as other crucial parameters like spin rotation, heat, equipments status and many more.

Type of Bad Sectors
There are usually two types of bad sectors took place in modern as well as traditional hard drives:

Hard or Mechanical or Physical are the one caused by heads after coming in contact with platter surface of the hard drive. For ex, if the computer is bumped or dropped while reading/writing data from/to the disk would make hard drive heads to crash or damage the area. Extreme heat, faulty heads, dust or other ageing equipments could also contributes heavily towards hard bad sectors.

Once the hard bad sectors is created, it can only be prevented, neither removed or reformed. Best bet is copy/save all your important stuff into another hard drive and replace the drive as soon as possible to stay away from various catastrophic data loss situations.

Though, if your hard drive fails due to hard bad sectors and youve lost any or all your important data, using data recovery services would be the last hope. Highly cleaned room with skilled equipments where special treatments were used to carefully open hard drive equipments and recover data from the storage area.

Soft or logical bad sectors
are less drastic and delivers minimum harm to your PC or the stored data. It is created when an error correction code of a sector cant verify the content of the same sector due to virus/threats injection on the BIOS section, improper system shutdown or directory structure corruption.    

Soft bad sectors can be repaired by using low level formatting (quick format) or disk check/repair tools which fills zeros in all the soft bad sectors. Disk wiping process is pretty effective and completely removes soft bad sectors around the hard drive, however you might permanently lose the stored data and data recovery isnt possible even by using professional recovery program. 

How to repair bad sectors?
There are choices to repair bad sectors by using either inbuilt utility or software provided from third party. As there is no guarantee of repairing bad sectors, you can still try any of the options mentioned below.

Using Inbuilt Utility
Various inbuilt check disk utility is available to check hard drive health status or any running issues and repair them immediately. Microsoft provided this utility for free of cost with Windows to help troubleshoot file system errors, scan and fix bad sectors found around the hard drive.


                                            disk-repair-utility

Running check disk utility is completely safe and doesnt harm overall functioning of your PC. As check disk utility will perform scan and recovery concurrently, this process might takes time little longer than usual.

Heres how you can start check disk utility in your PC:
  1. Double click on My Computer  from the desktop or press window button + E.
  2. Right click on the desired drive you want to check and choose properties. Note:You cant check and repair all the drive at once.
  3. From the opened properties window, select Tools tab and click on Check Now.
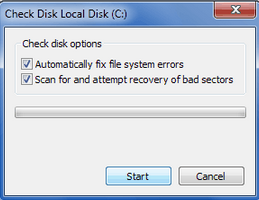
  4. Check disk box will open containing options like Automatically fix file system errors and Scan for and attempt recovery of bad sectors. Mark both the options or can leave the first one only if you wants to check only hard drive for bad sectors and repair it.
  5. Click on Start to initiate check disk operation.
  6. Enter administrator password if requested and click OK.
  7. Wait for sometime and then restart PC once the operation is completed successfully.
Using third party software

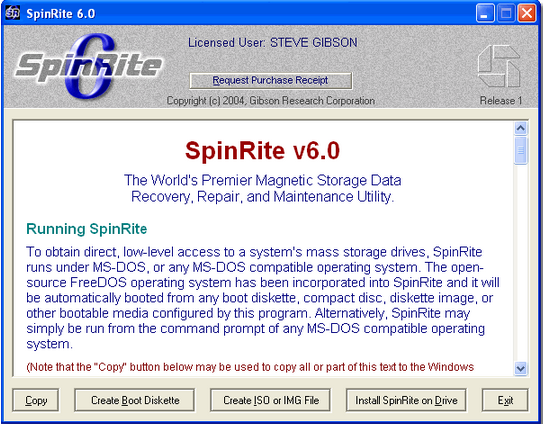
Spinrite is a professional hard disk check and repair utility suitable for all the latest Windows operating system and works effectively on FAT, NTFS and Linux formatted volume. The software is self explanatory and requires simple steps to boot from DOS environment and repair almost any kind of bad sectors.

             spinrite v 6

Note: Spinrite could costs your around $ 89 USD.

Preventing bad sectors in future

Below are the precautions steps you could take to avoid bad sectors from being developed around your hard drive,
  1. Use inbuilt disk defragmenter utility to stabilize operations and reduces stress from heads. Run this utility at least once or twice in a month or schedule it to run periodically. It also helps in managing disk spaces and thus, reducing overall burden from the heads.
  2. Always use, professional and recommend anti virus software to keep your system clean and malware free.
  3. Avoid bumping or throwing during ongoing operations.
  4. Use system in cooled and dust free environment.
  5. Use standard cables or connecting media for longer durability.
  6. Use proper shutdown or standard way to turn your system off. Use UPS or similar power backup devices to make sure that you always have enough time to safely shutdown your PC when the power is absent.
  7. Running OS repair utility could also shorten the occurrences of bad sectors around the hard drive.
Have you found bad sectors in your hard drive or planning to check, what utility youre using or the way youll recommend to repair bad sectors? Dont forget sounds all this using the comment form below.


Available link for download

Read more »

Monday, October 3, 2016

Steps to make Google crawl your blog

Steps to make Google crawl your blog


How to make Google crawl my website/blog ?


On the day I started my blog “ Varun on Web“ I decided to write an article every day in the blog. As per my opinion “writing a genuine interesting article every day with good Search Engine Optimization (SEO) practice will make “Google crawl your blog every day”. Writing an article with good content value is equally important as writing an article every day.


I started the blog “varunonweb” by keeping an aim in my mind. The first thing is to update my knowledge. The second thing is to earn few bucks from my blog. With the help of this blog I want to help the people who are facing problems like me while using computer or internet. I want to update my blog with the problems and solutions I faced while using Computer, Internet and Mobile. Apart from these I want to write few general articles which are not related to technology.


Read more »

Available link for download

Read more »

Tuesday, September 13, 2016

New Features To Grab in Your Smartphone with Android Kitkat

New Features To Grab in Your Smartphone with Android Kitkat


Android is an operating system which gives life to more than one billion Smartphones, Tablet and Phablets devices. As per their name the various versions of Android OS sweeten up our lives, all of them are named after some desserts such as Cupcake, Donut, Eclair, Froyo, Gingerbread, Honeycomb, Ice Cream Sandwich, and Jelly Bean.


Everyone finds chocolate equally tempting for soothing there taste buds so by keeping this fact in mind the new version on Android OS 5 in named as Android Kitkat.


Android is an open OS from its evolution time, term open OS means that it can run any kind of widget or application. The information about the whole globe is at device screen you can explore the whole world or web just with your finger tips.

Android Kitkat offers you new feature of Screen Recording. This feature enables you to capture lifes moment in a MP 4 video even when you are browsing your smartphone or watching videos. There are many different apps on Google Play, you just need to install the app, tap record allow the permission to sources, adjust the settings after that you are ready to record while you are busy somewhere else on your phone.

You can make your home screen the way you want, by arranging apps and widgets between multiple screens or in folders. Amazing live wallpapers respond to your touch. Every page of the screen contains an omnipresent Google search bar at the top with a 4X4 page layout and theres a dock also at the bottom and an app drawer shortcut which enables users to customize and add frequently used apps.

Another feature of Android OS Kitkat is Voice Typing. This element enables you to input text controlled by your voice actions that means just by speaking all your required operations will be performed thus you can command and control your phone with your voice actions just by speaking.


It gives a new dimension in your gaming experience Android OS is with new sensors which makes your Android device feel great for gaming as well, so now you can touch, tap, shake, tilt and play. It also improved tremendously over camera and gallery experience, the shakes and distortion while shooting video will be reduced. Its HDR feature can take multiple shots at different angles and exposures and blend them into a single image. Specifically good on Nexus 5, with great improvement over colors and details of the picture. The kitkat gallery consist of an inbuilt photo editor having preset filters,image cropping and border options, rotating, mirroring, and straightening your photos.

This version is fast and smooth as compared to the earlier versions with buttery graphics, you can get right information on time with more than 1 million apps on Google Play on thousands of android devices.

The next good and admirable thing about Kitkat is its calling experience computing your contact names of t he people you talk the most not only this by using contact app you can search for the places which are near to you. Thread caller ID is the best app which displays the relevant information about the caller including their pictures, last text messages etc.

With Kitkat Android is super amazing for everyone.

Available link for download

Read more »