Showing posts with label galaxy. Show all posts
Showing posts with label galaxy. Show all posts
Tuesday, February 14, 2017
Tutorial Flashing Samsung Galaxy Menggunakan Odin
Tutorial Flashing Samsung Galaxy Menggunakan Odin

Nah,Jadi saya sarankan sebelum melakukan flashing di HP Samsung Android kesayangan anda sebaiknya di backup dulu No imei agan.
Langsung Simak Persiapan dan Langkah-langkahnya :
Download dulu bahan :
1. Laptop/PC2. Samsung Kies, download => Samsung Driver Pack.3.Download => Odin4. Kabel USB5 => Stock RomSekarang kita masuk ke tahap Instalasinya :
1. Kalau Ponsel masih bisa menyala backup dulu data anda.
2. Batery diatas 80%
3. Install Samsung Kies / Samsung Driver Pack & di Laptop/PC.
4. Ekstrack file stock rom, dan anda akan mendapat 3 file .tar
5. Matikan Samsung Galaxy Y.
6. Sekarang Masuk ke Download Mode ( caranya tekan tombol power + home + volume down secara bersamaan sampai logo Y menyala )
7. Jika muncul layar peringatan tekan volume up.
8. Sekarang Hubungkan Samsung Galaxy Y ke Laptop/PC menggunakan kabel USB.
9. Buka Aplikasi Odin.
10. Pastikan ponsel anda sudah ke detect oleh odin, dan dikotak pesan pertama ada tulisan added dan ID:COM sudah terblok warna kuning, seperti gambar

11. Masukkan file .tar seperti berikut :
PDA : PDA_xxx.tarPHONE : MODEM_xxx.tarCSC : CSC_xxx.tarNOTE: Isi tergantung dengan firmware yang anda download tadi. dan biarkan kolom pit dan bootloader kosong.
12. Pastikan semua file sudah terisi dengan benar dan centang auto reboot dan F.Reset Time, yang lain biarkan tidak tercentang.
13. Jika sudah yakin semua benar, sekarang klik START dan tunggu sampai ada tulisan PASS warna hijau di pojok kiri atas, seperti gambar
14. Kemudian Samsung Galaxy Y akan me-reboot otomatis, kemudian tutup aplikasi odin dan cabut kabel USB.
15. SELESAI.
Jika Terjebak Misalnya Bootloop, lakukan cara berikut:
1. Cabut Batery
2. Re-insert battery
3. Masuk recovery mode ( tekan tombol power + home + volume up secara bersamaan sampai logo Y muncul )
4. Gunakan tombol volume up/down untuk berpindah menu dan gunakan tombol home untuk masuk ke menu/OK.
5. Kemudian pilih wipe data / factory reset, lalu pilih yes.
6. Pilih reboot system now.
Sekian duluTutorial Flashing Samsung Galaxy Menggunakan Odin semoga bermanfaat.
Available link for download

Saturday, February 4, 2017
Samsung Galaxy J7 J700F Flash done with Odin Flash tool tested
Samsung Galaxy J7 J700F Flash done with Odin Flash tool tested

When i try in FRP Reset then i use miracle box for that but not success and in that was problem of software issue so i use below firmware link then success and i can easy remove frp lock so if you have any type this device then you can use this tutorial because this is tested by me without any error was success but remember before use this tutorial first charged your device battery if low and try in flash then you will be device dead or other issue so please carefully use this tutorial i suggest first read all tutorial carefully after following step by step if any issue using this tutorial then just simple leave your comment on below comment box
This flash file tested by me without any error working well, you can use this flash file when your device hang on logo problem, restarting problem, security lock problem, password lock problem, pattern lock problem etc software related problem and you can use this tutorial without any box and this is free for all who know about software in mobile, impotent for flashing first must check your micro usb cable if not good then you cant flash it so check micro usb cable second check your device battery that is impotent for flashing if your device battery low so stop your device between flash so this is impotent for flash, before you flash save your data like contact, photos, videos etc because this is factory flash file so you cant save after full flash so must remember all are impotent notes.
Download Link
J700FXXU1AOFJ_OJV1AOFJ Download here
Odin3_v3.10.7 Download here
Required for flash:
- 1. Samsung J7 (J700F) device with good battery charged
- 2. Samsung J7 (J700F) tested flash file
- 3. Odin3_v3.10.7 Flash tool
- 4. Micro usb cable
- 5. Computer or Laptop
Procedure:
- Download tested firmware or Odin flash tool from above link
- Extract to both files to desktop or as you like path ( must be installed winrar software in your computer or laptop)
- Open Odin3_v3.10.7 folder and choose Odin3 v3.10.7.exe file
- Click on BL button and choose BL_J700FXXU1AOFJ_CL679261.....tar.md5 file
- Click on AP button and choose AP_J700FXXU1AOFJ_CL679261.....tar.md5 file
- Click on CP button and choose CP_J700FXXU1AOFJ_CL679261.....tar.md5 file
- Click on CSC button and choose CSC_OJV_J700FOJV1AOFJ..........tar.md5 file
- Turn Off device (if your device ON)
- Press and hold Volume Down + Home + Power button for Download Mode
- Insert usb cable into device (wait until driver installed)
- Click on Start button
- Wait until full installed Android system (note : do not try unplug when your device in download mode)
- Congratulation you are done
Samsung Galaxy J7 (J700F) Flash done with Odin Flash tool screenshot:

Samsung Galaxy J7 (J700F) Flash done with Odin Flash tool Video HERE
Available link for download
Saturday, January 28, 2017
Samsung Galaxy S6 and S6 edge USB drivers
Samsung Galaxy S6 and S6 edge USB drivers

Download Samsung Galaxy S6 USB drivers
Download Samsung Galaxy S6 USB drivers (for Windows)
Click Here to Download Samsung Galaxy S6 USB Drivers
Click Here to Download Samsung Galaxy S6 Edge USB Drivers
Download Samsung Kies 3 for Galaxy S6 and S6 Edge (for Windows & Mac)
Click Here to Download Samsung Kies 3 for PC
Click Here to Download Samsung Kies 3 for Mac
Samsung Smart Switch
In case you’d like to simply transfer all your data from your previous mobile phone to the new S6 or S6 Edge, then Samsung has the perfect solution for you. It is called the Samsung Smart Switch.
Download Samsung Smart Switch Mobile from Play Store
Click Here to Download Samsung Smart Switch for PC
Click Here to Download Samsung Smart Switch for Mac
Available link for download
Monday, December 26, 2016
Samsung Galaxy A7 SM A710F FD Y M Root done with simple tutorial tested
Samsung Galaxy A7 SM A710F FD Y M Root done with simple tutorial tested

This tutorial simple if you better understand and one way for better understand tutorial simple before use first read all are content carefully then following step by step you are done easy without any issue, if you have samsung device A7 all variants and need to unlock just dont worry following step by step why need to root device ? because if you have out country device then you insert your own country sim card then device asked insert unlock code so if you want to unlock device then first need to root device without root device you cant unlock it so this is simple way for root here put simple tutorial for better understand but must remember before use this tutorial must charged your battery up to 80% after try to unlock also must be working well micro usb cable or must be installed driver in your computer or laptop.
Download Link
Twrp_3.0.0-0_sm-a710f.tar Download HERE
Supersu.zip Download HERE
Samsung Galaxy A7 SM-A710F/FD/Y/M Driver Download HERE
Required for Root:
1. Samsung A710F device with good battery charged
2. Twrp_3.0.0-0_sm-a710f.tar
3. Supersu.zip
4. Odin
5. Driver (if not installed in your computer or laptop)
Procedure:
1. Download all are required from above link
2. Extract to desktop or as you like path
3. Open Odin flash tool
4. Click on AP option and choose twrp_3.0.0-0_sm-a710f.tar file
5. Press and hold Volume Down + Home + Power button (for Download Mode)
6. Insert usb cable to device
7. Click on Start button
8. Wait until full flash
9. After Full flash unplug device
10. Take out battery into device and insert again battery into device
11. Copy UPDATE-SuperSU-v2.65-20151226141550 folder into SD Card
12. Insert SD Card to device
13. Press and hold Volume Up + Home + Power button for recovery menu
14. Choose Install zip from SD Card
15. Choose Pasted UPDATE-SuperSU-v2.65-20151226141550 file and install it
16. After installed reboot device
17. Congratulation you are done
Samsung Galaxy A7 SM-A710F/FD/Y/M Recovery flash screenshot:

Available link for download
Friday, November 25, 2016
Samsung Galaxy J5 J500G FRP Reset done tested
Samsung Galaxy J5 J500G FRP Reset done tested

Must read users:
This tutorial tested by me without any error but remember here some impotent question for successfully done with this tutorial, must be working device sub socket, must be working micro usb cable, must be working volume up or down keys for boot device, must be working computer or laptop usb socket, this tutorial you can use without any box its simple.What happen if not ahead still Gmail Account ?:
When your new purchase device of any company like Samsung, Micromax, HTC, Intex, Lenovo any other company mostly new device then you start device and its asked you exiting gmail account after register exiting account then some few day you forgot pattern lock or security lock so without reset or flash device you cant solve that after new flash installed you have to start device then again asked device gmail account you was first time register in that device if you remember that gmail id or password so your are done but if not remember so you must factory reset to device so here solution if you forget gmail id or password so lets see how to solve that.Required for FRP Reset:
1. Samsung Galaxy J5 (J5500G) device with good battery charged2. Octoplus Box or Z3x box
3. Micro usb cable
4. Computer or Laptop
Procedure:
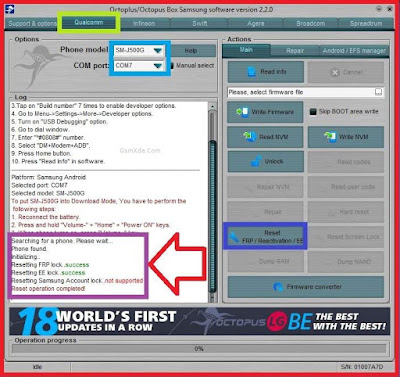
1. First open OctoPlus box (this tutorial in octoplus box so here full procedure of with octoplus)2. Go to Qualcomm CPU tab
3. Chose Phone Model : SM-J500G
4. Press and hold Volume Down + Home + Power button for Download Mode
5. Insert micro usb cable
6. Go to Main Section and click on Reset FRP / Reactivation /EE.. button
7. Wait until process
8. Congratulation you are done
Samsung Galaxy J5 (J500G) FRP Reset done screenshot:
Available link for download
Wednesday, November 16, 2016
Tutorials Root dan Pasang Costum Room Smartfren Andromax V Jadi Galaxy S4 Full Keren
Tutorials Root dan Pasang Costum Room Smartfren Andromax V Jadi Galaxy S4 Full Keren

Pada tutorial kali ini kita akan memodifikasi Smartfren Andromax V menjadi Galaxy S4 melalui Custom ROM GALAXYSMART HYBRID Base 2.0.2. Custom ROM ini berbasiskan android Jelly Bean 4.2.1 yang diubah sistem operasinya menyerupai Galaxy S4 dengan gaya icon dan lock screen yang mirip.
Bagi kalian yang masih penasaran dengan tampilannya berikut saya akan tampilkan screenshot yang kurang lebih seperti ini.


Sekilas mirip dengan Custom ROM lain seperti S4UI, memang screenshot ini diambil dari S4UI tapi hampir tidak ada perbedaan dari sisi tampilan. Secara performa Custom ROM GALAXYSMART HYBRID jauh lebih baik dari Custom ROM S4UI menurut hasil pengujian saya. Selain itu kelebihan GALAXYSMART HYBRID ada pada penyimpanan memori internal yang digantikan oleh Virtual Memori Internal dimana sebenarnya adalah sd card yang telah dimodifikasi secara otomatis, ini jauh lebih efektif dari pada di SWAP secara manual karena dalam beberapa kasus saya pernah mengalami keanehan ketika menginstal game HD setelah beberapa kali game dimainkan sistem android tidak membaca aplikasi gamenya / Application not installed.
Oke langsung saja ini dia caranya...
- Download semua file yang dibutuhkan berikut
- root_mtk6589_abdc.zip
- Mobileuncle MTK Tools v1.3.apk atau download di google playstore gratis
- N986_130609__recovery.img (CMW Recovery)
- GHOSTBUSTED_GALAXYSMART_V.1_B202.zip
- Pertama android kalian harus di root terlebih dahulu, caranya aktifkan USB Debugging di Setting > About Phone dipaling bawah ada tulisan Build Number, klik 7 kali sampai nanti ada tulisan seperti ini

- Setelah itu msuk ke setting > Developer Option > Checklist USB Debugging, tunggu sampai windows menginstal drivernya
- Colokan kabel data ke hp
- Ekstrak file root_mtk6589_abdc.zip hasil download, di dalam folder esktrak ada file run.bat klik dua kali dan biarkan proses root berjalan sampai ada tulisan exploit compete. Jika berhasil hp akan restart dan aplikasi superuser pun terinstal.
- Langkah berikutnya copy file Mobileuncle MTK Tools v1.3.apk, N986_130609__recovery.img dan GHOSTBUSTED_GALAXYSMART_V.1_B202.zip ke dalam sd card.
- Install Mobileuncle MTK Tools v1.3.apk
- Jalankan Mobile Uncle Tool pilih menu recovery update dan pilih N986_130609__recovery.img
- Jika ada pertanyaan masuk ke recovery, pilih ya selanjutnya hp akan reboot ke CMW Recovery secara otomatis
- Melalui CWM Recovery lakukan wipe data/factory reset, wipe cache dan wipe dalvick cache di menu advanced > wipe dalvick cache
- Ini step terakhir, masih di CWM Recovery pilih menu install zip from sdcard dan pilih file GHOSTBUSTED_GALAXYSMART_V.1_B202.zip
- Tunggu sampai install Custom ROM berhasil dan otomatis restart
- Selamat kalian telah berhasil menggunakan Custom ROM GALAXYSMART HYBRID "oya untuk sandi debugging andromax v " 260981
Terima kasih kepada agan GhostbusteD
Jika ingin bertanya silahkan isi kotak komentar dibawah, terima kasih :)
Sumber:kaskus.co.id
Baca juga :
Cara Mengatasi Masalah IMEI, Backup, Restore, No service Pada Smartphone Tablet Berprosesor Mediatek
Cara Mengatasi Masalah IMEI, Backup, Restore, No service Pada Smartphone Tablet Berprosesor Mediatek
Pengertian Tentang Root, Kernel dan Flashing OS
Download CWM S5E Semua Versi
Available link for download
Saturday, October 8, 2016
Samsung Galaxy Note 3 N900V Android ver 5 0 Root done tested
Samsung Galaxy Note 3 N900V Android ver 5 0 Root done tested
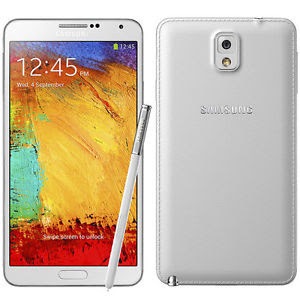
This tutorial simple for Samsung Galaxy Note 3 (N900V) Root and you can root with android 5.0 version just one click and this software you can run in Windows 8 or 10 operating system why need to Root device ? because Samsung Galaxy Note 3 (N900V) device comes only few language so after root you can Add or remove unwanted items and you can enable languages and also need to for repair device most impotent of need to all are required to be working well because if any issue in the required so you cant root device you want to know more which is required for that so you can check below required for root.
Download Link
Samsung Galaxy Note 3 (N900V) 5.0 ROOT Tool Download here
Samsung Galaxy Note 3 (N900V) USB (Flashing) Driver Download here
Required for Root:
1. Samsung Galaxy Note 3 (N900V) device with well battery charged
2. Samsung Galaxy Note 3 (N900V) USB Driver (link are above)
3. Micro usb cable
4. Samsung Galaxy Note 3 (N900V) Root Software (link are above)
Procedure:
1. First install android usb driver if not installed in your PC from above link
2. Download root software from above link
3. Extract to desktop or as you like path, must be installed winrar software in your PC
4. Open Root software and attach device to PC (device must be ON)
5. If root software not detect device so must be enable usb debugging for root
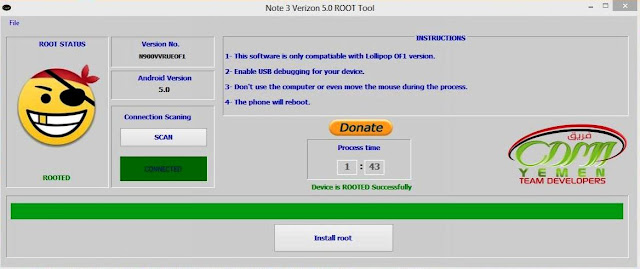
6. Click on SCAN button
7. Last click on Install Root button
8. Wait until Root device (do not disconnect while device in root processing)
9. Congratulation you are done
Screenshot:
Available link for download
Thursday, October 6, 2016
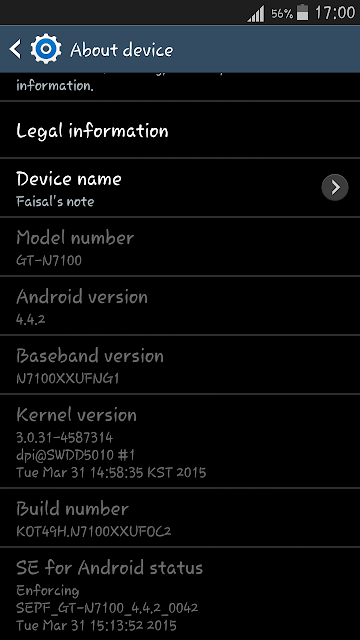
How To Root Galaxy Note 2 N7100 On Kitkat 4 4 2
How To Root Galaxy Note 2 N7100 On Kitkat 4 4 2
Preparations :
Install Samsung USB Driver From Here
Download root Files For Note 2 From Here
Installation :
1 : Extract CF-Auto-Root-t03g-t03gxx-gtn7100.zip
2 : Run Odin3-v3.07.exe
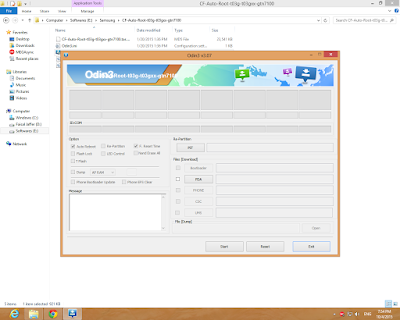
3 : Now Put Your Phone into Downloading Mode
*Turn Off Your Phone
*Press Volume Down + Home Button + Power Button
*Press Volume Up Key To Continue
4 : Connect Your Phone with Computer via USB Cable
5 : Click on PDA Option And Select "CF-Auto-Root-t03g-t03gxx-gtn7100.tar.md5"
6 : Click On Start Button
7 : Wait util Finished
8 : Your Phone Restarts Automatically
9 : See Your App Drawn If Superuser app Exist Your Have Root Acess
Available link for download
Subscribe to:
Posts (Atom)