Showing posts with label recovery. Show all posts
Showing posts with label recovery. Show all posts
Wednesday, March 22, 2017
REleased CWM based recovery for Qmobile Noir A35 REleased
REleased CWM based recovery for Qmobile Noir A35 REleased
CWM based recovery released first time on 313Tech.blogspot.com but it is still buggy
Known bugs:
you can remove some useless apk to make backup that can be restored with no error
these stock apk can be deleted for making backup
1:remove backup and restore stock apk
2: remove any third party apps i suggest you to wipe data or factory reset your noir a35
3:remove play store if you want and i recommend you to remove all ringtones and notifications from your noir a35
first you have to root for rooting noir a35 click >>>here <<<
download root explorar from here
and go to system/media/audio/ringtones and delete all files from it
if you can not delete some apks or ringtones restore will be stopped so first delete rintones and notification and then make backup also factory reset your mobile before procedding
some time MD5 check sum error pop up but if you try 2 or three times this will gone
2; go to system/media/audio/notification and remove all files from this folder
so we have done freeing some space so that restore process cant be stopped
recovery i m uploading is patched so flash it through
requirments:
1; running computer
first connect your a35 and open mtk droid tools and root.exe click on root and back window and click on flash already prepared recovery.img
after flashing a window will come saying want to reboot into flashed recovery click yer an voilaaaaaaa Custom recovery in your hand
Download recovery.img >>>here<<<
Copyright Powered by Blogger.
plz share this post to others
backup made with it cannot be restored because system partition gets full so backup process stoppeed but
or es file manager from here
2; usb cable
3; mtk usb drivers download from here
4; mtk droid tools and roots download from here
(dont know forgot the names )
Policy
Available link for download
Thursday, January 5, 2017
How To Use Redo Backup And Recovery
How To Use Redo Backup And Recovery
Redo Backup is an application based on an Ubuntu Live CD for easy backup and restore of an entire hard disk, including all partitions and the Master Boot Record (MBR)
Redo Backup and Recovery backs up all the data on a computer, including the boot manager and operating system. In an emergency, it can thus completely restore the old state, and you can get back to work immediately.
Redo Backup and Recovery backs up all the data on a computer, including the boot manager and operating system. In an emergency, it can thus completely restore the old state, and you can get back to work immediately.
To Backup :-
- Download Redo Backup.
- Burn ISO file Using ISO Burner Software.
- Create Bootable USB of Redo Backup.
- Restart the PC To BIOS Using F2,F10,Insert The Bootable CD/DVD Or USB
- You Will See a Screen Like This.

- In Screen You will See Backup and Restore, Click On Backup Select Start Redo Backup And Press Any Key.
- In Screen You will See Backup and Restore, Click On Backup.

- Next Select The Drive That you wish to backup. Select the Partitions By Tricking the Box And Then Click Next Button.

- Select the Destination drive You want to save your backup.

- Once The Backup Completes,You Will See
---------------------------------------------------------------------------To Restore :-- Restore the Created Image Backup. Boot Your Computer Using Redo Backup and REcovery CD/DVD Or USB, Select Start Redo Backup, Then Click Restore button on the Screen.
- Select the source drive where the image backup is located. Select the destination drive which you overwrite and restore and Click on Next. Click on Yes Confirmation Message to Start Restoring message.
- Browse The Redo Backup Image In Directory.

Finish...
Available link for download
Friday, October 14, 2016
Easy Steps to Make A Recovery Drive in Windows 8 Using Standard Flash Drive or USB
Easy Steps to Make A Recovery Drive in Windows 8 Using Standard Flash Drive or USB
Recovery drive in Windows 8 is another great features to help user resurrect problems with their PC. Windows 8 facilitates easy ways to create recovery drive and let you free up some space (around 16 GB) by deleting the recovery partition. Creating recovery drive will move all the system repair and maintenance functionality of recovery partition to the USB (your recovery drive) and thus, youll no longer need the inbuilt recovery partition.
All you need is a USB Drive of capacity up to 16 GB or more to store all the OEM recovery partition content & Windows 8 recovery & maintenance features. Make sure that you havent stored your valuable files on it as this procedure will permanently wipes off all your current USB Data and make it very fresh. Remember, once youve successfully created the recovery drive, you cant use it for anything else.
Heres how to create recovery drive?
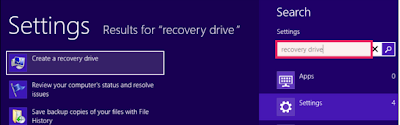
- On the desktop screen at Windows 8 PC, press “CTRL + W ” altogether and type Recovery Drive in the search box.
- Click on the Settings category and again, click on Create a Recovery Drive option from the left side of the window.
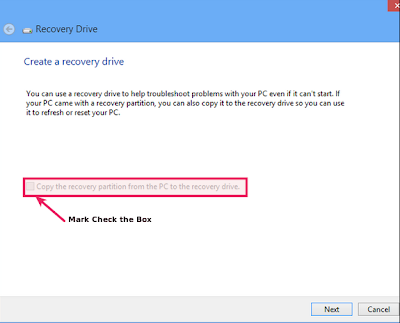
- Recovery drive window will now open. Check mark the option stating “Copy the recovery partition from the PC to the recovery drive” and click Next. Clearly, the recovery partition is much heavier in size and thats why were ask you to have USB of at least 16 GB capacity.
- On the next step, youll require to connect the blank USB that were talking about. You may able to see your USB drive as soon as you connect it to your PC.
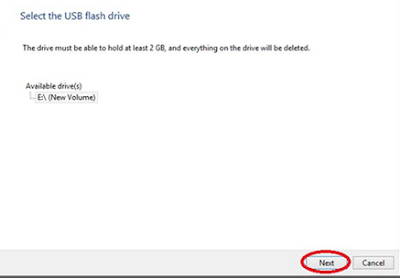
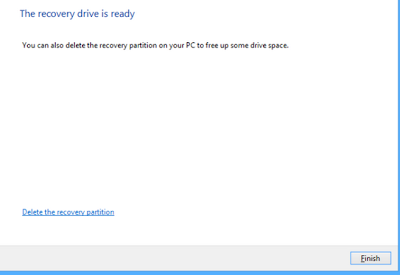
Note: 2 GB is required space according to the image above, however itll ask you for 16 GB space when the “Recovery Option” is selected to be backed up. - On the next screen (Create the recovery drive screen), a warning message will appear to confirm you that everything on the drive will be deleted. Once you assured that youve successfully copied all your data from the USB, can go for “Create” option.
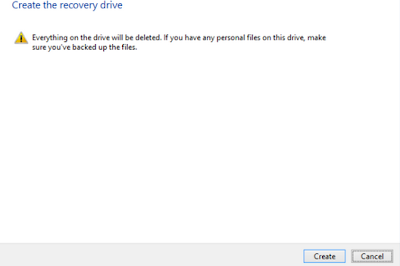
- Thats all youve to do for creating recovery drive. Depending on the system specs, this step will take some time and finally comes with confirmation dialog that your recovery drive is successfully created.
Available link for download
Tuesday, October 4, 2016
A Look Into Causes Of Hard Drive Crash And Possible Data Recovery
A Look Into Causes Of Hard Drive Crash And Possible Data Recovery
We all are well aware that Hard Disk drive is a storage device used for storing and retrieving digital information using rapidly rotating disks known as platters coated with magnetic material. A HDD preserve its data even when it is powered off or not in use. Data is read in a random manner that means particular single blocks of data can be stored, retrieved or accessed in any order somewhat sequentially.
It consist of one or more hard swiftly rotating platters having magnetic heads, arranged on a moving actuator arm to read and write data to the surfaces.

What is a HDD Failure ?
A hard disk drive failure occurs when the drive malfunctions and the stored information cannot be accessed with a properly configured computer. A disk failure may also occur in between of normal operation, or due to an external factor such as exposure to fire or water or high magnetic fields, suffering a sharp impact , environmental contamination which leads to a head crash.
Causes of the HDD Failure
As discussed above, the most notorious cause of hard-drive failure is the head crash. The internal read-and-write head of the device usually just flying above the surface touches a platter, or scratches the magnetic data-storage surface. A head crash leads to severe data loss and data recovery attempts may cause further damage if not done by a specialist with proper equipment. Hard-drive platters are coated with a very thin layer of non-electrostatic lubricant, so that the read-and-write head will simply rebound the surface of the platter so that a collision occur.
Whereas, this head Flickr only nano-meters away from the platters surface which confirms the risk of collision. Another cause of failure can be a defective air filter. The air filters regulates the atmospheric pressure and moisture between the hard-drive cage and its outside environment. If the filter fails to catch a dust particle, then that tiny dust particle can cause a head crash if the head reach over it. After a hard-drive crash, each particle from the damaged platter and head media can cause a bad sector. In such cases, it may be possible to recover all data.

Types of HDD Failures:-
As discussed above, the most notorious cause of hard-drive failure is the head crash. The internal read-and-write head of the device usually just flying above the surface touches a platter, or scratches the magnetic data-storage surface. A head crash leads to severe data loss and data recovery attempts may cause further damage if not done by a specialist with proper equipment. Hard-drive platters are coated with a very thin layer of non-electrostatic lubricant, so that the read-and-write head will simply rebound the surface of the platter so that a collision occur.
Whereas, this head Flickr only nano-meters away from the platters surface which confirms the risk of collision. Another cause of failure can be a defective air filter. The air filters regulates the atmospheric pressure and moisture between the hard-drive cage and its outside environment. If the filter fails to catch a dust particle, then that tiny dust particle can cause a head crash if the head reach over it. After a hard-drive crash, each particle from the damaged platter and head media can cause a bad sector. In such cases, it may be possible to recover all data.
Types of HDD Failures:-
Operating system crash and a hard drive crash both are different from each other
If your are using Mac, Windows or Linux and your operating system crashes then it is called as a Logical Failure.
And, If your hard disk is not functioning properly or having some physical issues and if hard drive itself malfunctions, then such situation is known as Physical Failure.
In both the ways the data is not easily accessible but still present on the hard drive.
Of course, you should have a backup or an image of your computers hard drive and if you dont have backup, still there is hope to get back precious Gigabytes of data through a data recovery solution.
The best way to prevent damage from a hard disk crash is to take a cautious approach and back up the data stored on the drive.
Logical Failure:- Logical failure is when your computer BIOS can identify your hard drive but unable to access it then this sort of failure is known as logical failure. It may not be able to mount the partition or Operating system can simply report that no drive is present at all. In a logical failure the hard drives electronic and mechanical components are all working properly. But the failures occur due to defective media/bad platter or data corruption.
In some cases of logical failure a hard drive that rotates fine, but is not even recognized by the computer’s BIOS as being present.
Almost all logical failures can be retrieved without opening the hard drive. Whereas there are a number of logical data recovery software programs available in market. But, its important to know why your drive had a logical failure before you proceed further to recover your data.
Physical Failure?
A physical failure is any time a drive can not be accessed because of electronic malfunction or internal hardware failure.
These failures results as drive being not recognized by the computer’s BIOS or operating system, as well as repetitious clicking or grinding noises. If your hard disk is producing such kind of unusual sound, the you must power off your PC and don’t attempt to use it again until you sent your HDD to a recovery center.
The noises which a hard drive is producing is due to a head crash. A head crash happens with the arms that read the data on the surface of your hard drive’s platters smash into the rotating platter instead of gliding across it on a cushion of air like they are supposed to.This results in physical damage to that platters and can cause a complete and permanent data loss.
The only way to recover your data after a physical failure is to either replace the damaged hard drive integral or move the data platters to a donor drive where they can be recovered to a stable destination drive. This kind of recovery process is performed in a cleanroom with a special handling.

Hard Drive Failure – Resolutions.
It is not easy to fix a damaged Hard Disk Drive, there are a number of things that you have to look into when it comes to hard drive recovery. This is because hard drive problems could involve issues with the logical and physical areas. Damage on the electronic circuit board can leads to hard disk problems. Some cases of hard drive failure requires several years of experience on hard disk recovery. Consulting a hard disk recovery expert is the best way to get back your data. You will have to pay for the hard disk repair service. But if you are going to think about it, paying the services of an expert is more sensible than threaten the condition of the device and data. The hard disk recovery expert will go through the condition of the device first. He will determine if the damage is still within control and if the data can still be retrieved or not.
You Can try following mentioned Free data Recovery Tools
1) TestDisk(Windows/Mac/Linux)
2) Recuva(Windows)
3) PhotoRec(Windows/Mac/Linux
4) Restoration(Windows)
5) Undelete Plus(Windows)
Available link for download
Sunday, September 11, 2016
How to Root QMobile Noir i10 CWM Recovery
How to Root QMobile Noir i10 CWM Recovery

Today well root Qmobile Noir i10 and also well flash CWM recovery to make this android phone more powerfull and kindly follow the instructions as mentioned in the post to avoid any problems :D
Ok lets Root this Beast :)
-First download this .zip file which contain all the important things you need in this rooting + Flashing recovery procedure. Download Here
-Enable Usb Debugging
-Download and install android adb drivers from here
-Download Sp Flash Tools From here (From XDA)
-Now turn off your phone wait for 10 seconds after power off
-Now connect it to pc & open SP Flash Tools
-Then Click on Scatter-Loading & choose the scatter .txt where you extracted the .zip file

CATION!!!:
Only Mark Recovery.img Unmark Preloader+ Mbr + EBR1 + UBOOT +SEC_RO ETC only choose recovery.img

now copy SUPER SU UPDATE.ZIP to Sd card And reboot phone into recovery mode by pressing
Power Button+Volume Down

AND VOILA :D Your beast is Rooted
Available link for download
Subscribe to:
Comments (Atom)