Showing posts with label using. Show all posts
Showing posts with label using. Show all posts
Wednesday, March 8, 2017
How to Flash HTC Desire 820 820MU dual sim by using Fastboot code Tested
How to Flash HTC Desire 820 820MU dual sim by using Fastboot code Tested
HTC Desire 820 Dual Sim to be different Stock ROM Firmware in this method using stock rom model of A31_DTUL, Build : 1.01.709.1, CID : 11111111, HBoot : 3.19.0.0000, MID : 0PE621000, Security : OFF, Region : Super_CID, if you want to use this method first check this mention model number if not then do not try with this Stock ROM Firmware but you can use this guide if you want to correct Stock ROM firmware put on fastboot mode and readinfo using HTX Multi Tool.exe software and this software also available in this guide.
HTC Desire 820 in any type issue software related you can easy solve using this method and this is for everyone who new fresher technician or experience technician in android software related, before use remember of must be working well all are required which you can see in this method it below to be mention, different to be error when you try to flash or upgrade first of USB not recognized this error possible when micro USB not working, battery not charged, phone USB socket not working properly so if you fail with this method just write down your comment on below comment box i will soon possible to fix it, first take backup into device if live otherwise dead you cant take backup, this guide you can use when device in dead condition also but must be in software related issue otherwise if any hardware then you can solve that.
If you want to repair your device, you can try to repair it by you. You have to charge your battery with any charger and charged it by 95%. Your data is very important for you so it is good to do a backup of your data it may consist like your contact details,your important messages, your emails or any other important thing which you feel to be the backup in your device. This backup can be done on another device. we have to do the backup because after a format of your device, all your data will be gone and it will not be recovered. For backup in other devices you can use other external device like your hard drive, SD card or any other suitable devices. If you are doing by your own. do it at your own risk as we dont take any responsibility if your device is damaged
This method you can use without any box its done from flash tool its also available here, and impotent of must be installed phones driver, you cant flash or upgrade if not installed in your computer or laptop it must be installed and also available in this post, here all are linked that tested and working fine just in one try, you can use this guide when your device in hang on logo, restarting, auto turn on internet connection, auto turn on wifi connection, auto apk installing, auto gone balance, pattern lock, screen lock.
Requisite for HTC Desire 820MU
- HTC Desire 820 (820MU) dual sim with well battery charged, do not try with low battery
- HTC Desire 820 (820MU) dual sim Stock ROM tested | Download here
- HTC Desire 820 (820MU) dual sim HTC Fastboot Driver spl | Download here
- HTC HTX Multi Tool | Download here
- HTC Desire 820 (820MU) sual sim fastboot code | Download here
- Good Quality Micro USB Cable
- Computer or Laptop
Procedure for HTC Desire 820 (820MU) dual sim
- Download needed files from above link, if link not working just leave your comment on below comment box i will soon fix it if possible
- Install WinRAR in your Computer or Laptop if already installed ignore this
- UnZip to Desktop or as you like path from the WinRAR
- Install HTC USB (Flashing) Driver already installed ignore this
- Unplug battery socket wait few second and gain Insert battery socket
- Press and hold Volume Down + Power button and choose Fastboot mode and Insert Micro USB Cable into device
- Open RBSoft folder and choose HTX Multi Tool.exe file and open it
- Go to Fastboot Tab and click on Read Boot Info button and wait until full readinfo to your device
- If above mention model to be in your device then use this Stock ROM Firmware, if different readinfo then just write down your info on below comment box i will give you correct stock ROM firmware link
- Rename Stock ROM Firmware 0PE6IMG_A31_DTUL_K44_DESIRE_SENSE60_HTCCN_CHS_CMCC_1.20.1403.1_R6_Radio_01.01.110_U1030481_08.01.1119_F_release_414395_combined_signed to 0PE6IMG and do Copy
- Open htc fastboot driver spl folder and Paste there Stock ROM Firmware
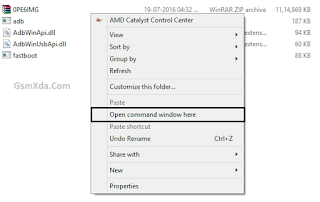
- Right click with Shift key on White area and choose Open command windows here option (see below image)
- Write down there first command of "fastboot devices" and press Enter key
- Write down again "fastboot oem rebootRUU" and Press Enter key
- Write down "fastboot flash zip 0PE6IMG.zip" and Press Enter key and wait until full installed Stock ROM Firmware
- After finished Stock ROM Firmware flashing procedure and use last command "fastboot reboot" and Hit Enter key
- Congratulation you are done
Available link for download

Friday, February 24, 2017
Samsung FRP Reset Files Using Odin tool
Samsung FRP Reset Files Using Odin tool

This file you can use with an odin flash tool this files factory reset file this is different file this security you cant remove via hard reset or full flash but you can be done with this files here some model files available but some few day full model available in this list. This security how to make ? when you purchase device then first start device it asking to gmail id or password and this must remember that if forgot then device do hard reset or flash then it asked firsts enter email id or password if remember then first start wifi and enter it if forgot then use this file.
Android Factory Reset Protection (FRP) this is new feature for your device protect and this feature has been added to Android OS 5.1 or higher
New Method Google Bypass Gmail Account
Supported models : Samsung Galaxy A3, A5, A7, J1, J2, J3, J5, J7, S5, S6, Edge, Note, Tab series google bypass Gmail account (FRP) SEE HERE
Model
Samsung G550FY FRP Reset File
Download
Samsung G920T FRP Reset File
Download
Samsung G925i FRP Reset File
Download
Samsung J700F FRP Reset File
Download
Samsung N920G FRP Reset File
Download
Samsung FRP Reset File MODEM G920F OJ1
Download
Samsung FRP Reset File MODEM G920I OJ6
Download
Samsung FRP Reset File MODEM G920T1 OI5
Download
Samsung FRP Reset File MODEM G920T1 OJ6
Download
Samsung FRP Reset File MODEM G920T OJ7
Download
Samsung FRP Reset File MODEM G920w8 OJ7
Download
Samsung FRP Reset File MODEM G925F OJ1
Download
Samsung FRP Reset File MODEM G925I OJ6
Download
Samsung FRP Reset File MODEM G925T OJ7
Download
Samsung FRP Reset File MODEM G925w8 OJ7
Download
Samsung FRP Reset File MODEM G928C OJ5
Download
Samsung FRP Reset File MODEM G928F OJ5
Download
Samsung FRP Reset File MODEM G928G OJ4
Download
Samsung FRP Reset File MODEM G928I OJ4
Download
Samsung FRP Reset File MODEM G928T OJ5
Download
Samsung FRP Reset File MODEM G928w8 OGD
Download
Samsung FRP Reset File MODEM N920C OJ5
Download
Samsung FRP Reset File MODEM N920G OJ4
Download
Samsung FRP Reset File MODEM N920I OJ4
Download
Samsung FRP Reset File MODEM N920T OJ5
Download
Samsung FRP Reset File MODEM N920w8 OI1
Download
Samsung FRP Reset File SBOOT G920F OJ1
Download
Samsung FRP Reset File SBOOT G920I OJ6
Download
Samsung FRP Reset File SBOOT G920t1 OI5
Download
Samsung FRP Reset File SBOOT G920t1 oj6
Download
Samsung FRP Reset File SBOOT G920t oj7
Download-1 | Download-2
Samsung FRP Reset File SBOOT G920w8 OJ7
Download
Samsung FRP Reset File SBOOT G925F OJ1
Download
Samsung FRP Reset File SBOOT G925I OJ6
Download-1 | Download-2
Samsung FRP Reset File SBOOT G925t oj7
Download
Samsung FRP Reset File SBOOT G925w8 OJ7
Download
Samsung FRP Reset File SBOOT G928C OJ5
Download
Samsung FRP Reset File SBOOT G928F OJ5
Download
Samsung FRP Reset File SBOOT G928G OJ4
Download
Samsung FRP Reset File SBOOT G928I OJ4
Download
Samsung FRP Reset File SBOOT G928t oj5
Download
Samsung FRP Reset File SBOOT G928w8 OGD
Download
Samsung FRP Reset File SBOOT N920C OJ5
Download
Samsung FRP Reset File SBOOT N920G OJ4
Download
Samsung FRP Reset File SBOOT N920I OJ4
Download
Samsung FRP Reset File SBOOT N920t oj5
Download
Samsung FRP Reset File SBOOT N920w8 OI1
Download
Samsung FRP Reset File G550FY
Download-1 | Download-2
Samsung FRP Reset File G920T
Download-1 | Download-2
Samsung FRP Reset File G925i OJ6 SBOOT MODEM
Download-1 | Download-2
Samsung FRP Reset File J700F
Download-1 | Download-2
Samsung FRP Reset File N920G
Download
Samsung SM-N920W8 Galaxy Note 5 FRP Sboot
8VLU2AOK5_Sboot Download
8VLU2BPC5_Sboot Download
8VLU2BPD6_Sboot Download
8VLU2BPE3_Sboot Download
Samsung FRP Reset File MODEM G920F OJ1
Download
Samsung FRP Reset File MODEM G920I OJ6
Download
Samsung FRP Reset File MODEM G920T1 OI5
Download
Samsung FRP Reset File MODEM G920T1 OJ6
Download
Samsung FRP Reset File MODEM G920T OJ7
Download
Samsung FRP Reset File MODEM G920w8 OJ7
Download
Samsung FRP Reset File MODEM G925F OJ1
Download
Samsung FRP Reset File MODEM G925I OJ6
Download
Samsung FRP Reset File MODEM G925T OJ7
Download
Samsung FRP Reset File MODEM G925w8 OJ7
Download
Samsung FRP Reset File MODEM G928C OJ5
Download
Samsung FRP Reset File MODEM G928F OJ5
Download
Samsung FRP Reset File MODEM G928G OJ4
Download
Samsung FRP Reset File MODEM G928I OJ4
Download
Samsung FRP Reset File MODEM G928T OJ5
Download
Samsung FRP Reset File MODEM G928w8 OGD
Download
Samsung FRP Reset File MODEM N920C OJ5
Download
Samsung FRP Reset File MODEM N920G OJ4
Download
Samsung FRP Reset File MODEM N920I OJ4
Download
Samsung FRP Reset File MODEM N920T OJ5
Download
Samsung FRP Reset File MODEM N920w8 OI1
Download
Samsung FRP Reset File SBOOT G920F OJ1
Download
Samsung FRP Reset File SBOOT G920I OJ6
Download
Samsung FRP Reset File SBOOT G920t1 OI5
Download
Samsung FRP Reset File SBOOT G920t1 oj6
Download
Samsung FRP Reset File SBOOT G920t oj7
Download-1 | Download-2
Samsung FRP Reset File SBOOT G920w8 OJ7
Download
Samsung FRP Reset File SBOOT G925F OJ1
Download
Samsung FRP Reset File SBOOT G925I OJ6
Download-1 | Download-2
Samsung FRP Reset File SBOOT G925t oj7
Download
Samsung FRP Reset File SBOOT G925w8 OJ7
Download
Samsung FRP Reset File SBOOT G928C OJ5
Download
Samsung FRP Reset File SBOOT G928F OJ5
Download
Samsung FRP Reset File SBOOT G928G OJ4
Download
Samsung FRP Reset File SBOOT G928I OJ4
Download
Samsung FRP Reset File SBOOT G928t oj5
Download
Samsung FRP Reset File SBOOT G928w8 OGD
Download
Samsung FRP Reset File SBOOT N920C OJ5
Download
Samsung FRP Reset File SBOOT N920G OJ4
Download
Samsung FRP Reset File SBOOT N920I OJ4
Download
Samsung FRP Reset File SBOOT N920t oj5
Download
Samsung FRP Reset File SBOOT N920w8 OI1
Download
Samsung FRP Reset File G550FY
Download-1 | Download-2
Samsung FRP Reset File G920T
Download-1 | Download-2
Samsung FRP Reset File G925i OJ6 SBOOT MODEM
Download-1 | Download-2
Samsung FRP Reset File J700F
Download-1 | Download-2
Samsung FRP Reset File N920G
Download
Samsung SM-N920W8 Galaxy Note 5 FRP Sboot
8VLU2AOK5_Sboot Download
8VLU2BPC5_Sboot Download
8VLU2BPD6_Sboot Download
8VLU2BPE3_Sboot Download
Available link for download
Friday, January 20, 2017
FTP Setup Using Filezilla
FTP Setup Using Filezilla
FTP Setup Using Filezilla
I would like to use FileZilla how do I go about the setting it up and connecting to my site?
- A Bluehost hosting service..
- A computer running Microsoft Windows, Linux, or Mac OS X 10.5 or newer.
- The free FTP software, which you can download by clicking FileZilla.
- Open the Site Manager, from the File menu.
- Click the New Site button.
- Enter the setup information for your FTP account.
- Type in the New FTP Site Name: (Can use any name like "My website")
- Host: Enter your Domain Name. e.g. example.com
- Port: 21
- Protocol:: FTP - File Transfer Protocol
- Encryption: Use plain FTP
- Logon type: Normal
- User:: This is your username. e.g. examplec or john@example.com If you do not have this information, you can login to cPanel and view it on the left hand side. (It is based on the first 8 characters of your domain). If you created this username, use username@domain.com.
- Password: This is your cPanel password or the password specified when the FTP account was created .
- Click the OK button. When the above steps are complete, click Connect to connect to the server. (You will automatically be connected in your own folder).
- Click Edit
- Select Settings
- Click Passive Mode, which is found underneath Connection in the left hand window. In the Passive mode settings window (right side), click the Use the servers external IP address instead if it is currently not marked. If you connect to our server and get disconnected quickly, this is the soluti
Due to different firewalls, some people experience problems with FTP. To fix this problem, try:
Available link for download
Saturday, December 24, 2016
Easily Recover Data without using Undelete Software
Easily Recover Data without using Undelete Software
Data Recovery is a process to recover accidentally deleted or formatted files from your computer including common storage devices such as external or internal hard drive, USB, CD/DVD, memory card etc. Such files can be restored if proper actions are taken immediately or as soon as possible.
Data recovery software is indeed a great way to have your deleted files back, though it may require you to invest money and time. Recovery software can make use of sophisticated algorithm to deeply scan files that is mark as deleted or lost in MBR and treat them carefully to recover exactly as they were deleted.
However, we’ll discuss about some manual ways to recover your lost or deleted files without using such recovery software. It’s strongly advised to not to save or overwrite any more data on the problem storage device as it’ll make your attempts failed of recovering lost or deleted data.
Restore deleted files (Manual method)
Accidental deletion of files and folders- Perhaps, you’re cleaning your system by deleted unnecessary and junk files to free up some hard disk space. However, accidentally you may have deleted an important files or folders that you badly needed. Unluckily, you can’t file those files in the recycle bin as you’ve chosen to delete it permanently by pressing ‘shift + delete’.
Resolution: In some cases, you should see your computer recycle bin folder to see if the deleted files are there. You can right click on it and choose ‘Restore’ to save them back to their original destination. However, if you can’t found files what you’re looking for, try following the steps mentioned below:
a. Right click on folder containing your files deleted previously.
b. Choose ‘Properties’ and go to ‘Previous versions tab’.
c. This will list all the previous version of files existed previously (Before deletion). Select file which you want to restore and click on ‘Restore’ button to restore those files back to your system.
Data recovery software is indeed a great way to have your deleted files back, though it may require you to invest money and time. Recovery software can make use of sophisticated algorithm to deeply scan files that is mark as deleted or lost in MBR and treat them carefully to recover exactly as they were deleted.
However, we’ll discuss about some manual ways to recover your lost or deleted files without using such recovery software. It’s strongly advised to not to save or overwrite any more data on the problem storage device as it’ll make your attempts failed of recovering lost or deleted data.
Restore deleted files (Manual method)
Accidental deletion of files and folders- Perhaps, you’re cleaning your system by deleted unnecessary and junk files to free up some hard disk space. However, accidentally you may have deleted an important files or folders that you badly needed. Unluckily, you can’t file those files in the recycle bin as you’ve chosen to delete it permanently by pressing ‘shift + delete’.
Resolution: In some cases, you should see your computer recycle bin folder to see if the deleted files are there. You can right click on it and choose ‘Restore’ to save them back to their original destination. However, if you can’t found files what you’re looking for, try following the steps mentioned below:
a. Right click on folder containing your files deleted previously.
b. Choose ‘Properties’ and go to ‘Previous versions tab’.
c. This will list all the previous version of files existed previously (Before deletion). Select file which you want to restore and click on ‘Restore’ button to restore those files back to your system.
What if the files were deleted from the Desktop folder?
For example, if you have deleted files from the desktop folder named ‘XYZ’. Try creating a new folder with exactly the same name i.e. ‘XYZ’. Moving further, right click on the same and go to its ‘Properties’. Under ‘previous version’ tab, you should see all the deleted files located under the folder. Simply, choose any or all the files you want and hit on restore button.
However, make the system protection is set to turned on. Follow the steps below to check and make sure the system protection is ON:
For example, if you have deleted files from the desktop folder named ‘XYZ’. Try creating a new folder with exactly the same name i.e. ‘XYZ’. Moving further, right click on the same and go to its ‘Properties’. Under ‘previous version’ tab, you should see all the deleted files located under the folder. Simply, choose any or all the files you want and hit on restore button.
However, make the system protection is set to turned on. Follow the steps below to check and make sure the system protection is ON:
- Right click on ‘My Computer’ and select ‘Manage’.
- Navigate to ‘System Protection’ tab and see if the protection is set to ‘On’ or ‘Off’. To turn the protection ‘On’ for drive ‘D’ (See the image below), click on the drive and select ‘Configure’.

- Under ‘Restore Settings’ section, select the radio button stating ‘Turn on System Protection’ and set the ‘Disk Space Usage’ as per your convenient.

- Click on ‘Apply’ to make changes take effect.
Other type of deletion that can’t be addressed manually
Partition Format- If you’ve accidentally formatted or deleted an entire partition, you might be in trouble as you can’t be able to restore them manually. Instead, you should seek for professional and efficient partition undelete software that can scans and recover data from formatted or deleted partition.
Below are some common type of partition problem occurs in Windows OS:
2) File system damages - This kind of failure occurs due to hardware failure or registry corruption. Sometime logical damage is also caused by software failure. However, most modern file system has a high level of protection against file system.
3) Partition Corruption due to virus attack- This kind of corruption arises due to unknown malware or other type of threats that may leave partition inaccessible and all the data stored.
Conclusion
Data deleted from computer will keep residing on the memory till it’s not overwritten by some other data. In most cases, we simply delete any files that were no longer needed and can be restored from the recycle bin folder. If you can make use of manual tricks of restoring deleted files, you might not need to invest money on purchasing data recovery software.
However, if situations isn’t in your favor, choose efficient data recovery software might be your last resort. It’ll help you in recovering data from severely damaged or corrupt partitions as well as ensures you that it’ll be completely accessible and 100% working as before.
Available link for download
Saturday, November 12, 2016
CONNECT ANOTHER COMPUTER USING REMOTE ACCESS CONTROL FREE DRIVERS DOWNLOAD
CONNECT ANOTHER COMPUTER USING REMOTE ACCESS CONTROL FREE DRIVERS DOWNLOAD

----------------------------------------------------------------------------
CONNECT ANOTHER COMPUTER USING REMOTE ACCESS CONTROL
-------------------------------------------------------------------------------
If you have Windows XP it has built in remote access software that helps you connect to a friends computer, by invitation, to help them by taking remote access control of their computer system. This means you could be in the USA and be helping your friend in Australia to find a solution to his or her computer problems. The technology to gain remote access to basically anyones computer is available on most computer users start menu. I regularly give my friends computer support from the comfort of my own home.
-----------------------------------------------------------------
What you need to use the Help and Support tool to gain remote access
1. An broadband or cable internet connection.
2. Windows Xp on both computers
3. An email address or be signed into Windows 4. Live messenger.
What you need to use the Help and Support tool to gain remote access
1. An broadband or cable internet connection.
2. Windows Xp on both computers
3. An email address or be signed into Windows 4. Live messenger.
----------------------------------------------------------------------
The easiest way to connect
It is very easy to connect two computers over the internet. One computer can take control and fix problems on the other computer. Following these steps to use the Help and support software that is built in to Windows.
1. Sign in to Windows Live Messenger and have your friend do the same thing.
2. Go to the start menu and choose Help and Support (shown below) Just the computer user that wants to invite does this.
3. The Help and Support Center will appear.
4. Click on Invite a Friend to connect to your computer with Remote Assistance. Located under the Ask For Assistance menu.
5. Then press Invite someone to help you. The window below will appear.
6. Choose your friends name from the Windows Messenger contact list.
The easiest way to connect
It is very easy to connect two computers over the internet. One computer can take control and fix problems on the other computer. Following these steps to use the Help and support software that is built in to Windows.
1. Sign in to Windows Live Messenger and have your friend do the same thing.
2. Go to the start menu and choose Help and Support (shown below) Just the computer user that wants to invite does this.
3. The Help and Support Center will appear.
4. Click on Invite a Friend to connect to your computer with Remote Assistance. Located under the Ask For Assistance menu.
5. Then press Invite someone to help you. The window below will appear.
6. Choose your friends name from the Windows Messenger contact list.
7. Click on Invite this person.
8. This will allow your friend to see your desktop. If they want to control your they must press the Take control button and the other person must agree by pressing OK.
8. This will allow your friend to see your desktop. If they want to control your they must press the Take control button and the other person must agree by pressing OK.
----------------------------------------------------
Thank You.
Available link for download
Friday, October 14, 2016
Easy Steps to Make A Recovery Drive in Windows 8 Using Standard Flash Drive or USB
Easy Steps to Make A Recovery Drive in Windows 8 Using Standard Flash Drive or USB
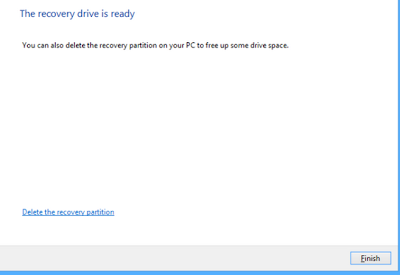
Recovery drive in Windows 8 is another great features to help user resurrect problems with their PC. Windows 8 facilitates easy ways to create recovery drive and let you free up some space (around 16 GB) by deleting the recovery partition. Creating recovery drive will move all the system repair and maintenance functionality of recovery partition to the USB (your recovery drive) and thus, youll no longer need the inbuilt recovery partition.
All you need is a USB Drive of capacity up to 16 GB or more to store all the OEM recovery partition content & Windows 8 recovery & maintenance features. Make sure that you havent stored your valuable files on it as this procedure will permanently wipes off all your current USB Data and make it very fresh. Remember, once youve successfully created the recovery drive, you cant use it for anything else.
Heres how to create recovery drive?
All you need is a USB Drive of capacity up to 16 GB or more to store all the OEM recovery partition content & Windows 8 recovery & maintenance features. Make sure that you havent stored your valuable files on it as this procedure will permanently wipes off all your current USB Data and make it very fresh. Remember, once youve successfully created the recovery drive, you cant use it for anything else.
Heres how to create recovery drive?
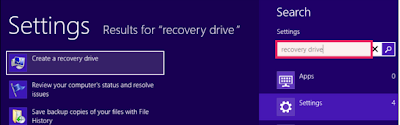
- On the desktop screen at Windows 8 PC, press “CTRL + W ” altogether and type Recovery Drive in the search box.
- Click on the Settings category and again, click on Create a Recovery Drive option from the left side of the window.
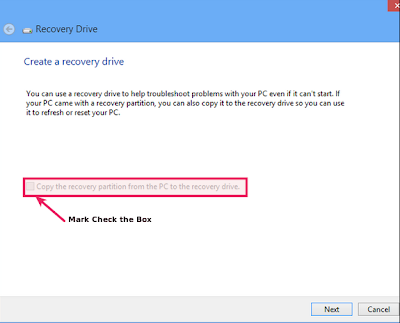
- Recovery drive window will now open. Check mark the option stating “Copy the recovery partition from the PC to the recovery drive” and click Next. Clearly, the recovery partition is much heavier in size and thats why were ask you to have USB of at least 16 GB capacity.
- On the next step, youll require to connect the blank USB that were talking about. You may able to see your USB drive as soon as you connect it to your PC.
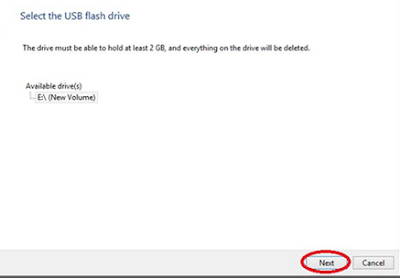
Note: 2 GB is required space according to the image above, however itll ask you for 16 GB space when the “Recovery Option” is selected to be backed up. - On the next screen (Create the recovery drive screen), a warning message will appear to confirm you that everything on the drive will be deleted. Once you assured that youve successfully copied all your data from the USB, can go for “Create” option.
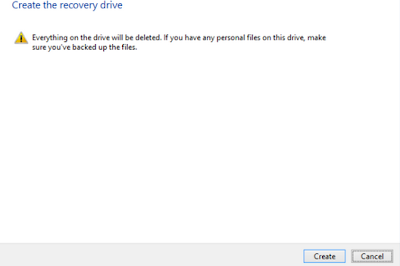
- Thats all youve to do for creating recovery drive. Depending on the system specs, this step will take some time and finally comes with confirmation dialog that your recovery drive is successfully created.
Available link for download
Monday, September 5, 2016
How to Spy using Mobile Phone
How to Spy using Mobile Phone
Spying with the help of Mobile Phones
In this article I will explain the detail procedure on how to spy on other people while they are talking by using your Android mobile phone. With the help of an App called M-SPY one can spy on others and hear what they are speaking.
How to use M-SPY App in mobile phone ?
1) First user has to download the App M-SPY from the Google Play store.

2) After downloading the App, the user has to set a secret PIN number which is necessary while spying.
3) To start the procedure of spying, the user has to keep his mobile phone near to the place where the person((Whom he wants to spy.) is speaking
Available link for download
Subscribe to:
Posts (Atom)