Showing posts with label fix. Show all posts
Showing posts with label fix. Show all posts
Monday, March 13, 2017
How To Hard Unbricked LG G2 All Variants Fix Qualcomm HS USB QDLoader 9006 mode
How To Hard Unbricked LG G2 All Variants Fix Qualcomm HS USB QDLoader 9006 mode
After Read This Guide You Will Fix These Situations.
No Recovery Mode.
No Download Mode.
No Boot.
Showing Qualcomm HS-USB QDLoader 9006 mode In Device Manager.
Showing Unknown Device In Device Manager.
Require Tools.
Download Latest SRK Tool From Here
Qualcomm Drivers From Here
Now Solve This Problem.
Step 1.
If Your Phone Show Qualcomm HS-USB QDLoader 9006 mode in Device Manager You Can Skip This Step.
If Your Phone Showing Qualcomm HS-USB QDLoader 9008
And Any Another So Enter Your Phone In 9006 Mode By Follow These Instructions.
If Your Phone Are Not On Qualcomm HS-USB QDLoader 9006 mode So Follow These Instructions To Enter Into Qualcomm Mode.
a) Disassemble Your Phone
b) On Motherboard Navigate "eMMC" Chip. You Can See In Picture.
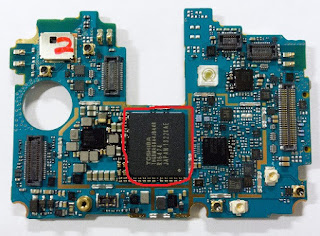
c) Now Connect USB With Battery Short Cut These Points With Cooper Wire That Shown In Picture Under The eMMc Chip.
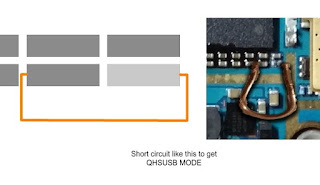
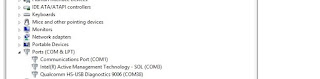
d) Now Your Device Shows In Device Manager As "Unknown Device" Then Install Drivers Which Given In Tools Section.
e) Your Device Will Shows Up.
Step 2.
1 : Download And Extract SRK Tool.
2 : Run SRK Tool.
3 : Press 4 Then 5.
4 : Select Your Device Model Number.
5 : Now Y For Yes, Then Again Y.
6: Then Disk Management Windows Pop-Up Then Select Disk Number Will Shows After Connecting Your Phone.
Note : Select Chose Correct Disk Which Shows lots Of Paritions.
7: Then Enter Disk Number.
8: Then Press Y And Wait
9: After Complete Your Phone Can Boot Into Download Mode.
10 : Then Boot into Download Mode And Flash kdz/tot File.
11 : Finished.... :)
7: Then Enter Disk Number.
8: Then Press Y And Wait
9: After Complete Your Phone Can Boot Into Download Mode.
10 : Then Boot into Download Mode And Flash kdz/tot File.
11 : Finished.... :)
Available link for download

Saturday, February 25, 2017
Lenovo K4 Note A7010a48 FRP Reset or Fix DL Mode done tested
Lenovo K4 Note A7010a48 FRP Reset or Fix DL Mode done tested
What is FRP Lock ?
This is new feature in all new modes when you new purchase device then first starting then asking enter your own gmail account and this account enter one time so remember it because in future device reset or upgrade then first asking device to enter your own gmail account or password after that go ahead otherwise device still but dont worry if forgot gmail account or password here solution for bypass gmail id its very simple if you better understand to this tutorial before use first charged device battery if low then device not properly working like restarting problem or other software related.
About Miracle box:
This tutorial done in miracle box if you have box then you can easy done but this dont have so you can use other box but option to be required in box.
About USB Driver:
For this tutorial must you have to usb driver for connect device with computer or laptop if not install then you cant connect if not connect so you cant done this job so must be installed in your computer or laptop, if you dont have driver so you can download from this post and update or install in your computer or laptop.
About Micro USB Cable:
Must be working well Micro usb cable this is also impotent of part for bypass gmail account (FRP reset) when micro usb cable not working then error like usb not recognized this error also if your device battery low means both reason of usb not recognized and also check device usb socket its must be working well if any problem in that then you cant connect with this box.
Download Link
Lenovo K4 Note A7010a48 Driver Download
Need for Gmail Account bypass:
1. Lenovo K4 Note A7010a48 device
2. Miracle box
3. Lenovo K4 Note A7010a48 usb driver
4. Micro usb cable
5. Computer or Laptop
How to Bypass Gmail Account in Lenovo A7010a48 ?
1. Download usb driver from above link (if link dead just leave your comment)
2. Extract to desktop or as you like path (must be installed winrar software)
3. Install usb driver if there .exe file
4. Open Miracle box
5. Go to MTK Tab and choose Unlock/Fix tab
6. Choose Clear Setting/Frp option
7. Select Boot : 8th Boot(MT65xx & MT67XX/8127) option
8. Tick on USBCable option
9. Click on Start button and Press and hold Volume Up button and insert usb cable
10. Wait until driver install, if driver installed then process start automatically
11. Congratulation you are done
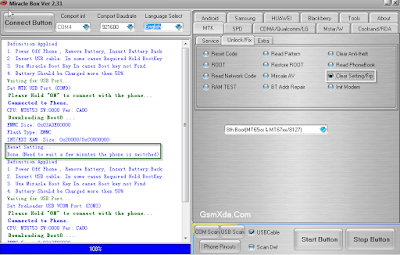
FRP Reset done Screenshot:
How to Fix DL Mode in MTK device ?
1. Download usb driver from above link (if link dead just leave your comment)2. Extract to desktop or as you like path (must be installed winrar software)
3. Install usb driver if there .exe file
4. Open Miracle box
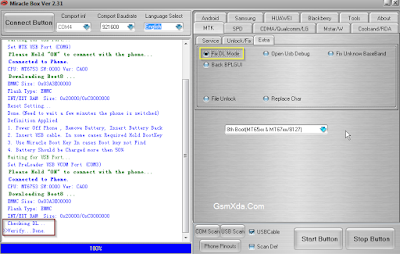
5. Go to MTK Tab and choose Extra tab
6. Choose Fix DL Mode option
7. Select Boot : 8th Boot(MT65xx & MT67XX/8127) option
8. Tick on USBCable option
9. Click on Start button and Press and hold Volume Up button and insert usb cable
10. Wait until driver install, if driver installed then process start automatically
11. Congratulation you are done
Fix DL Mode Screenshot:
Available link for download
Monday, February 20, 2017
How to fix hard drive missing In Windows7
How to fix hard drive missing In Windows7
A Windows partition is simply a logical volume for storing data. There can be several scenarios when you can face the missing partition problem such as: while installing, re-installing or updating the Operating system.
Sometimes it happens that the partition is not visible to you (.i.e. missing partition) or you can see it but cannot access its contents (.i.e. inaccessible partition). Majority of Windows 7 users have to face this issue after they have reinstalled Windows 7.
In this article, I am going to discuss the way to fix “Missing hard drive/partition in Windows7”.
Hard drive partition can be missing/accessible/lost due to several reasons such as:
- Corrupt logical structure of the hard drive.
- Partition header corruption due to virus or malware
- Power surges while working on the system
- Partition corruption due to hardware issues
- Bad sectors in hard drive
- Bad RAM etc.
Consider one of the commonly faced problems with Windows 7 users: While installing the Windows 7 operating system, I have formatted my drives (named D :). I installed the OS then. But after the process is done, I cannot find one of my drives, it’s missing.
How to get it back?
Solution:
First check your disk status with Device Manager and ensure that everything is fine with drive, it’s not going to die soon. Simply, go to My Computer->Manage and Select Disk Management. This will enlist information about installed disks.
If everything is fine then go ahead with the next step.
Check whether the partition exists in "Disk Management" or not.
To do so:
- Open the Run dialog box by holding the “Windows” key & pressing the "R" key.
- Run diskmgmt.msc. This will open "Disk Management".
- Check if there is any partition without a drive letter
- If there is such partition then do:
- Right-click it
- Go to "Change Drive Letter and Paths..." > "Add" button --> Add --> Select the drive letter -->
- Finally Click OK.
See if this helps. If the problem still exists, opt another possible way for fixing the issue.
Fix the issue by running diskpart.
To do so:
- Open command window.
- Type diskpart and enter. This will open the disk partition manager window.
- In the command prompt window type list volume and enter. The output will be the list of hard disk volumes. There, type “select missing_volume(eg. D:/ drive)”. Hit enter.
- After selecting the missing volume, Type assign and Open my computer to check whether the drive is visible or not.
If the problem still exists, try changing ‘partition Drive Letter and Paths’.
To do so:
- Go to> Control Panel> select ‘All Items view’ > Administrative Tools> Computer Management
- If the UAC window prompts, select ‘Yes’.
- Close the Administrative Tools window.
- From the left pane go to Storage> Disk Management. Here, all connected hard drives and partitions will be shown. From the enlisted partitions, choose the missing one.
- Click ‘Change Drive Letter and Paths’.
- Click Add
- Click ok
You can also open Disk Management by running diskmgmt.msc command.
To do so:
- Go to start > search bar> run diskmgmt.msc command. The Disk Management interface will be opened.
- From lower half of your disk management interface, select Drive without any drive letter.
- Now choose the option “Change Drive Letter and Paths”.
- Click the Add button. Choose a drive and click OK to assign selected drive letter.
- Now restart and check whether the missing drive is shown or not?
If you are still not able to access your Windows drive data then, try using standard hard drive partition recovery tools. These software are a kind of Do-It-Yourself utility that can scan your windows for the missing hard drive partitions and let you recover the data back along with the lost or inaccessible partitions. If the lost partition isn’t shown in the scan result, you will not be able to recover it. Try out various software, opt the one that provides the best results. If still nothing helps, No Good luck then! Your drive might be beyond recovery. You may require sending it to some professional recovery company that can anyhow recover your lost data and send it back to you. er
Available link for download
Friday, January 20, 2017
How To Unbrick LG Optimus G – fix bootloop security issues
How To Unbrick LG Optimus G – fix bootloop security issues
First of all reinstall kdz on your phone :
From here
http://appsandtips.blogspot.com/2014/08/how-to-upgrade-lg-optimus-g-to-kitkat.html
Download the manual adb wipe batch file
http://www.mediafire.com/?ru7erfxsz7p7s3p
http://www.mediafire.com/?ru7erfxsz7p7s3p
1) If the phone is stuck at the booting up LG/Telco logo, you will need to manually wipe the data partition.
2) Force the phone off by holding the power button for appx 15secs.
3) Put the phone into recovery mode by holding the volume up and home button concurrently, then press the power button. Let go of all the buttons after you see the LG logo on screen for the 2nd time and the screen goes blank thereafter (backlight may still be on). The phone will kind of reboot and then enters recovery mode. Repeat the process if you did not get it the first time.
4) With the phone in Recovery Mode, connect it to the computer, wait for the drivers to load (if doing it for the first time), unzip the wipe batch file downloaded earlier from step (4), double click on wipe.bat to execute the wipe command.
5) Your phone will auto reboot when wiped and (hopefully) boot as per normal.
Available link for download
Saturday, January 7, 2017
Fix External Hard Drive Error The Disk Structure is Corrupted or Unreadable in Windows 7
Fix External Hard Drive Error The Disk Structure is Corrupted or Unreadable in Windows 7
External hard drive are more popular these days because of their portability and availability in verity of sizes (still growing). It offers flexibility to carry large amount of data as well as helps you restore data if the primary location becomes inactive or seriously damaged. However, at times, external hard drive itself becomes inaccessible or prevent users to access the stored files. Be it virus infection, directory structure corruption, file system damages etc.
Once such external hard drives holding GB’s of valuable stuff, you may become panicked and frustrated as you’d have no idea about how to deal with such problems. Disk Structure corruption is yet another common error that comes whenever you tries to access your external hard drive and prevent users to access or copy the stored files.
As all of your files were stored there, formatting will permanently wipes your important files and make it permanent non recoverable even by using professional recovery tools. We’ll go through series of steps mentioned in this tutorial to fix this error easily (if you are lucky) and retrieve all of your important files as well as make the external drive usable again.
Below are the common error types you’ll see once similar situation strikes to your external hard drive:
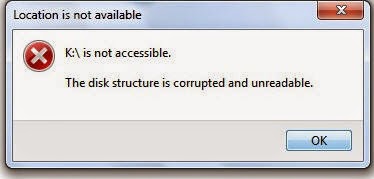
Error 0x80070571 : The disk structure is corrupted or unreadable
This disk in the drive is damaged
Please format this disk!!
The Drive isn’t accessible
The disk in drive is not formatted. Do you want to format it now?
Common reasons behind this error
External hard drive is created using moving mechanical moving parts which will may fails either sooner or later. Some unavoidable instances makes these drive inaccessible or damaged immediately and makes user data beyond the reach of known recovery software. Below are the some common reasons responsible for this situation:
- Improperly connecting or removing the drive
- The file system itself become damaged cannot be used to access the drive
- File system has become RAW which cannot be used any longer to access, manage or format the drive. In most instances, those drives becomes completely unusable.
- Large number of bad sectors and blocks has been emerged which prevents externally drive to perform normally. You’ll get freezing, hanging, corrupt files or similar issues when bad sectors took place on your drive.
Troubleshooting steps
As the drive is going through serious damages, there is no guarantee that any specific or subsequent steps could help you fixing the problem. However, let’s follow the standard procedure to deal with this error and see if we may able to resolve it:
- Right click on My Computer and choose Manage.
- Enter administrative details if asked and hit enter
- Go to Disk Management located under Storage at the left hand side menus.
- From the image below, check and make sure that any or all the volumes is listed along with the drive that’s connected externally. If you’ve recently faced the above mentioned error, you’ll see the volume status as RAW or offline
- Right click on that drive and choose to format it. As stated earlier, formatting will permanently wipes off all your important files and folders and your hope to get it back ever.
- Alternatively, you can right click on the external drive from Windows explorer interface and go to its properties.
- Choose the Tools tab and hit enter after selecting the check box stating ‘Check this disk for errors’.
- Once the operation completed successfully, try restarting your system and see if the error resolved.
Nothing helps, still can’t able to retrieve files?
Many times, the error will continue to persist even after following all the troubleshooting steps carefully. Additionally, nothing matters except your precious files that still clicking somewhere on your hard drive, right?? Don’t worry, as we are covering up some really useful utility that helps windows enthusiasts in getting back their data from various crucial situations of data loss like above.
Stellar Phoenix Partition Recovery is a life savior utility that can easily detect drives (both internal and external) going through serious damages and later, allows you to safely restore all your important files. Download the software from here and install it on your PC. Once installed, start the software from the desktop or installed software location. Make sure the drive is connected properly and shown in the software interface.
This tool offers powerful recovery options to recover data even from the severely damaged or inaccessible drives. As talked in the situation above and if the problem drive status is shown as RAW, you’ll still be able to recover data from RAW drives using this efficient partition recovery tool.
Many times, the error will continue to persist even after following all the troubleshooting steps carefully. Additionally, nothing matters except your precious files that still clicking somewhere on your hard drive, right?? Don’t worry, as we are covering up some really useful utility that helps windows enthusiasts in getting back their data from various crucial situations of data loss like above.
Stellar Phoenix Partition Recovery is a life savior utility that can easily detect drives (both internal and external) going through serious damages and later, allows you to safely restore all your important files. Download the software from here and install it on your PC. Once installed, start the software from the desktop or installed software location. Make sure the drive is connected properly and shown in the software interface.
This tool offers powerful recovery options to recover data even from the severely damaged or inaccessible drives. As talked in the situation above and if the problem drive status is shown as RAW, you’ll still be able to recover data from RAW drives using this efficient partition recovery tool.
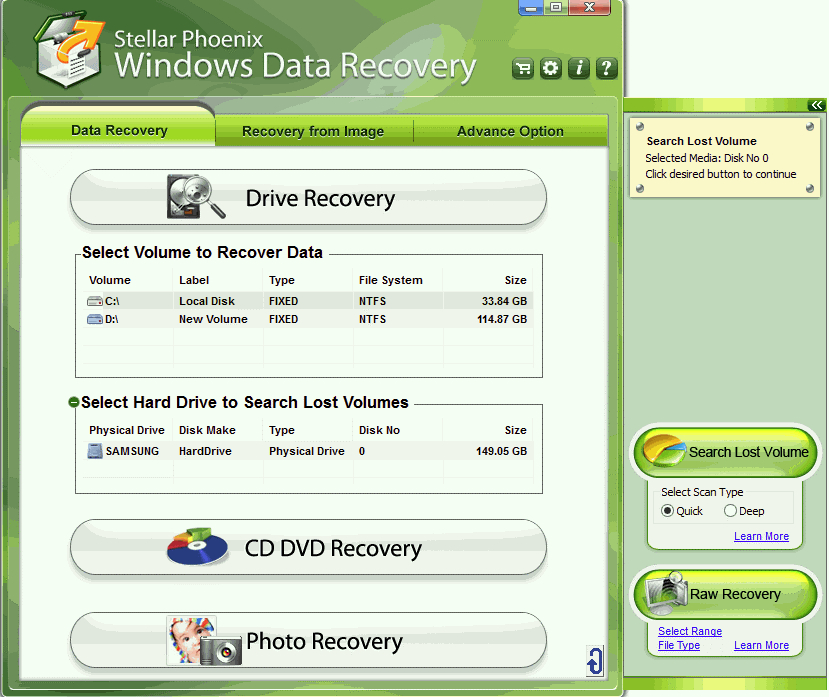
Click on the problem drive, listed under ‘Data Recovery’ > ‘Drive Recovery’ tab. The subsequent recovery methods will pop up as soon as you click on any particular drive or volume. Choose ‘Advanced Recovery’ from the available methods and let the software scans your drive completely (do not stop scanning at mid). Don’t panic if the software is taking too long to scan your problem drive. It may also possible that sometime the whole system freezes and needs you to restart the it. That’s because of the data recovery tools limitations and drive nature (RAW status) which takes really tough luck to getting detected on the system and recover data off the drive.
Once the scanning is completed, you’ll be able to see preview of any or all the recoverable files and folders using the preview pane, located at the top right corner. Chose or select desired files for recovery and click on Recovery button. Make sure that you’ve activated the software before start recovering your files as saving is disabled in demo version.
Do let us know your feedback or your particular situation if the error still persists!!
Available link for download
Thursday, December 15, 2016
How To Fix XAMPP – Error Apache shutdown unexpectedly
How To Fix XAMPP – Error Apache shutdown unexpectedly
Changing XAMPP Default Port
If you are desperate to get XAMPP up and running, you should consider changing the port from the default 80 to say 7777.
 In the XAMPP Control Panel, click on the Apache – Config button which is located next to the ‘Logs’ button. Select ‘Apache (httpd.conf)’ from the drop down. (Notepad should open) Do Ctrl+F to find ’80’ and change line Listen 80 to Listen 7777 Find again and change line ServerName localhost:80 to
ServerName localhost:7777
Save and re-start Apache. It should be running by now.The only demerit to this technique is, you have to explicitly include the port number in the localhost url. Rather than
http://localhost it becomes http://localhost:7777.
Available link for download
Tuesday, October 18, 2016
How to Fix Corrupt User Profile in Windows 8
How to Fix Corrupt User Profile in Windows 8
User profile in Windows 8 usually carries all your personalized settings, options, data and installed programs. It contains all the options, background options, Startup behavior and almost anything else you’ve did to customize your Windows 8 whichever you feels comfortable. All the settings and options were usually restored as soon as you start the system and looks exactly as you’ve left it the last time you logged in.
Sometime, whenever you try to log on to your Windows computer, it may give you error messages and prevent you to access your computer because of corrupt or damaged user profile. Luckily, you can try few fixes available to get over from such problems and start using your system as you normally do.
To fix corrupt user profile in Windows 8, you can repair the desired corrupt profile or try creating a new user profile and copy all your data from old to new profile.
Common error messages of corrupt user profile in Windows 8
There are few common and well known error messages once any user profile is corrupt, damaged or inaccessible. You can get the clear idea about the problem if any of the below mentioned error messages pops out to your computer screen:
User Profile Service service failed the sign-in. User Profile cannot be loaded.
User profile is damaged and cannot be loaded at the bottom. Try restarting your system.
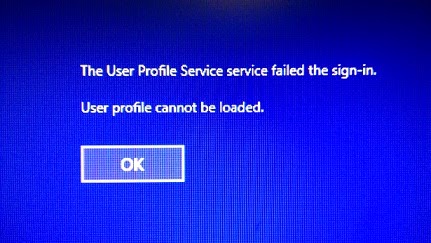
P.S. Above mentioned error may occurs with both Windows 8/ Windows 8.1 computer.
Whenever you try to log on to your computer, above mentioned error pops out to your screen just after the ‘booting/loading windows screen’. You’ll get only a single option and that is to press on ‘OK’ button located below the error message. Clicking on the button will loops back again to the Sign in screen and continue to happen till you have fixed the damaged user profile.
Reasons behind this error
Among the various reasons of any user profile from being damaged or corrupted, you can find below some known reasons that help you figuring what’s wrong with the system. Carefully reading this will ensures you that you are following the right solution.
Reason # 1
Someone intentionally or accidentally deleted user profile folder form C: Users (profile-name). Abruptly deleting user profile from Windows could result in permanent data loss along with the all the settings, options, customizations lost permanently. Later, you can’t able to restore deleted data back without using best data recovery software.
Once the profile is improperly deleted from your computer, Windows still try to load the account using ProfileImagePath and gives error loading profile message as the profile was deleted and couldn’t be loaded anymore.
Reason # 2
Someone improperly renamed the user profile using the folder C: Users (profile-name). Once the profile was renamed, it has to be renamed in Security Identifier (SID) from the current user profile list.
Reason # 3
Any malware/Trojan attempted to tweak the registry settings of current user profile and changed the parameters abruptly. You’re always recommend to routinely scan your entire computer to check and remove any serious threats.
Available solutions to fix corrupt Windows 8/ Windows 8.1 user profile
Apart from the various solutions available, the very first and generally worked solution is to restart your computer. In most situations, there were no major problems with the profiles and restarting the system will itself restore the default settings and options to selected user profile. However, if that didn’t seems working, you can try the applicable solutions from the list mentioned below:
Fix the current profile that is damaged/corrupted without losing your data
- We are considering the case that you’ve 2 or more administrator account on your system so you could sign on with unaffected or working user profile that have administrative rights.
Note: If you don’t have another administrator account, you’ll need to enable the built-in administrator account to sign in. To enable this, follow the tutorial mentioned below:
a) Press ‘Window’ + ‘Q’ button to open the search text bar and type ‘cmd’
b) Right click on the ‘Command Prompt’ option and choose ‘Run as Administrator’
c) Type the command net user administrator /active:yes and hit enter.
d) Type ‘exit’ and hit enter - Press Window + R keys to open the dialog box and type regedit, then click on OK.
- You’ll need to navigate to the registry location as described below:
HKEY_LOCAL_MACHINESOFTWAREMicrosoftWindows NTCurrentVersionProfileList
- Navigate to the location exactly as stated in the image below and see the ProfileImagePath value and ensures that it’s for the same user account you’re trying to fix.
- See if the profile name has been renamed (cross check it from the user folder in file explorer window). It its look different, then right click on the user profile name and rename it.
- Close the window once you’ve follow the all the above steps.
Delete the damaged/corrupt user profile and create a new one
Keep note that doing this will delete the problem/ corrupt user profile. You’ll permanently lose all your personalization and account settings.
- Follow the steps 1-3 from the solutions mentioned above.
- Right click on the damaged/corrupt user profile and press ‘Yes’ to confirm. See the dialog box below for reference,

- See if you’ve any other user account with same profile name that is damaged or corrupted and then follow the step 2again to delete them as well.
- Close the registry editor.
- Restart your computer and see if you’re not getting the said error message again. Once the next restart, a new user profile will automatically be created with the same name and default settings.
In case none of the above mentioned solutions seems working, consider restoring to your system to any previous successful restart date and time. Doing this will simply roll back all the changes to problem user profile and lets you sign on using the same profile without giving any problem or error message.
Have you tried different steps or methods to get over from the said problem? Please share it using the comments.
Available link for download
Friday, September 30, 2016
How to Fix Service Disabled Problem in LG Mobiles
How to Fix Service Disabled Problem in LG Mobiles
First Of All :
Install Stock rom on your phone
Then
Run phone App
Then
Enter this code
5457#* enter your model number #
i.e, 5457#*240# for LG G Pro F240
Then
A menu popup
click on Wcdma channel
and select on full option
then press back button
then click on band selection
select Gsm bands only
your Signal will come Back :)
Available link for download
Subscribe to:
Posts (Atom)